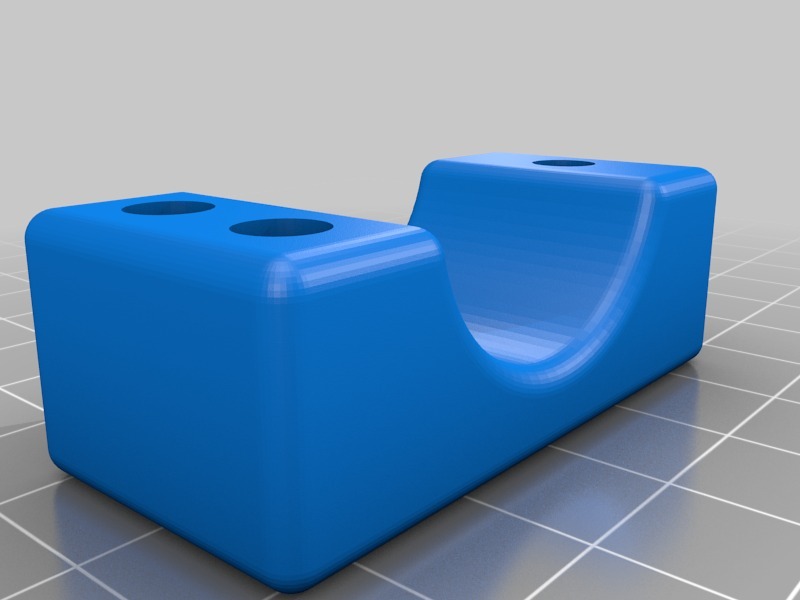
Midblade fork adapter (large)
prusaprinters
<p>Emulates the functionality of:</p> <ul> <li><a href="http://surlybikes.com/parts/all/front_mid_blade_mount_kit">http://surlybikes.com/parts/all/front_mid_blade_mount_kit</a></li> <li>P-clamps</li> <li>U-bolts</li> <li><a href="http://thetouringstore.com/thetouringstore/tubus-bicycle-racks-for-touring-and-commuting/tubus-fit-solutions/">http://thetouringstore.com/thetouringstore/tubus-bicycle-racks-for-touring-and-commuting/tubus-fit-solutions/</a> "Tubus Aluminum Alloy Fork Mounting Kit"</li> </ul> <p>for mounting front racks on forks that do not have eyelets in the middle of the fork length. These racks could be used for panniers, potentially.</p> <p>This is the large version for large-diameter forks. Think mountain forks (possibly suspension, but I think those might be too large). I have another version for much smaller diameter road forks that has less features.</p> <p>The pieces could be sensitive to the compressive forces introduced by the screws. Be careful. Remember that the lower eyelet on the forks (for fenders, etc.) should always be present & should take most of the load. This piece only prevents rotation about the wheel axis. It might bear some up/down load, but only as a bonus.</p> <p>Safety disclaimer: use at your own risk.</p> <h3>How I Designed This</h3> <p>Why I think this design is better than the alternatives listed above (although I haven't tested all of them):</p> <ul> <li>The Surly version is quick & easier to install, but lacks the security of nylon locknuts. This is a must for touring, unless you like retightening the bolts every so often & potentially losing hardware due to vibration.</li> <li>P-clamps: they're okay. Still would add inner tube shims to prevent paint rub-off.</li> <li>U-bolts: very secure, but very ugly & out of place. The ones that come with the Nashbar front rack are rubber-coated, but still rubbed off a lot of paint on my fork over 6300 miles or so. Add inner tube shims.</li> <li>The Tubus version is slimmer & nicer in this regard (they're metal, so can use less material). But the through or blind hole in the center makes it impossible to use nylon locknuts (see Surly). If it's a through hole & the bolt is too long, you might unknowingly barrel the bolt straight into your fork. If it's a blind hole & the bolt is too long, you might bottom out & not know you don't have enough torque. I guess you could use red/blue Loctite threadlocker, but I'm a fan of permanent-until-you-don't-want-it-to-be solutions, like locknuts.</li> </ul> <h3>Assembly & Materials</h3> <p>1 piece has through-holes, the other has two nut insets & an unused hole (call it weight reduction). The nutted/standoff piece goes on the inboard (wheel side) of the fork. Use nylon locknuts.</p> <p>Use very long 4 mm screws to attach.</p> <p>You can add spacers on the outboard sides so that the pannier hooks don't gouge your fork's paint. There are standoffs built in for this purpose. If they're too long, then just file them down. I think they are designed right now to provide 0.6" of clearance between the adapter & the rack.</p> <p>Use inner tube shims to increase friction & provide a better custom fit.</p> <h3>Extra features over small version</h3> <ul> <li>Outboard pieces have built-in standoffs. These add spacing between the fork & your pannier hooks to prevent them from scratching the paint on your fork. I designed these to have the standoffs up instead of down when installed. Can't think of a good reason why the other way would be better. This results in a unique piece. If you want a complete pair, make sure you mirror this piece or else you'll have two lefts or two rights.</li> <li>Outboard pieces have all through holes, with one nut inset. There's no reason to have 3 super long screws, when two will suffice. The old version (not uploaded) had this design flaw, but I fixed it.</li> <li>The inboard piece (marked "PONDEROSA LARGER") is basically the same as the small version, just resized appropriately.</li> </ul> <h3>Updates</h3> <p>Installation problem: I eventually gave up on these & just used very large p-clamps instead.</p> <p>The problem was that, between the large diameter of the fork & the necessarily large form factor of the adapter (the plastic being weak & all), the rack was displaced very far outboard on the bike. It made a V-shape on the bike since I wanted the lower eyelets to be as close to the rack as possible for the best support, but the top of the rack needed to be spaced outboard to allow for the combined width of the fork's radius, the adapter, & the standoff.</p> <p>It is possible to eliminate the V-shape by using longer bolts on the lower eyelets, but at the expense of strength. The 4 mm bolts are not very large & are poor at bearing load at distance. You'd have to use a decent amount of a spacers & a fairly long bolt to get the rack to be parallel on both sides. What you'll get is potentially a 4 mm screw head, the rack, then about an inch or more of spacers, then the eyelet.</p> <p>This cantilevered setup may break/shear the screw, especially under repeated loadings with heavy panniers & a lot of miles.</p> <p>All of this may be irrelevant with the right rack. I use a Nashbar front rack (<a href="http://www.nashbar.com/webapp/wcs/stores/servlet/Product2_10053_10052_167572_-1">http://www.nashbar.com/webapp/wcs/stores/servlet/Product2_10053_10052_167572_-1</a>). The problem is just that it is too narrow. Wide racks would avoid this problem somewhat.</p> Category: Sport & Outdoors
With this file you will be able to print Midblade fork adapter (large) with your 3D printer. Click on the button and save the file on your computer to work, edit or customize your design. You can also find more 3D designs for printers on Midblade fork adapter (large).
