Micromanipulator
prusaprinters
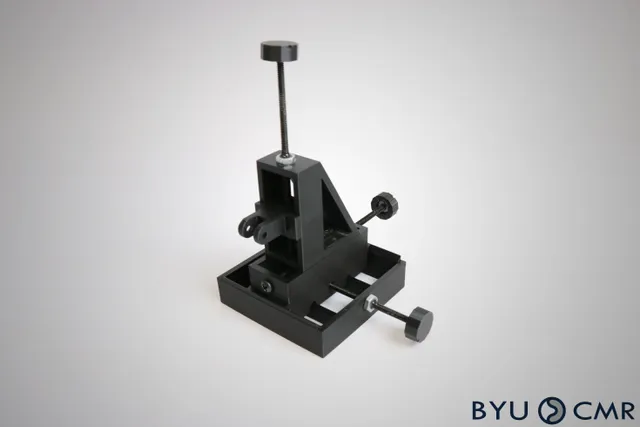
This printable design allows you to twist knobs and move a manipulator hand in the x, y, and z directions. The manipulator can be very helpful to actuate mechanisms otherwise difficult to manipulate at a macro level.We modified this design from backyard brains in the process of making the smallest Nerf blasters with Mark Rober. We needed a way to actuate the blasters (to learn more view his video or go to print the large scale version here). Because the blaster is smaller than an ant and the trigger is even smaller, we needed to create a mechanism that would allow us to move and manipulate the blaster microscopically. See our related article in Nature Communications.DirectionsPrintPLA0.2mm layer height0.4mm nozzleSupports as neededTools 3D printed pieces3 4 inch 6-32 fasteners/screws9 6-32 hex nutsSupergluePliers (optional)Philips screw driver (optional) AssembleReam the holes in the x-axis slider, y-axis slider, and base as shown bellow.Add glue to the the walls of each hexagonal indent on the x, y, and z-axis sliders. Insert the hex nuts and wait until dry.Optional: screw each fastener into the hex nuts to secure each hex nut until glue is dry then remove fasteners.Assemble the base and x-axis slider as shown bellow. Screw in the fastener until the head is flush to the wall of the 3D printed base.Assemble the y and z-axis sliders as shown bellow, screwing in the fastener until the head is flush to the bottom of the y-axis slider.Assemble the base and all sliders as shown, screwing the last fastener in until flush with side of the x-axis slider.Glue on the vertical fastener about 1/8" away from the y-axis slider, screw on a hex nut until it meet the top wall of the slider. Spin the fastener so that the hex nut adheres to the fastener but not the y-axis slider.Optional: Add additional glue to the top of the hex nuts to further secure the hex nut to the fastener. Repeat the process on the other fasteners.Add glue to the bottom end of each fastener and screw on the remaining hex nuts until flush with the bottom of the fasteners.Add glue to the top of each hex nut just added and adhere the knobs to each fastener. To manipulate, spin each knob. The top knob will manipulate the z-axis slider up and down along the z-axis. The front knob with manipulate the z-axis slider along the x-axis, and the back knob will manipulate the z-axis slider along the y-axis. Additionally, you can design your own piece to hold whatever you might want to manipulate and secure it to the front of the z-axis slider using a ½" fastener and a 2-56 hex nut.We designed a piece to hold a small needle to manipulate the Nerf blasters manufactured with carbon nanotubes.Learn MoreThis design was developed by the Compliant Mechanisms Research Group (CMR) from Brigham Young University (BYU). Follow us at @byucmr on Instagram, @CompliantMechanismsResearchGroup on Facebook, or visit the BYU Compliant Mechanisms Research (CMR) website to learn more about compliant mechanisms.Technical InformationFor in-depth technical information, see the following publications:Hietanen, I., Heikkinen, I. T. S., Savin, H., & Pearce, J. M. (2018). Approaches to open source 3-D printable probe positioners and micromanipulators for probe stations. HardwareX, 4.To learn more about compliant mechanisms in general, see the BYU Compliant Mechanisms Research (CMR) website or these books: Compliant Mechanisms, Handbook of Compliant MechanismsThis Model was originally designed by Backyard Brains: https://backyardbrains.com/products/micromanipulator BYU CMR modified the design for specific use in manipulating the smallest Nerf blaster in the world.
With this file you will be able to print Micromanipulator with your 3D printer. Click on the button and save the file on your computer to work, edit or customize your design. You can also find more 3D designs for printers on Micromanipulator.