Micro Word Clock Enclosure
thingiverse
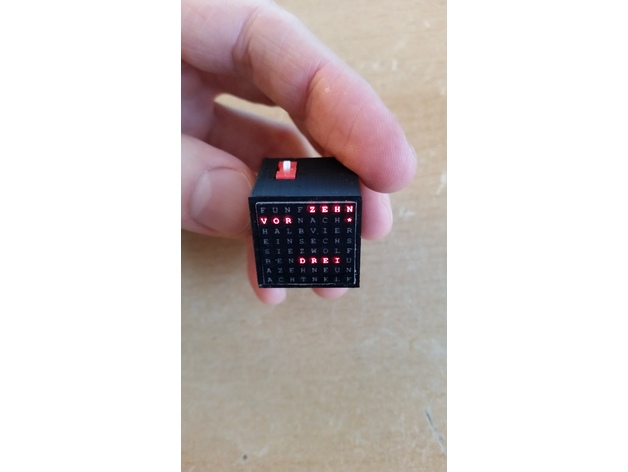
I built a compact enclosure for the Micro Word Clock designed by Daniel Rojas.https://github.com/formatc1702/Micro-Word-Clock The microcontroller and LEDs are powered by three AG13/LR44 alkaline batteries, which are widely available and inexpensive; a CR1220 is used to power the real-time clock. I selected this pushbutton:http://www.ebay.de/itm/100Pcs-Push-Button-Tact-Switch-4-Pin-Smd-Micro-Switch-6-6-2-5Mm-Tactile-Switch-P-/331928441992?hash=item4d487a1488:g:-YwAAOSwKOJYIZ5N A single DIP switch serves as the power switch:http://www.ebay.de/itm/10pcs-2-54mm-Red-Pitch-Slide-Type-DIP-Switch-1-Bit-2-Bit-3-Bit-4-Bit-5-Bit-6-Bit-/331311690635?var=&hash=item4d23b7338b:m:mpc81MzzplMLqZs9QUWzF5w I added a schottky diode for reverse polarity protection, which was soldered directly to the switch. For the LR44 batteries, I used these battery holders (trimmed slightly using scissors):http://www.ebay.de/itm/Metal-AA-Battery-Spring-Contact-Lamination-Plate-Terminal-Silver-Tone-30pcs-/121938564123?hash=item1c641ad41b:g:MPYAAOSwPCVX~xga For the CR1220, I created two simple contacts out of tin. As an extension for the pushbutton, a M2 bolt was used, which was cut to size after the device was finished (you can see it sticking out from the back cover). Two tiny 1.5mm plastic screws from some scrap electronics device were used to hold the back cover in place. Print Settings Printer Brand: Ultimaker Printer: Ultimaker 2 Extended Rafts: No Supports: Yes Resolution: 0.1mm Infill: 30% Notes: Print using supports! I printed it in black ABS.
With this file you will be able to print Micro Word Clock Enclosure with your 3D printer. Click on the button and save the file on your computer to work, edit or customize your design. You can also find more 3D designs for printers on Micro Word Clock Enclosure.