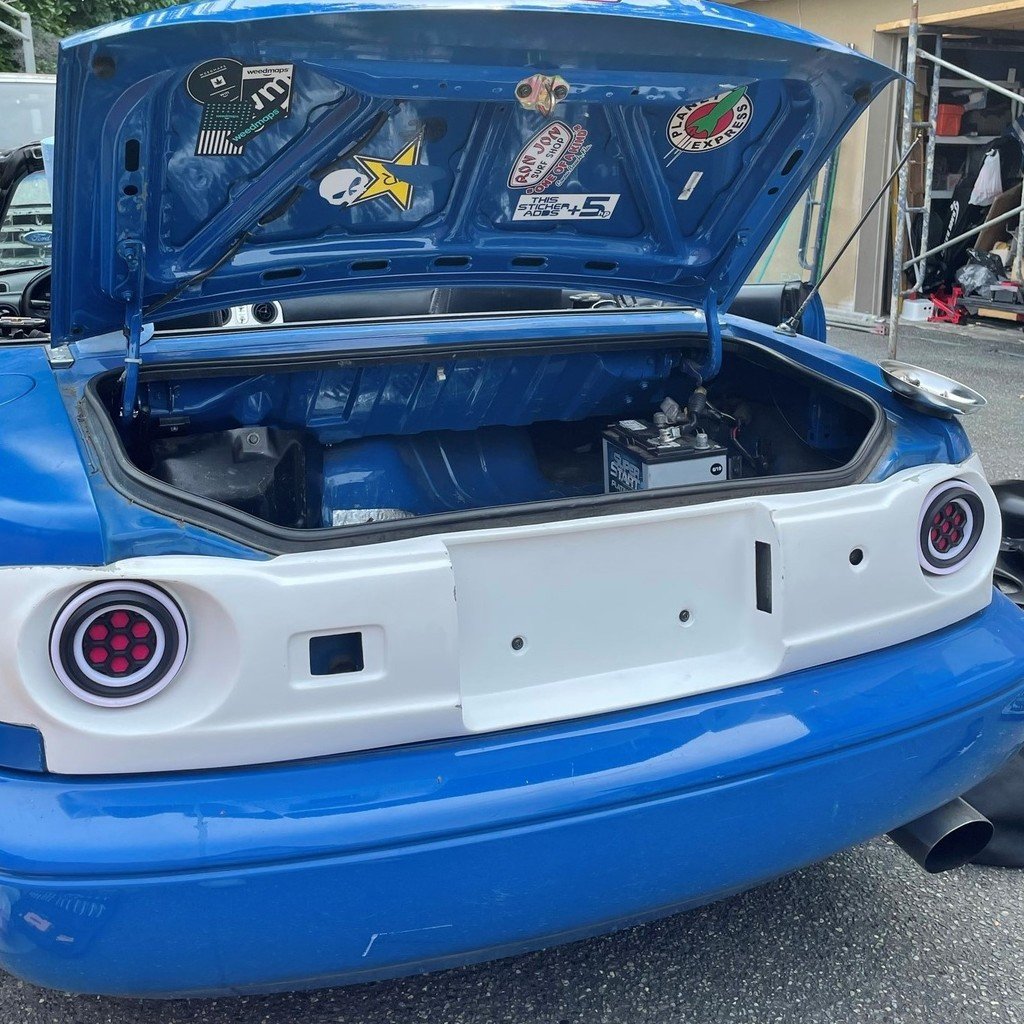
Miata Garage Vary Honeycomb LED Tail Lights
thingiverse
These are tail lights for Mazda Miata NA to be used on a Garage Vary panel. **See bottom for attributions and credits of work.** I took the original design for these lights and updated them to include a housing unit for a central LED light for expanded use. **Work is still ongoing for the installation process after printing the tail light. Feel free to message me on Instagram [@KameSociety](https://instagram.com/kamesociety) with any questions or suggestions!** Installation video to come on my [YouTube channel](https://www.youtube.com/channel/UCglfI7_bnjXXmgzMjsmAZcw). Printing --------------------- The honeycomb structure in the center of the light provides for a difficult printing experience. I tested with PLA & ABS and have had varying results with supports. If using an FDM printer, it is necessary to use supports. I have another version where I separated the two parts (the outer ring and the center honeycomb), but the results weren't as good as printing the entire thing. **I opted for the housing (not the lens) to be printed using MJF Nylon 12 on a HP MJF (Multi Jet Fusion) printer through Xometry.** This rendered sub-millimeter accurate results and did not require supports afaik. I will be CNC machining the middle lens on acrylic, but currently have printed on transparent red PETG. Tools --------------------- These are the tools I used: · Soldering iron with heat-set tip · Wiring kit (incl. crimps, wire strippers) · Heat shrink tubing/crimps/electrical wires (wire responsibly & at your own risk) Parts --------------------- These are the parts I used: · 1M Ohm Resistor · Screws · Heat set threads · [120mm LED ring](https://www.amazon.com/gp/product/B07CYX742G/?th=1) · [80mm LED ring](https://www.amazon.com/gp/product/B07CYV3CV4/) *Finished list coming soon - have to gather everything I used with sizes lol* Installation --------------------- Coming Soon ------------------------------- **Designing the Lights** --------------------- These tail lights house 3 holes for each LED ring to support a specific casing that I found on Amazon (see links above for each ring). I wanted to have a frosted look to the lights, so I opted to buy LEDs that came with the rings for simplicity and modified the files to match. The original files (not included here) also didn't address wire management, so I included a spot to hide wires and feed through the backside of the housing. There are two holes in the back of the light. I recommend using a grommet for the smaller hole (see parts for sizing) and the middle hole supports a light bulb housing unit that you can twist to lock for simple maintenance. I also included a middle lens that I have printed with transparent PETG currently to serve as a diffuser for the middle light. This is still a work in progress and I plan to CNC acrylic for the final product. The back housing has indents on the pillars of where the screws are to go through (see Installation) to prevent the middle lens from moving around too much and keeping it secure in place. Silicone can be used to keep it more secure. ------------------------------- ### Attributions The honeycomb pattern is inspired by Dionne Mascunana's Hydron+ Hyper LED tail lights on his NA Miata. [Instagram - @omgmiata](https://www.instagram.com/omgmiata/) [YouTube - OMGMIATA](https://www.youtube.com/user/Dmascunana) Original design of this omgmiata inspired design was made by Ryan B. on Thingiverse (design has been since deleted) under the PD0 license. [Thingiverse - myfingersarecold](https://www.thingiverse.com/myfingersarecold/designs) Further design on the part was commissioned on Fiverr from Russell. Hire him for some outstanding 3D modeling work! [Fiverr - rmsingerdesign](https://www.fiverr.com/rmsingerdesign) Feel free to follow me or my car channel on Instagram. I'm doing continuing work for this! [My Instagram - @dilberadam](https://instagram.com/DilberAdam) [Car Instagram - @kamesociety](https://instagram.com/KameSociety) [YouTube Channel - Kame Society](https://www.youtube.com/channel/UCglfI7_bnjXXmgzMjsmAZcw)
With this file you will be able to print Miata Garage Vary Honeycomb LED Tail Lights with your 3D printer. Click on the button and save the file on your computer to work, edit or customize your design. You can also find more 3D designs for printers on Miata Garage Vary Honeycomb LED Tail Lights.
