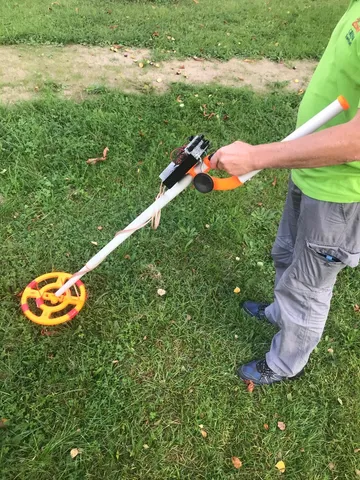
Metal Detector Assembly with 10"/5" Coaxial Coil
prusaprinters
This is a DIY Project for a Metal Detector. The diameter of the coils are 254mm (10") and 127mm (5"). When the coil is inserted you can use silicone to fix it and create protection against environmental effects (water,..). There is a hole for a coax connecting wire (i.e. RG58, RG59,..) on each coil gap. You will need to print the four parts of the coil (A to D) and four pieces of the swallowtail block. The coil parts will be connected with the swallowtails. The holes in the swallowtail are to apply silicone or glue for the final assembly. To connect a stick you have to print the CoilHolder and the AnkleJoint. You can design your own AnkleJoint if you use another type of stick. The AncleJoint is connected with a 40mm long M6 nylon screw. There are also parts for a quick release clamp. The stick is an electrical installation tube with an outer diameter of 25mm. To create a telescope there are two pieces (Endpiece and Slider) available. The larger tube is also an installation tube but with an outer diameter of 32mm. Further parts for the battery holder and handheld will follow when testing is completed. Update 20 Aug 2017: New Version of Coil_D Part with channel for bucking coil cables. Update 27 Aug 2017: Added more photos of the first design, Simple and Pro Handgrip. Update 11 Sep 2017: The parts for the battery pack can be found here: https://www.thingiverse.com/thing:2529149 Update 26 Oct 2017: Added the clip which is needed to fix the telescoping part. Plus a photo of that specific detail. How I Designed This Assembly Print the four coil parts (A to D) and four swallowtail connectors. The four coil elements will be conected with the swallowtails. You can apply some silicone or glue through the holes in the swallowtail pieces. There hare two holes and a channel for connecting coils and feeder cables on coil part D. If everything (coils, feeder cables,..) have been installed and tested you can also apply silicone into the coil gaps to protect the coils and connections against environmental effects. Next you add the coil holder. There are also holes for applying silicone (as for permanent fixation). Now the AncleJoint is insertet into the coil holder. It must be fixed with a 40mm long M6 nylon screw, don't use any metal screws - which could have negative effects on the function of the coil. There are also parts for a (optional) quick release clamp. A swallowtail block will connect two coil elements. Later this will be the lower side of the coil. Coil Design For the beginning you can start with only one coil for transmitting and receiving: Single Coil: 26 turns of 0,5mm enamel copper wire, inner diameter of the coil: 254mm The more advanced version uses three coils: Outer Coil: 26 turns of 0,5mm enamel copper wire, inner diameter of the coil: 254mm for transmitting Inner Coils: 41 turns of 0,4mm enamel copper wire, inner diameter of the coil: 127mm for receiving 6 turns of 0,5mm enamel copper wire, placed on the receiving coil as bucking coil, must be connected serial to the transmitting coil but with reversed winding. For winding the coil it is good to prepare a nail-form on a plain sheet of plywood. Make sure the board is big and thick enough to keep the nails at their place. Use a tool do get a perfect round shape. We used an old PCB piece with two notches for the nails. Make sure you cut off the nailheads (use a grinder) and deburr the sharp edges. You can also add some duct tape to cover the nails before winding the coils. It is good to have a tool for forming... Create a form for the coils... Wind the turn on the form and use waxed string to fix the coil before removing. TX Coil already wrapped with waxed string and plastic ribbon. The shielding aluminium tape is still missing. Inner coil for RX and 6 turns for loopback (bucking coil). You can see the waxed string which fixes and forms the coil. Category: Electronics
With this file you will be able to print Metal Detector Assembly with 10"/5" Coaxial Coil with your 3D printer. Click on the button and save the file on your computer to work, edit or customize your design. You can also find more 3D designs for printers on Metal Detector Assembly with 10"/5" Coaxial Coil.
