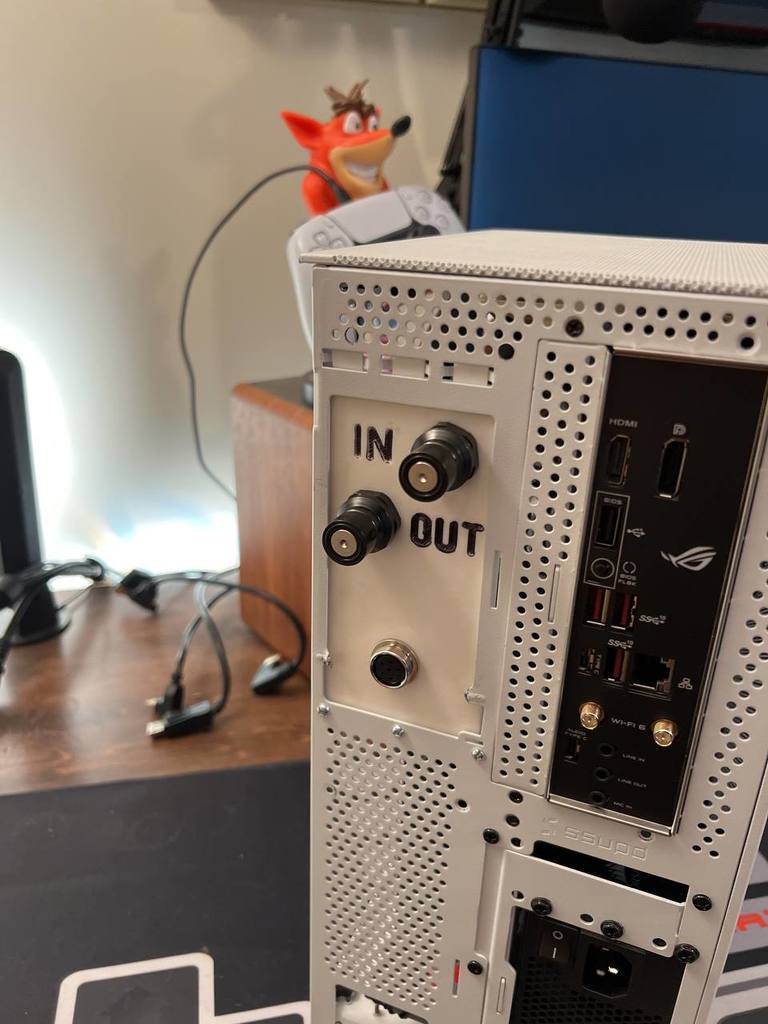
Meshlicious QDC backplate with labeled in/out (plus panel passthrough for aviator connector)
prusaprinters
<p>Edit: 2022-03-28:</p> <p>Created a v2 that's a bit thicker and has an additional passthrough for a GX16 connector. It turns out this last connector is actually in the way of the PCIe horizontal bar, and should be raised about 10-15mm or so before printing, unless you want to just cut that bar out like I did.</p> <p>Edit 2022-01-30:</p> <p>First print went decently well, won't be able to test it for a bit until the actual MO-RA3 and other parts arrive on shipment. Photo has been added where you can seen that the corners lifted a bit during the print, but that's more because there was some temperature fluctuation in my home during the print time itself, not because of poor design of the model. I just didn't have consistent temps and the problem would be resolved if I did or if I used something like a brim for the print. Also just colored in the lettering with Sharpie to make it pop a bit more.</p> <hr/> <p>Remixed this from IroesStrongarm's version to offset the QDC holes, widen them a bit so that you can use any panel or bulkhead fittings without needing to thread them into the print, added text for the inlet and outlet which I thought was kinda helpful/neat for QDC usecases, and also added a hole for an additional aviator connector mount.</p> <p>I intend to use this with a MO-RA3 external radiator, so I wanted a clean way to pass Molex power for the pump and PWM signal for the fans out of the case and I found this suggestion from another Reddit user. He just drilled a hole in his case, but I figured I could 3D print something so I didn't need to make permanent modifications.</p> <p>As IroesStrongarm mentions in his post, the bottom holes may be a bit lower than they need to be, and he used them with heat pressed M3 inserts. I'm posting this prior to actually printing it just as a way to save my thought process, but I may fix/adjust the hole spacing once I do, and then I will update the files here accordingly.</p> <h3>Print Settings</h3> <p><strong>Printer Brand:</strong></p> <p>Creality</p> <p class="detail-setting printer"><strong>Printer: </strong> <div><p>Ender 3 Pro</p></div> <p><strong>Rafts:</strong></p> <p>Doesn't Matter</p> <p class="detail-setting supports"><strong>Supports: </strong> <div><p>Doesn't Matter</p></div> <p><strong>Resolution:</strong></p> <p>0.2</p> <p class="detail-setting infill"><strong>Infill: </strong> <div><p>30-60%</p></div> </p></p></p> Category: Computer
With this file you will be able to print Meshlicious QDC backplate with labeled in/out (plus panel passthrough for aviator connector) with your 3D printer. Click on the button and save the file on your computer to work, edit or customize your design. You can also find more 3D designs for printers on Meshlicious QDC backplate with labeled in/out (plus panel passthrough for aviator connector).
