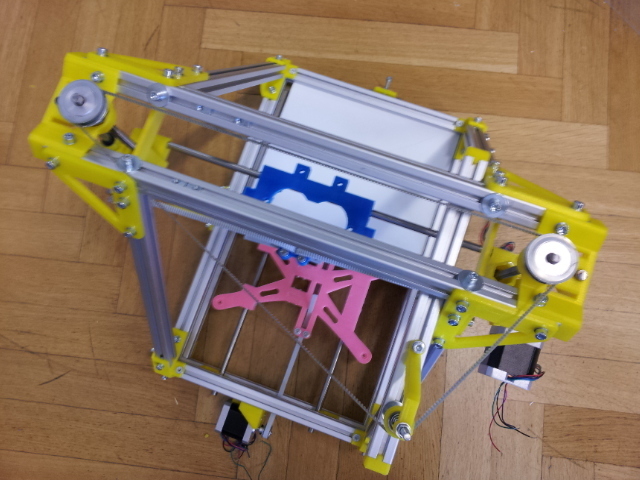
MendelMax 1.5 with only one motor for Z-axis
prusaprinters
<p>By using this solution one motor for the Z-axis can be replaced by two 32 teeth T2.5 pulleys and a 950mm T2.5 belt.</p> <p>This modification offers several benefits like:</p> <ul> <li>less weight</li> <li>less wiring</li> <li>less noise</li> <li>reduced costs</li> <li>Z-axis can be moved by hand</li> <li>No more parallelism adjustments of Z-axis</li> </ul> <h3>Instructions</h3> <p>Bill of Materials (BoM):</p> <ul> <li>These are the parts you'll need for the zig-zag solution:</li> </ul> <p>Print:</p> <ul> <li></li> <li>2x SpannFix (holder for the tensioner pulleys)</li> <li>2x Pulley 625ZZ</li> <li>1x Lower Z Mount (with bearing instead of motor), from another thingiverse source.</li> </ul> <p>Vitamins (to buy):</p> <ul> <li></li> <li>4x M5 T-Slot nuts</li> <li>4x screw M5 x 10, socket head</li> <li>2x screw M5 x 30, hex head</li> <li>Washers 5 mm, Qty. as required</li> <li>4x Bearing 625ZZ</li> <li>2x Pulley T2.5 / 32</li> <li>1x T2.5 closed belt, Length: 950mm</li> <li>2x Z-axis rod, Length: 340mm and 310mm (which are longer than the original ones), I use Tr 8x1,5</li> </ul> <p>UPDATE:</p> <ul> <li>As the zig-zag Solution isn't good for the durability of the belt another solution by just using an aluminium rail (see picture) seems to be quite effective.</li> </ul> <p>So for the "triangular" solution you need this:</p> <p>Print:</p> <ul> <li></li> <li>Spanner Holder</li> </ul> <p>Vitamins (to buy):</p> <ul> <li></li> <li>20 x 20 aluminium profile, length: 25 cm</li> <li>3x M5 T-Slot nuts</li> <li>2x screw M5 x 20, socket head</li> <li>1x screw M5 x 10, socket head</li> <li>1x screw M5 x 80, hex head</li> <li>Washers 5 mm, Qty. as required</li> <li>Nut M5, Qty. as required</li> <li>2x Bearing 625ZZ</li> <li>2x Pulley T2.5 / 32</li> <li>1x T2.5 closed belt, Length: 950mm or 910mm</li> <li>2x Z-axis rod, Length: 340mm and 310mm (which are longer than the original ones), I use Tr 8x1,5</li> </ul> <p>You havw to drill two 5mm holes into the aluminium profile to fix it on the frame. The first hole needs to be 2cm to the end, the second 12cm to the same end - which makes 10cm between theese holes. Countersink the holes on one side by using a 9mm drill (or larger) - as shown on the photo.</p> Category: 3D Printer Parts
With this file you will be able to print MendelMax 1.5 with only one motor for Z-axis with your 3D printer. Click on the button and save the file on your computer to work, edit or customize your design. You can also find more 3D designs for printers on MendelMax 1.5 with only one motor for Z-axis.
