Mendel parts
thingiverse
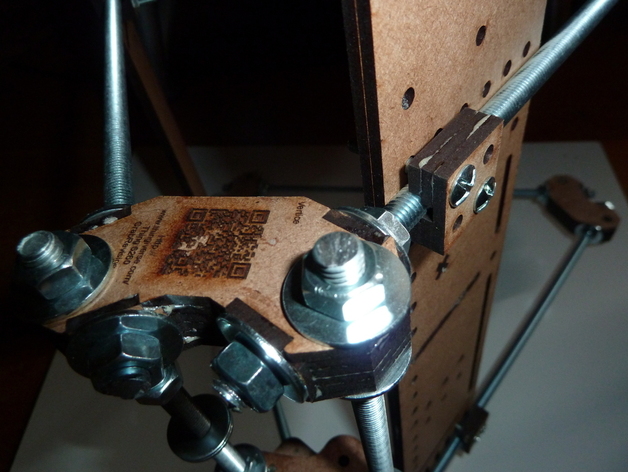
I'm eagerly awaiting the delivery of my electronics via regular mail. In anticipation, I modified certain parts for use on my Epilog Zing 40-watt laser cutter. The material of choice is 3mm MDF (possibly compatible with 1/8" thickness). To work with the files, open them using OpenOffice 3.2, as later versions may encounter issues with large print jobs. I've shared my adapted Mendel parts designed for laser cutting on a forum, and they don't require post-processing – just glue and clamps to assemble. While I provide both .svg and .odg files, I personally prefer using the latter. Upon trying out the parts, I'll update their location online. Instructions for assembly are provided in the form of visual guides. Embracing the adage 'a picture is worth a thousand words,' I've created diagrams to simplify the build process. The parts that need assembling include vertices (requiring six pieces), bar clamps (at least 12, with two cross clamp pieces), PCB mounts, and jigs for precision in assembly. For the vertices, glue together six components, aligning them to insert into each other for added strength. Clamp and protect your work surface with paper to avoid damage. Once dry, use a small bar to break apart the walls. Bar clamps are constructed using four laser-cut parts, which are glued together while being inserted into the tool. Protect the work surface again, and remove excess glue before it dries. These versatile components can be reused in various projects. A cross bar clamp is formed by combining one M-A-005, one M-A-004, and two M-A-004 pieces. Future plans include modifying additional Mendel parts and adding a 9x9 centering cross to the vertices for easier assembly. Additional enhancements may involve larger or removable wooden walls with diagonal supports.
With this file you will be able to print Mendel parts with your 3D printer. Click on the button and save the file on your computer to work, edit or customize your design. You can also find more 3D designs for printers on Mendel parts.