Mendel 90 remix
pinshape
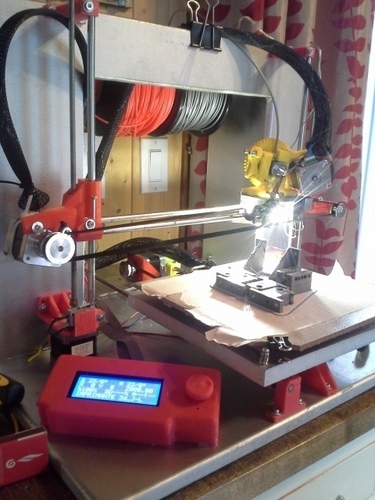
Summary First, I wanted to have a solid 3d printer for as little money as possible. So I chose the model Mendel 90 because there aren't that many printed parts and the body is made of MDF, which I'm used to working with. So looking at the plans and "vitamins," I realized it was going to be hard to make it cheaply: since I'm in Canada (Quebec), it's difficult to find metric stuff. So I decided to work on plans to make it with imperial stuff for rods, bolts, nuts, etc. Before I started, I also removed everything that isn't essential from the original design. This printer can be built for less than $300. So here are my main changes: I used 5/16 smooth rods instead of 8mm (7.94mm). I used LM8UUJ adjustable linear bearings. For this reason, every bearing mount is designed to be screwable. So you screw the bolt and nut just enough for it to be stable but not too much so it can move freely. I redesigned the extruder to fit 6-32 screws and be more solid (I'm not the first to do that, but...) I worked on the X carriage to find a good optional way to easily install the extruder with a Bowden tube or not! Also, I fixed the J-head style fixation for the hot end directly on the X carriage so that if there is a jam, you can work on it just by removing the extruder or the Bowden adaptor, but still solidly installed on the X carriage. I changed the place where the back panels are so that it protects your PSU and ramps. But it also allows you to put some more plastic spools. I simplified all the wiring that was so complex on the original Mendel 90. Now you can just use normal wires with tie wrap. And the beauty of this design: you can (have) to use your imagination to make your own printer. I mean, for MDF panels, cut the size you want, same thing for rods. With these printed parts, you could build a 24x24x24-inch 3D printer if you wanted. Just use longer rods and bigger MDF panels! "Bowden" and "LCD case" aren't essential to make that thing work. Some improvements to come: -A little modification to the extruder so that the gears are easier to align. -Add end stop switch bracket on both sides (X motor and X idler) so that you can choose which side you want to put it. Add a plastic plate to glue hot end plugs on the X carriage. En passant, if you're in Quebec and you're interested, I have some of these machines for sale! Instructions You can inspire yourself from the official Mendel90 Reprap page... http://reprap.org/wiki/Mendel90_Build_Manual But understand that there will be several changes! I used: Ramps 1.4 LM8UUJ bearings and 5/16 rods J-head style hot end 6-5/8 screws and washers 6-32 bolts and nuts of many lengths 2 meters of timing strap with metal pulley 8x8 heated bed A lot of patience! I'll add videos of assembling as soon as possible! https://www.youtube.com/watch?v=hbSo27Q2qHo
With this file you will be able to print Mendel 90 remix with your 3D printer. Click on the button and save the file on your computer to work, edit or customize your design. You can also find more 3D designs for printers on Mendel 90 remix.