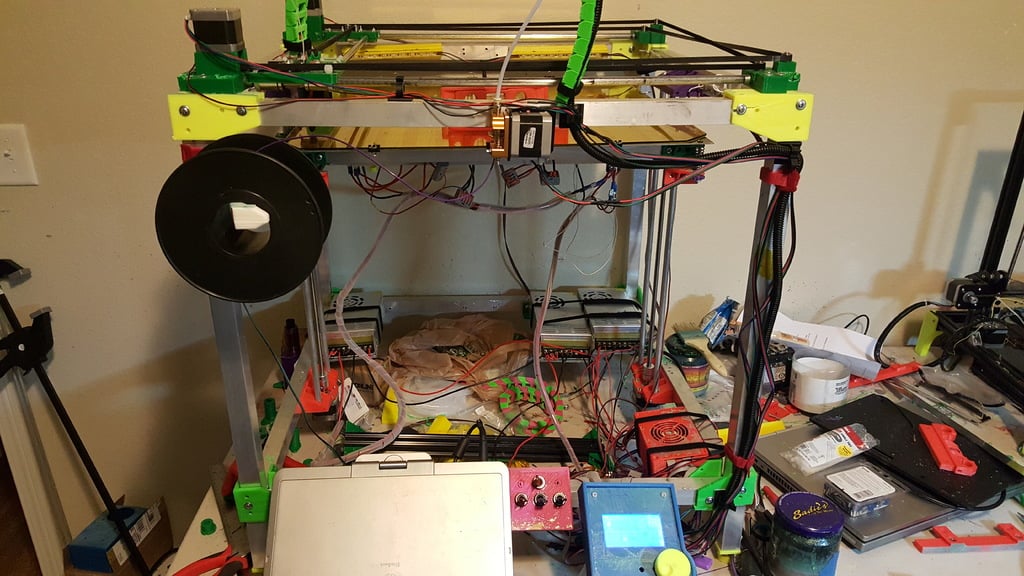
MegaTronXY CoreXY
thingiverse
Hello everyone, I have successfully converted my MegaTronXY X1 into a CoreXY Printer, boasting an impressive printing area of 400x450x370. After reading about the incredible speed of CoreXY printers, I was determined to give it a try. To make this conversion, I took my trusty MegaTronXY X1 printer frame and transformed it into a CoreXY setup. For the Ramps full Graphic Display 12864 Case and Mount, you can find the design on Thingiverse at https://www.thingiverse.com/thing:1343964 - any Ramps1.4 case will work, but I chose this one for its ease of use. To eliminate wobble, I employed three types of Anti-wobble inserts. You have two options: either drill out the Z_stage_carriage_100mm v2 or edit it to accommodate the anti-wobble insert in the carriage platform. I opted for drilling and gluing them in place after leveling the carriage. This conversion utilizes the same frame mounts found on my MegaTronXY X1, along with parts and supplies from Lowes and Home Depot. You can build this with either 3/4 aluminum square tubing or 1 inch square tubing - the frame mounts are scalable, so simply resize them for 3/4 tubing. Additionally, you can use 3/8 aluminum rods from Home Depot and Lowes; they may be slightly smaller but work just as well. For reference, check out my MegaTronXY X1 design on Thingiverse at https://www.thingiverse.com/thing:2326560, which features the tubing mounts. I borrowed the X and Y stepper mounts from here https://www.thingiverse.com/thing:1849704, making some adjustments to the Z axis bed support in the process. I've eliminated wobble entirely by adding level springs and screws - auto leveling is no longer necessary. Everything was crafted from 3/4 square tubing or 1 inch square tubing, available at Home Depot or Lowes. The heatbed consists of four 120-watt MK heat plates glued on with Fireplace caulk, which can be purchased at Home Depot or Lowes. Screws are 3/4 and 1 inch self-drilling metal screws, also obtainable at Home Depot or Lowes. This model employs three 400-watt power supplies: two for the heatbed connected to the Ramps 1.4 board with 12-volt automotive relays rated at 60 amps each at 14.4 VDC; and a third supply powers the extruder, motors, and L.E.D. LEDs. Heating the bed doesn't take long, thanks to the relays' built-in fans keeping them cool. A side note: the Bed Z Motors are wired together in series for even raising and lowering of the bed. A new update will allow you to adjust the belts on the fly by adding a Hot End Extruder Platform - more on that later. After testing printing for over 12 hours, I discovered the printed Anti-Wobble inserts failed. However, using them in conjunction with Brass Lead Screws allowed me to keep wobble at bay during another 12 hours of printing. To achieve this, I drilled out a 3/8 hole and inserted the Brass Lead Screw - the result is seen in the picture of the Anti-Wobble Brass inset. Update: On 12-23-2017, I revised the Z Axis Carriage to a wider and more stable platform. This improvement increases the bed's stability and levelness. Additionally, I updated the Hotend Carriage with a longer GT2 belt holder and added Y Bearing stabilizers and anti-belt slip-off features. On 11-24-2018, I introduced extra Fan Adapters to the CoreXY setup - you'll need to print a new Hotend Carriage or attach the adapters using glue. This modification allows for adjustable fans and includes chain holders for cable management. On the new Fan Mount, I've added space for mounting either a BT Touch or Bed Sensor.
With this file you will be able to print MegaTronXY CoreXY with your 3D printer. Click on the button and save the file on your computer to work, edit or customize your design. You can also find more 3D designs for printers on MegaTronXY CoreXY.
