
Mega Lego-like Skeleton (10:1 scale)
thingiverse
It's a big skeleton that is (for legal purposes) *inspired* by a Lego skeleton. If you want to know more about this project or see more pictures, check out my [project documentation page](https://docs.juliaebert.com/projects/2021/lego-skeleton/). This is also [available on Prusa Printers](https://www.prusaprinters.org/prints/78695-mega-lego-like-skeleton-101-scale). I was unsatisfied with existing Lego skeleton models online. There was a [model on Thingiverse](https://www.thingiverse.com/thing:3536767), but it had a very low resolution STL (circles had 16 sides, for example), and it was originally designed for a 1:1 model. I found a couple of great models on GradCAD from Yauhen - [Lego Skeleton Minifig Fantasy Era](https://grabcad.com/library/lego-skeleton-minifig-fantasy-era-1) and [Classic Lego Skeleton](https://grabcad.com/library/classic-lego-skeleton-1). These included the STEP and SLDPART files, so I could easily modify them and export with high enough resolution for printing. Lego minifigures are designed for injection molding, not 3D printing, so it's tricky to figure out how to break up the model to minimize the amount of support (and in turn, improve the surface finish of the parts). That's why there are so many parts to this print. I also tried to make sure parts could be printed in their strongest print orientation. Lastly, I had to adjust the tolerances of parts to make them snap together as big 3D printed pieces. I spent a lot of time prototyping this model, so I hope it works for you as well! This is designed to be printed at the size of the given STL files: 10x larger than a Lego minifigure. If you scale it up or down, I can't guarantee how the tolerances will hold up. If people are interested in other sizes, I can test the tolerances (and adjust the pin sizes) and make that available. If you want to make any changes of your own (including rescaling), [here are the design files in OnShape](https://cad.onshape.com/documents/0244ea1dd3a12456399aaaef/w/e0d1c4a865a9519d549edefe/e/475ea9aed0e3ba36a32a9902?renderMode=0&uiState=6172dec4a070904d88332843). You will need an OnShape account, but there is a free hobby tier available. **January 2022 update:** There are now additional files that split up the torso into multiple pieces (with more pins!) so that it will fit on smaller printers like the Prusa Mini at 100% scale. See more below in the “Printing Notes” section. ## Printing Notes *Apologies that Thingiverse is broken and won't let me re-order the files. If you want to see them organized, check this out on [Prusa Printers](https://www.prusaprinters.org/prints/78695-mega-lego-like-skeleton-101-scale/files).* If you're print using the 3MF files (recommended), you will need to print: (All supports are already configured here) - 2x `arm.3mf` - 2x `leg.3mf` - 2x `body-torso-half.3mf` - 1x `body-neck-4x-pelvis-shoulder.3mf` - 1x `connector-pins.3mf` - MMU head: - 1x `head-mmu.3mf` - Head as separate pieces: - 1x `head-skull-separate.3mf` - 1x `head-face-separate.3mf` If you're printing directly with the STLs, you will need to print: (No supports required, except where noted) - 2x `arm-upper-arm.stl` - 2x `arm-lower-arm.stl` - 2x `arm-hand.stl` - 2x `leg-foot.stl` (requires bed-only support) - 2x `leg-calf.stl` - 2x `leg-thigh.stl` - 2x `body-torso-half.stl` - 2x `body-pelvis-shoulder.stl` - 1x `body-neck.stl` - 50x `connector-pin.stl` - If you are printing the skull and face together with an MMU (or similar): - 1x `head-skull-mmu.stl` - 1x `head-face-mmu.stl` - If you are printing the skull and face separately (or not printing the face inset): - 1x `head-skull-top-separate.stl` (requires support everywhere) - 1x `head-skull-bottom-separate.stl` (requires bed-only support) - 1x `head-right-eye-separate.stl` (optional, requires bed-only support) - 1x `head-left-eye-separate.stl` (optional, requires bed-only support) - 1x `head-nose-separate.stl` (optional, requires bed-only support) - 1x `head-mouth-separate.stl` (optional, requires bed-only support) If you're printing on a smaller printer that can't fit the whole torso (this includes the Prusa Mini), there's an alternative version that splits the torso into two parts, connected by an additional 4 pins. Instead of `printing body-torso-half.stl`, print the files found in the “Split torso” folder below: - 2x `body-torso-half-upper.stl` - 2x `body-torso-half-lower.stl` - 4x `connector-pin.stl` The biggest purpose of the pins is to align parts when you glue them together. For this to work, the pins need to press fit into their respective holes. Before printing all the pins, check that they press fit! If not, scale the width and height up or down as needed to fit the holes. Don't scale the length, or your pieces might not sit flush together. I recommend printing on a smooth bed. This will make for better seams when gluing together the body and arms. This is not a functional, structural part, so you can't get away with sparse print settings to save time and filament. I printed mine in PLA with 7% infill, 2 perimeters, and 0.2 mm layer height. The filament I used was scavenged from a dumpster. ## Assembly Notes In general, there's only one way for pieces to fit together, so it should be fairly intuitive how to construct it. However, here's how all of the pins and pieces fit together, in CAD form: (Note that the pelvis and shoulder pieces on the body are identical/interchangeable.) 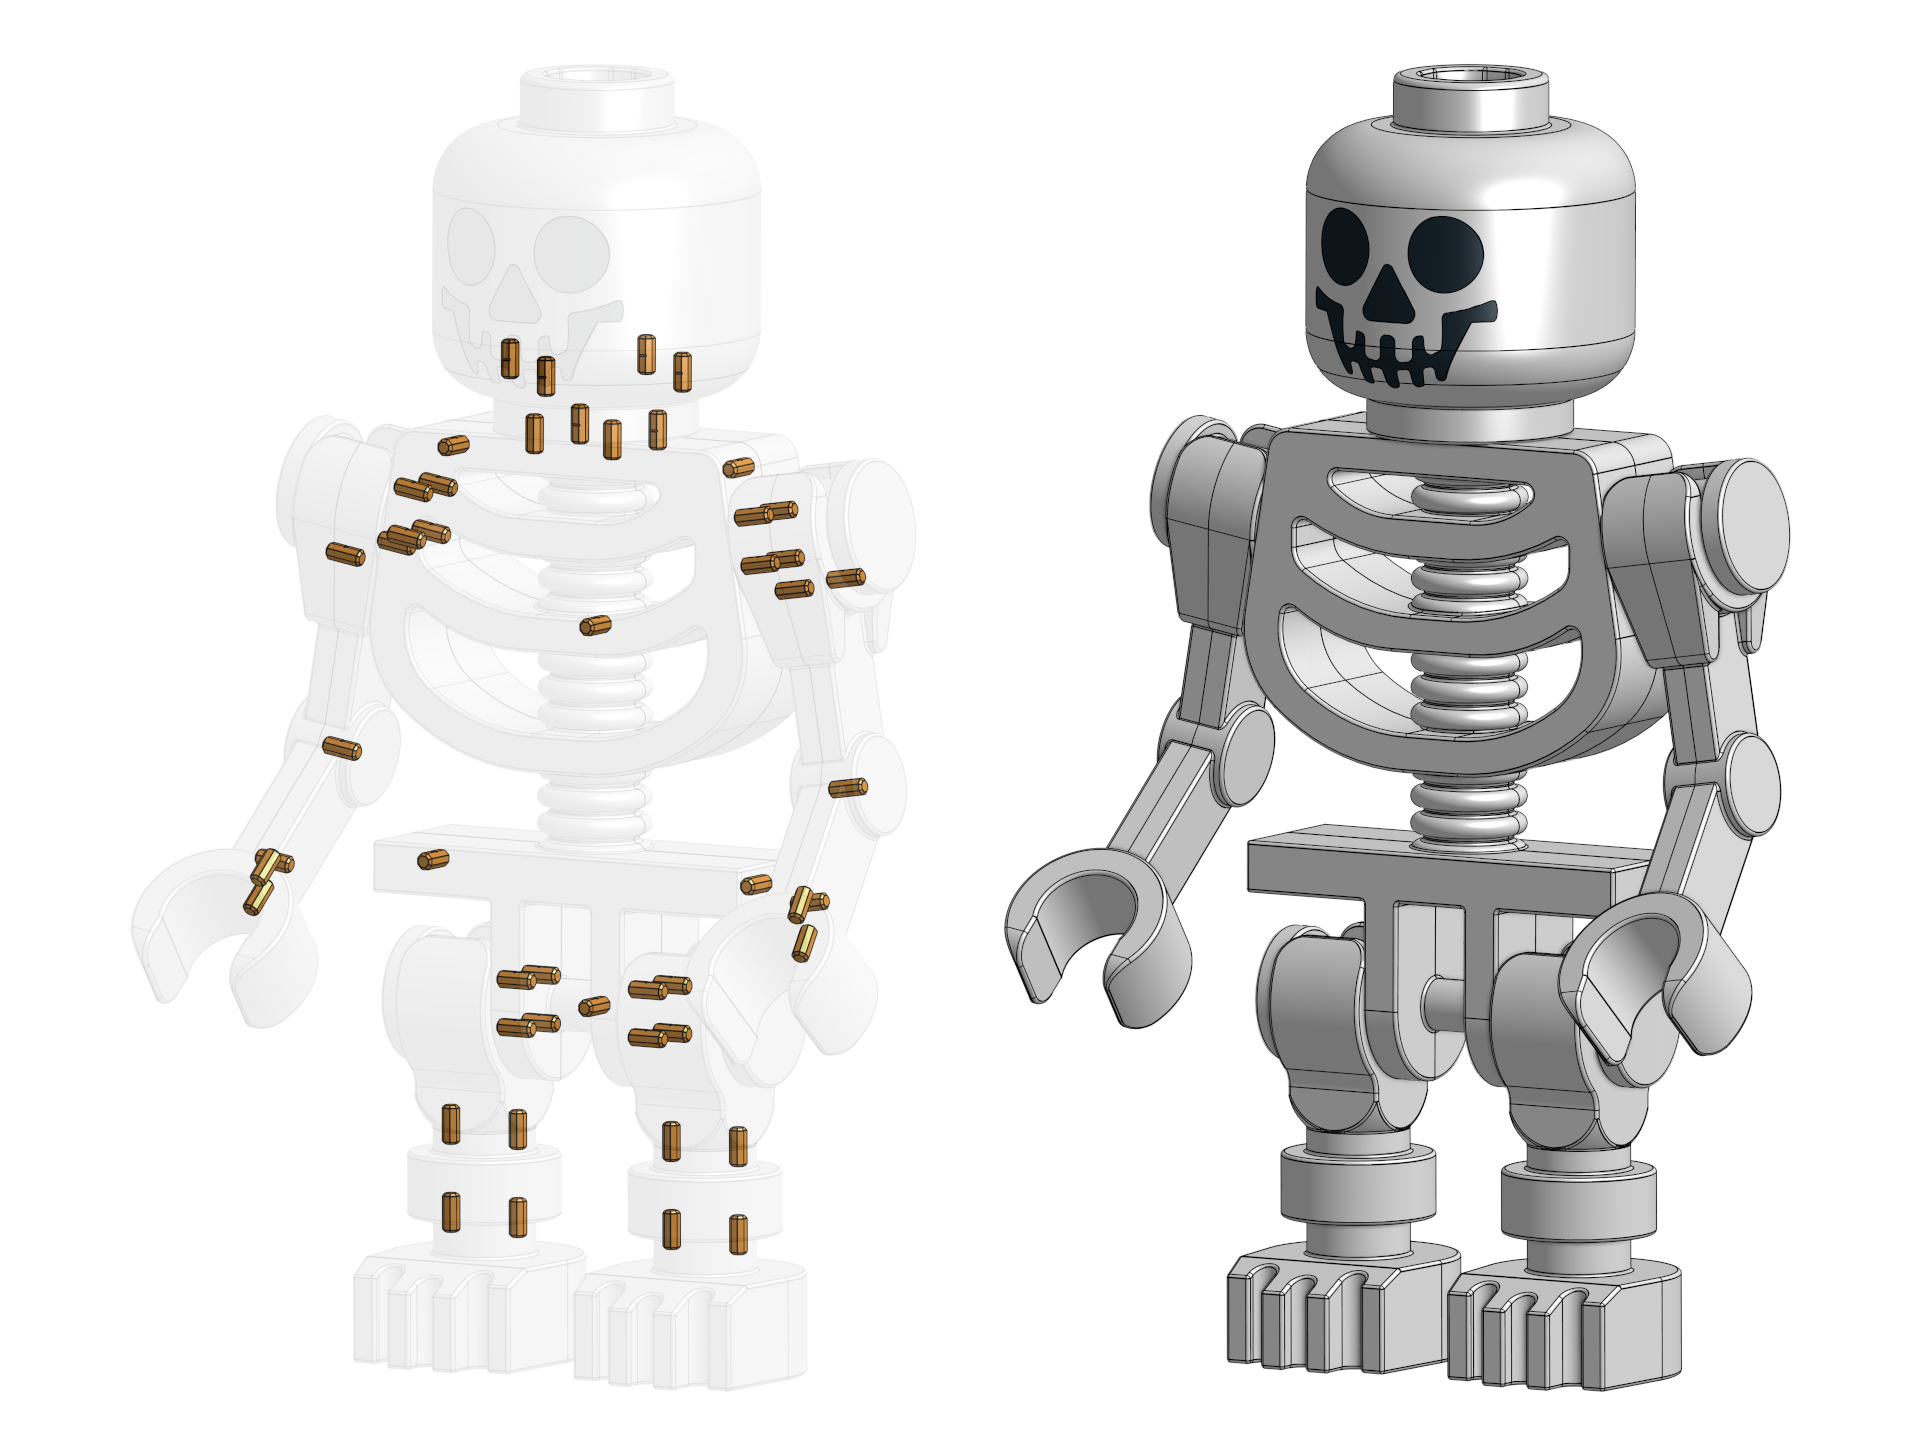 - Here's my suggested assembly procedure: - Start by test fitting together the parts with no glue, to check for any misalignment or loose/tight pins. - Glue all of the pins into *one* of the pieces you're fitting together. - Put super glue on the mating surface of the other part. No need to put it in the pin holes; the pins are for alignment, not strength, and if you put glue in them here, it can cure before you get the pieces fully together. - Line up the parts using the pins and carefully push the parts together. The thin layer of glue will cure very quickly, so there often isn't time for realignment! - I recommend liquid super glue (as opposed to gel). When the pieces get very close together, capillary action will pull the glue to cover a larger area, and you'll get a better connection between the parts. - Assemble the legs first. These are the most forgiving parts (less precise alignment required to look good), so they're best for getting the hang of things. - The arms and legs are designed to snap onto the shoulder and hip pegs. Before attaching the shoulder and hip pegs to the body, check that you can snap on the arms and legs. - If the arms/legs are too tight to snap on: Either (1) file/sand down the inside of the sockets until they fit on, or (2) slide the ams/legs on from the end of the pegs, then glue the pegs onto the body. The second option is easier, but make sure you don't use too much glue, or the arms/legs could end up glued in place instead of rotating freely. Also note that this option means you won't be able to take the arms and legs off. - If the arms/legs are too loose to hold their position: Add something to line the inside of the arm/leg sockets, like tape. This extra thickness should help hold them in place. ## Model Notes As mentioned above, this is based on GrabCAD models from Yauhen - [Lego Skeleton Minifig Fantasy Era](https://grabcad.com/library/lego-skeleton-minifig-fantasy-era-1) and [Classic Lego Skeleton](https://grabcad.com/library/classic-lego-skeleton-1) - and modified and shared here with their permission. In case you're curious about the corresponding Lego parts they're inspired by: - Skull: #82359 - Body: #60115 - Leg: #6266 - Arm: #59230 and #30377 (It's an amalgamation of these parts, not a part that actually exists; I took artistic license here to make something that looks nicer and is more functional.) To adjust the tolerances to make parts fit together, I always only adjusted the size of the *outer* piece. That means studs and pegs always retained their original size (48 mm for studs, 32 mm for pegs). So if you want to print any accessories for your skeleton (like a base, a hat, or something for it to hold), you can you these dimensions.
With this file you will be able to print Mega Lego-like Skeleton (10:1 scale) with your 3D printer. Click on the button and save the file on your computer to work, edit or customize your design. You can also find more 3D designs for printers on Mega Lego-like Skeleton (10:1 scale).