Mean Well LRS-350 PSU Case with Rear Plug for Prusa i3 Bear Full Upgrade
prusaprinters
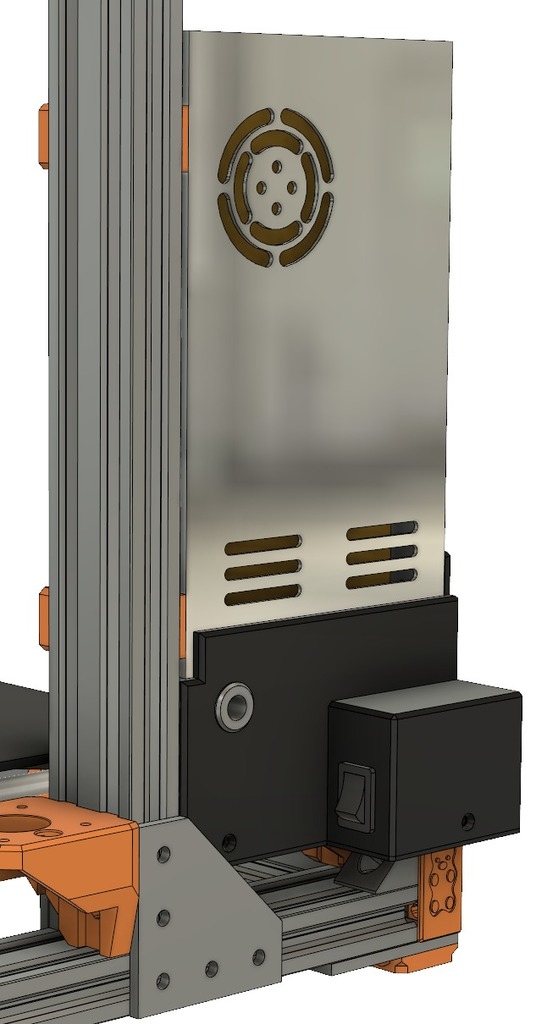
<p>I wanted to use a Mean Well LRS-350 power supply with my Bear upgraded MK3, so I designed the case available here: <a href="https://www.thingiverse.com/thing:3111868">https://www.thingiverse.com/thing:3111868</a></p> <p>Some people asked about a version with the plug coming out the rear of the case, so I created this design. The Prusa MK3 plug has soldered directly to it a "power panic" board. This is a small PCB with a circuit that detects that mains power has failed and notifies the printer controller before the 24V supply from the PSU also fails so that the state of any in-progress print job can be saved. Because this board is soldered directly to the terminals of the power (IEC) socket, the layout of the case is somewhat constrained. This is why there is a large bulge around the socket.</p> <p>Like my other Bear PSU case, it attaches to the frame in a manner similar to the Prusa PSU with the mounts in the Bear print list, however the "upper PSU mounts" are different (STL is included), so make sure you print those instead. The "lower PSU mount" is the same as that used for the Prusa PSU.</p> <p>Like the Prusa PSU case, and unlike my other design, this case has a removable bottom. I connect the mains Ground/Neutral/Load wires and 24V/GND wires to the PSU outside of the case, and then slide everything together. Then I plug the mains wires into the plug and the switch using a pair of needlenose pliers.</p> <p>The case mounts to the PSU with M4 screws. The ones in back are M4x8, and the ones on the side are M4x10. The brackets mount with M4x8 button head screws, although flat head can be used if that's all you have.</p> <p>You have an option on how the wires exit the case. If you want the wires to come out the side, as in the Prusa design, you would print Case_with_wire_passthrough.stl and Bottom.stl. If you want to the wires to come out of the bottom, you would print Case.stl and Bottom_with_wire_passthrough.stl.</p> <p>The case has a hole in the left hand side of the front. There is an additional component you can print, Voltage_Adjust_Guide.stl. This fits into this hole and provides a guide for a small screwdriver if you need to adjust the PSU output voltage after installation (the guide is there so that your screwdriver doesn't wander off target and short something out).</p> <p>-- UPDATE: 2018-12-09 --<br/> User repvik reported a clearance issue between the powers witch wires and the power panic board. I have taken his suggestion and increased the length of the plug/switch box by 10mm. (Many thanks to repvik for taking the time to share this feedback, so that others can benefit).</p> <p>-- UPDATE: 2018-12-27 --</p> <ul> <li>Added chamfers to most corners touching the build plate. I read that right angles on the build plate can increase the tendency for warping, so hopefully this should minimize that.</li> <li>Rotated "Upper_Mount.stl" so it is in correct orientation for printing.<h3>Print Settings</h3> </li> </ul> <p><strong>Printer Brand:</strong></p> <p>Prusa</p> <p><strong>Printer:</strong></p> <p>i3 MK3</p> <p><strong>Rafts:</strong></p> <p>Doesn't Matter</p> <p><strong>Supports:</strong></p> <p>Doesn't Matter</p> <p><strong>Resolution:</strong></p> <p>0.20 mm</p> <p><strong>Infill:</strong></p> <p>20%</p> <p><strong>Filament:</strong> Any PETG or PLA Any<br/> <strong>Notes:</strong></p> <p>I printed without supports, however as mentioned in the post-printing instructions, you may want to do a little post-print clean-up on the IEC socket hole.The hole is oversized, so even without this the plug should still fit.</p> <h3> Post-Printing</h3> <p><strong>Bridge area clean-up</strong></p> <p>The holes are slightly oversized and so should fit even if there is a little drooping during print. If you find that the PSU plug holes do not line up, it is because the large bridge over this area can sag. You can fix this by just shaving a small amount of plastic from the overhang area (but note, I did increase the size of this hole to compensate for this, so it's unlikely you will have an issue).</p> Category: 3D Printer Parts
With this file you will be able to print Mean Well LRS-350 PSU Case with Rear Plug for Prusa i3 Bear Full Upgrade with your 3D printer. Click on the button and save the file on your computer to work, edit or customize your design. You can also find more 3D designs for printers on Mean Well LRS-350 PSU Case with Rear Plug for Prusa i3 Bear Full Upgrade.