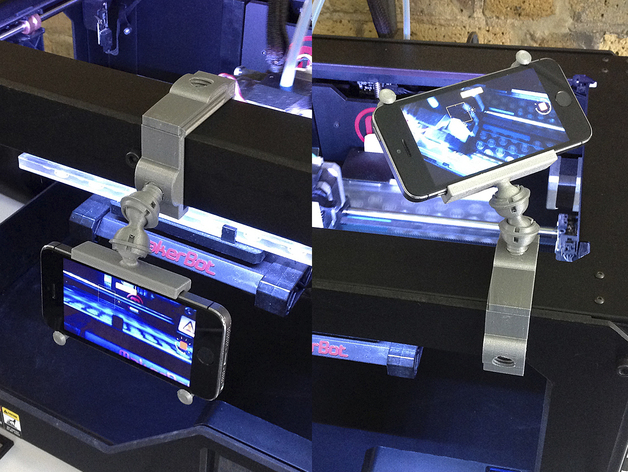
MB Rep 2 & UM 2 iPhone (time-lapse) mount
thingiverse
Everyone loves a time-lapse 3D print movie - it's an incredible way to witness the magic of desk top 3D printing unfold right before your eyes! However, setting up these epic videos is usually a huge hassle - those tripods are just too big to fit around my desk and getting that close-in shot requires a lot of setup work. That's why I designed this amazing compact, articulated, multi-angle mount that you can print at home. This revolutionary design offers both top and front shot options, complete with a threaded frame clamp mount that's sure to please. I've even included two separate file sets for the MakerBot Rep 2 and Ultimaker 2 printers, as well as phone mounts for both iPhone 5 and iPhone 6 devices. To get started, simply slide your phone into its corresponding mount - it couldn't be simpler! One of the best features of this incredible design is that you can add even more joints to customize your camera angles or shoot with two phones at once. I'm excited to see what you'll come up with! I hope that you'll be able to modify these files and incorporate them into your own printer mounts or phone mounting solutions. Just remember - make sure your iPhones are secure in their respective mounts, or disaster may strike! A broken UM 2 glass heated bed is the last thing anyone wants. Please keep this important note in mind when working with your printed designs! Thanks to the incredible community at Thingiverse for pointing out a major issue with one of my iPhone mount files. If you downloaded PHONE_CLAMP_iP6.stl before June 11, 2016, please update it immediately with PHONE_CLAMP_iP6_v2.stl. For best results when printing this design, use the following settings: * Rafts: Yes * Supports: No * Resolution: A high-quality resolution of 0.1 for sockets and threaded parts * Infill: High infill levels to achieve maximum strength Print the ball sockets and threaded parts at a fine resolution for an amazing tight fit - if your printer is over extruding, however, these parts might become too tight for optimal performance. To assemble the frame mounts, follow these simple steps: fit both pieces onto the printer's frame and slide them together - that's it! Now for post-printing tips: The ball and sockets will initially seem like a great snug fit but beware, they tend to come loose with just short use! To prevent this from happening again in the future, be sure to include the included snap ring files in your prints. Follow these exploded diagrams to attach these clever little snap rings around the socket grooves - while it may require some effort to get them in place at first (as they are a tight squeeze!), once fitted, they will keep your sockets firmly locked shut, preserving all that hard-won structural integrity for good.
With this file you will be able to print MB Rep 2 & UM 2 iPhone (time-lapse) mount with your 3D printer. Click on the button and save the file on your computer to work, edit or customize your design. You can also find more 3D designs for printers on MB Rep 2 & UM 2 iPhone (time-lapse) mount.
