Maxmix
prusaprinters
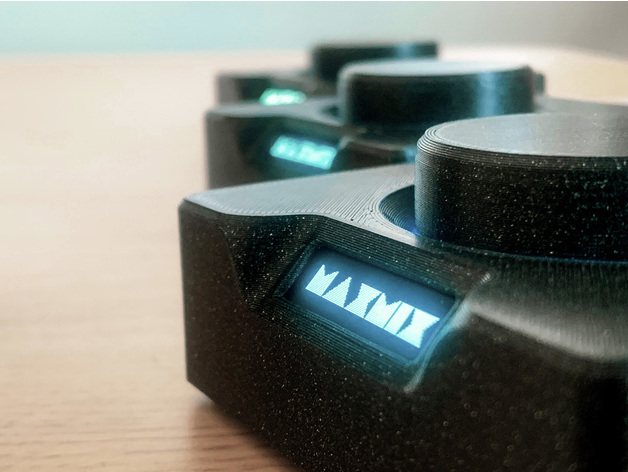
<p>Do you ever use a voice chat app to talk to your buddies while playing games?<br/> Don't you hate having to open up Windows Mixer to adjust the volume of the chat and the game?</p> <p>Maxmix is an open-source sound mixer that allows you to control the volume of every application with the turn of a knob.</p> <p><a href="http://www.youtube.com/watch?v=K7CqB7U6xoU" title="Maxmix Project"><img alt="Maxmix Project" src="http://img.youtube.com/vi/K7CqB7U6xoU/0.jpg"/></a></p> <h3>Files Included</h3> <p>Stl and Step files for all parts are included.<br/> Choose from the 14mm and the 17mm bottom depending on the hole spacing of your encoder.<br/> We also provide a 26mm and 28mm LED bracket to choose from depending on the hole spacing of your LED ring.</p> <h3>Print Settings</h3> <p>The design is optimized to be printed with the following settings:</p> <p>Layer height: 0.2 mm<br/> Vertical shells: 3<br/> Horizontal shells: 4 top/bottom<br/> Seam position: nearest<br/> Infill: 15% Rectilinear<br/> Support material: Yes, on build plate only (supports are very minimal)</p> <p>It is recommended to use a dark color to print the enclosure to prevent light bleeding while using a translucent color for the diffuser to let the light of the LEDs through.</p> <h3>Assembly</h3> <p>Part list, assembly instructions and software can be found in the <a href="https://www.maxmixproject.com">Product Page</a></p> <h3>Remixes</h3> <p>The .step file is included to make it easier to create remixes.<br/> <strong><em>Go remix!</em></strong></p> <h3>Changes</h3> <p><strong>R99</strong></p> <ul> <li>[Top] Reduced thickness in areas above dupont connectors to reduce wire tension.</li> <li>[Top] Updated tabs sockets to use same tab for both, display and MCU.</li> <li>[Bottom] Fixed encoder alignment.</li> <li>[Bottom] Updated tabs sockets to use same tab for both, display and MCU.</li> <li>[Knob] Added ribs for easier and better fit into encoder shaft.</li> <li>[Led] New LED assembly, diffuser and bracket with optional cells to prevent light bleeding.</li> </ul> <p><strong>R98</strong></p> <ul> <li>[Bottom] Moved power bus inwards to make space for weights.</li> <li>[Bottom] Added tabs to the top of the usb connector .</li> <li>[Knob] Removed revision number.</li> <li>[Knob] Fixed off-center hole causing the knob to orbit around.</li> <li>[Top] Changed tabs on the side of the screen to walls.</li> </ul> <p><strong>R97</strong></p> <ul> <li>[Top] Added logo to top front right corner.</li> <li>[Bracket] Fixed LightBracket 28mm spacing and pin size (SgtSarcasm)</li> <li>[Bracket ]Added LightBracket 26mm spacing stl. (Mavi)</li> </ul> <hr/> <h3><a href="https://www.maxmixproject.com">Product Page</a></h3> <h3><a href="https://www.thingiverse.com/thing:4343186">Thingiverse</a></h3> <h3><a href="https://www.amazon.com/dp/B08LMQXTZ3">Buy</a></h3> <h3><a href="https://www.paypal.com/cgi-bin/webscr?cmd=_donations&business=SQS6XJZBCBZA8¤cy_code=USD&source=url">Donate</a></h3>
With this file you will be able to print Maxmix with your 3D printer. Click on the button and save the file on your computer to work, edit or customize your design. You can also find more 3D designs for printers on Maxmix.