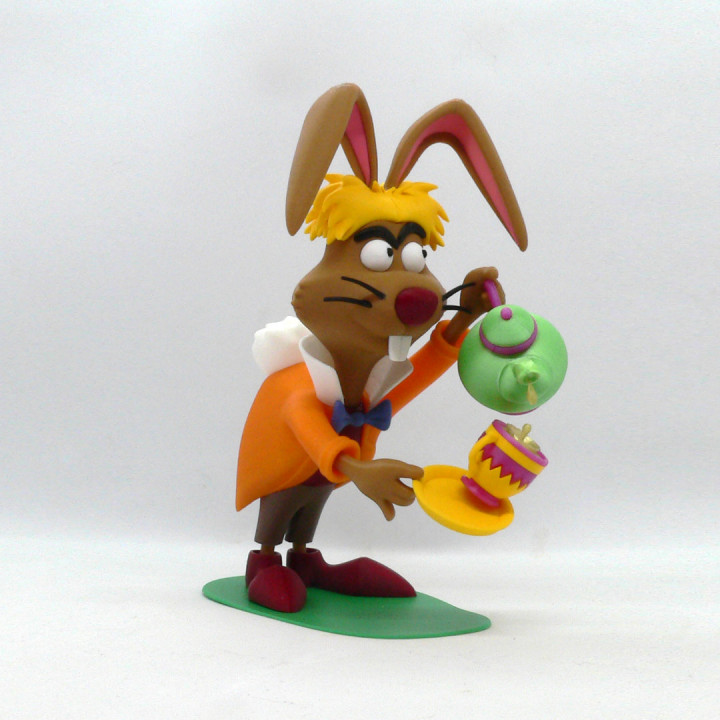
March Hare
myminifactory
The March Hare is a character from the 1865 book Alice's Adventures in Wonderland by Lewis Carroll. He is most famous for appearing in the tea party scene where Alice hypothesizes,"The March Hare will be much the most interesting, and perhaps as this is May it won't be raving mad – at least not so mad as it was in March" Some supports are required on four pieces (see notes below). If you have the proper filament colors, no painting is needed. The assembled model is 210mm tall. Enjoy! ........................................................................................................... Special shoutout to maker Benoît Lussier for providing QA printing and quality feedback. ........................................................................................................... **Print Instructions:**Supports: ear_right, ear_left, hand_left and jacket (see notes for details)Resolution: .2mmInfill: 15% *************** **Building the model** Colors Black: (Devil Designs PLA - Black)eyeblacks (file contains two identical parts)eyebrowswhisker_left (file contains two identical parts)whisker_right (file contains two identical parts).. Yellow: (Devil Designs PLA - Bright Yellow)hair_lefthair_rightplatecup_yellow_bottomcup_yellow_top.. Light Green: (Devil Designs Silk PLA - Silk, Bright Green)teapot_mainteapot_lid.. Pink: (Paramount3D PLA - Bright Pink)cup_pink_middleteapot_lid_bottomteapot_bottomcup_pink_bottomcup_pink_topteapot_knobteapot_handle.. Skin: (Paramount3D PLA - Dark Complextion)headhand_lefthand_rightleg_leftleg_rightear_leftear_right.. Orange: (Paramount3D PLA - McLereon Orange)jacket.. Blue: (Paramount3D PLA - Cadet Blue)tie_lefttie_right.. Dark Red: (Parmoun3D PLA - Iron Red)shirtshoe_leftshoe_rightnose.. White: (Overture PLA - White)eyewhite_righteyewhite_leftcollarteethtail.. Green: (Hatchbox PLA - True Green)base.. Brown: (PolyTerra PLA - Army Brown)pants.. Light Pink: (TEMU PLA - Sample pack "PLA 5m*30PCS)ear_pink_rightear_pink_left.. Translucent green: (TEMU PLA - Sample pack "PLA 5m*30PCS)teatea_drop.. Any Color: (hidden pieces)pin_hairpin_cuppin_teapot **************************************** ........................................................................................................... **Printing and assembly tips** Printing tips: 1 - Minimal upports are required on the follow parts (see picture section for where I placed supports in the slicer): ear_right ear_left hand_left jacket 2 - There are some pieces that may need brims or rafts, use your discretion. When setting up my prints I prefer to be conservative to ensure the least chance of a print failure, especially since the base of many parts are hidden when inserted into another part. *I used a brim on: hand_right hand_left collar pants teapot_handle tie_left tie_right tea_drop leg_left leg_right *I used a brim on the parts that required supports, might be overkill but I had no print failures on all my tests: ear_right ear_left jacket *I used a wide brim on head part and used supports around the base to ensure it held to the bed firmly: head 3-Colors! The colors for this character can vary. Use your judgement on choosing colors. I made this model specifically because it had so many colors in it. 4 - When removing parts from the printer bed, it's a **VERY** good idea to place left/right parts into separate containers to help with the assembly process. Sometimes the difference between the left and right parts is very small but it is still worth keeping track of them (especially if you size up the model significantly) and assembling them in their proper place. ..Assembly tips: 1 - Take your time gluing the model together and enjoy the process. Dry fit all the parts and give some thought into which parts to glue together as groups and then gluing the groups together. Let the glue for each group set completely before combining groups. 2 - I used 3D Gloop and E6000 to put this model together. Each type of glue has different pros/cons and I found that fast drying 3D Gloop was far easier to use than superglue (for me). The E6000 sticky glue allows more time to position parts and is still the best for smaller parts. For both glues using a smaller amount is usually better than more glue. 3 - **Very Important**The jacket/shirt/pants/tail connection was difficult to make, so there are considerations for assembly. Do not glue until you understand the assembly and can align the parts.-Insert the shirt into the jacket from the front. It is very tight to get through the neck area but it does fit.-Insert the pants into the jacket from the back. It does fit and needs some pressure as well.-The shirt and pants have a mating bump. Do not glue yet. Together there is some up/down play.-Position the tail in the back. It should fit exactly. If there is a gap, simply move the pants/shirt up/down a touch until the tail fits properly.-Glue all the parts, keeping an eye on the tail to ensure it continues to fit properly. 4 - There is a notch in the cup_yellow_top for the tea. Be sure the notch is placed by the cup handle during assembly. 5 - If you do not use a fast drying glue, you may need to put something under the cup to hold it an an angle on the plate to let the glue dry and hold the position. 6 - Put the teapot_handle onto the left_hand (do not glue the hand to the handle yet). Insert and glue the handle into the completed teapot. By not gluing the hand to the handle you have some leeway for the final alignment of the teapot to the cup. 7 - Refer to the assembly diagrams in the pictures section as well as the uploaded pictures for putting the model together. The model is meant to be glued. Do not hesitate to ask questions, feedback is essential to making better models.
With this file you will be able to print March Hare with your 3D printer. Click on the button and save the file on your computer to work, edit or customize your design. You can also find more 3D designs for printers on March Hare.
