Manual Joystick controller for MPCNC
prusaprinters
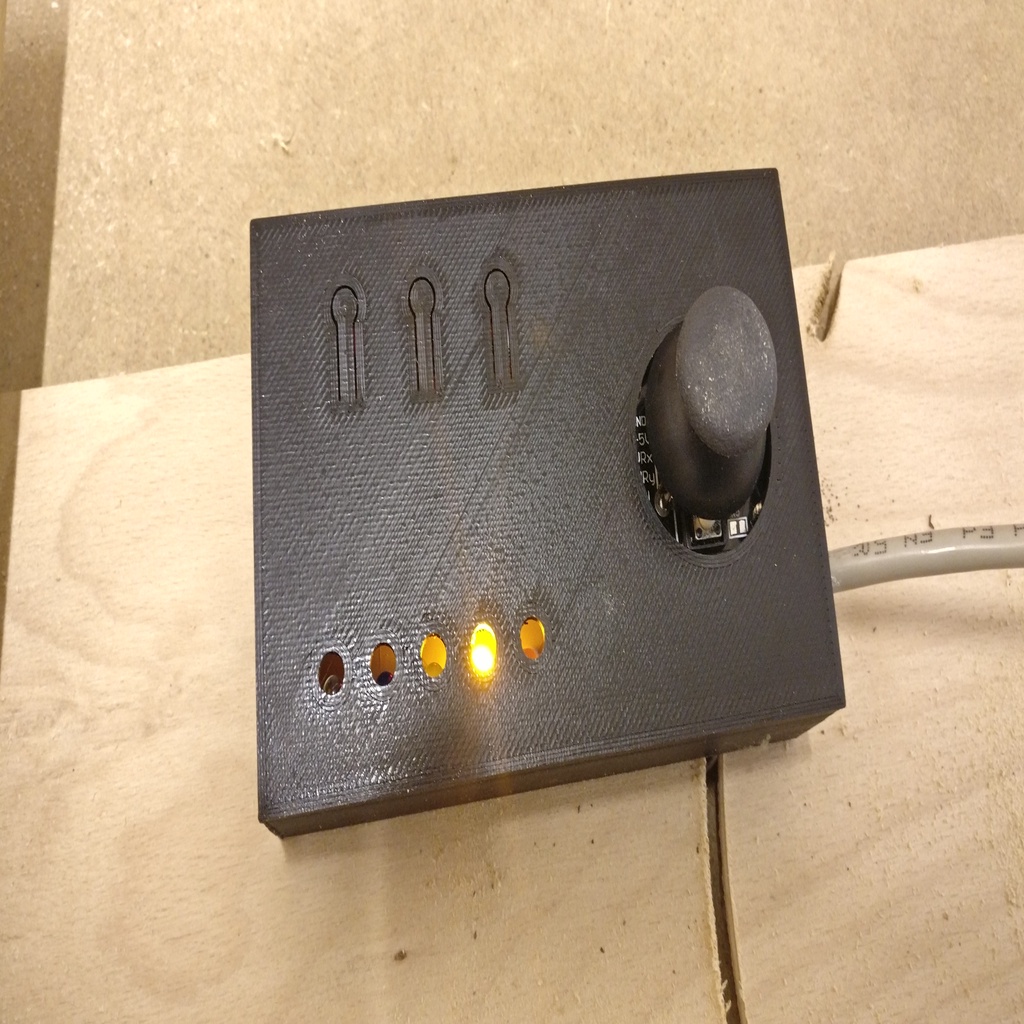
<p>Update November 2019:</p> <p>I made a PCB for the joystick. So I added the EasyEDA JSON file, the Gerber-files, circuit diagram and new case STL.</p> <p>If you are interested in a PCB and are located in Europe, please contact me. I have a couple left. Any money I make will go to charity (Paulinchen e.V., an organization helping children who suffered burn injurys).</p> <p>Update August 2019:</p> <p>jogdial_v0.3.ino</p> <p>New features upon request:</p> <p>Implement treshold for joystick zero for x and y</p> <p>Swapped order of movements (higher first)</p> <p>Make 100mm mode configurable individually or disable completely</p> <p>You have to change these user configurable options in the .ino script (lines 12-15):</p> <p>const int treshold_x = 200; // increase this value, if x-axis of joystick is not giving zero values when idle. Keep values between 300 and 0. Decrease to get joystick act more sensible.</p> <p>const int treshold_y = 200; // increase this value, if y-axis of joystick is not giving zero values when idle. Keep values between 300 and 0. Decrease to get joystick act more sensible.</p> <p>const long baud_rate=250000; // Baudrate of your MPCNC-Controller</p> <p>String _100mm_mode = "100"; // To adjust 100mm-mode individually set to any value eg. "100", "50.5", "20" or set to "disabled" to disable 100mm mode for x and y. Defaults to "100"</p> <p>Update May 2019</p> <p>I think I have found the issue with the jumps in position. Analyzes showed that these "jumps" were actually correct GCODE commands which would not point to noise by any means. It turned out that while uploading the GCODE remotely thru octoprint to the SDCARD (which took longer than I thought and there was no progressbar showing on the display itself) I was playing around with the joystick and did some homing and movements.Actually these commands not only made it to the machine but were also inserted into the stream of GCODE that was written to the SDCARD. In fact I found these commands in my files on SDCARD! Mystery solved! No issue with wiring or noise - just stupid operator error! So enjoy your joystick (when youre not uploading to your SD!!).</p> <p>Update March 2019</p> <p>After a couple of days, I realized some strange jumps of position (x,Y and Z) midmilling. I have a long cable attached to the serial port and I assume these jumps result from noise coupling into the datalines. So please use shortest cables possible with grounded shield. If you still experience strnge things happening (like going to 0,0 while milling and the continue as if nothing happend), disconnect before actually going into production.</p> <p>And please leave remarks in the comments so I can see if it's just me or others are affected as well.</p> <p>///</p> <p>Update as of February 10, 2019</p> <p>I encountered an incompatibility issue with octoprint (and potentially any other server attached to the USB-port). The controller was blocking the RS232 communication and Octoprint diconnected due to timeout.</p> <p>I have updated the arduino-script to version v0.2. This should solve the issue - at least it does with my machine! I also updated the file with source-code comments to make it more readable.</p> <p>version 0 stays in the file for version control purposes only.</p> <p>If you encounter any problems, please leave a comment.</p> <p>///</p> <p>PREWARNING!</p> <p>You must know what you are doing here! There is a risk of damaging your equipment, if you do something wrong!</p> <p>Still, it ain't rocket science either!</p> <p>This is an addon for the MPCNC.</p> <p>It works only with MPCNC running Marlin firmware on an RAMPS board and compatible like e.g. MKS 1.4, GEN L, Trigorilla or Fysetc F6. Your boards needs to have an AUX-1 port with direct access to the onboard serial port.</p> <p>BOM:</p> <p>Arduino Nano 3.0</p> <p>Joystick module</p> <p>(e.g. <a href="https://www.aliexpress.com/item/1pc-Free-Shipping-Higher-Quality-Dual-axis-XY-Joystick-Module-PS2-Joystick-Control-Lever-Sensor-For/32656963271.html?spm=2114.search0104.3.17.7a7742a5zRLMkv&ws_ab_test=searchweb0_0,searchweb201602_2_10320_10065_10068_10547_319_317_10548_10696_10084_453_454_10083_10618_10304_10307_10820_10821_537_10302_536_10902_10843_10059_10884_10887_10319_321_322_10103,searchweb201603_6,ppcSwitch_0&algo_expid=bec2aa50-19eb-45bb-8f8e-31120302c80c-2&algo_pvid=bec2aa50-19eb-45bb-8f8e-31120302c80c">https://www.aliexpress.com/item/1pc-Free-Shipping-Higher-Quality-Dual-axis-XY-Joystick-Module-PS2-Joystick-Control-Lever-Sensor-For/32656963271.html?spm=2114.search0104.3.17.7a7742a5zRLMkv&ws_ab_test=searchweb0_0,searchweb201602_2_10320_10065_10068_10547_319_317_10548_10696_10084_453_454_10083_10618_10304_10307_10820_10821_537_10302_536_10902_10843_10059_10884_10887_10319_321_322_10103,searchweb201603_6,ppcSwitch_0&algo_expid=bec2aa50-19eb-45bb-8f8e-31120302c80c-2&algo_pvid=bec2aa50-19eb-45bb-8f8e-31120302c80c</a> )</p> <p>R1 68Ohm</p> <p>R2 100 Ohm</p> <p>LED red, green , blue , yello and white</p> <p>3 tactile switches</p> <p>piece of breadboard</p> <p>wiring,</p> <p>4 pin Dupont female connector</p> <p>a couple of M3 screws.</p> <p>PLA for the case</p> <p>First, fire up the arduino IDE. Load the included script "jogdial_v0.2.ino". Hook up the Nano to your computer's USB. Check the right COM-port in Tools. Switch board to Arduino Nano. Make sure to choose the 328P processor with the right bootloader. If you can't upload, switch to old bootloader (or vice versa). Compile and upload the sketch.</p> <p>Detach Nano from USB and sstart wiring. Later, you can still flash a new firmware with the Nano installed in the controller. There is an accesshole in the back to hook up a USB cable.</p> <p>How to wire you can see on the Fritzing breadboard chart. Make your own board and use my example on the pictures if you want to use my box. Just count the pinholes to have the exact positions of the tactile switches, the nano and the screw- and through holes.</p> <p>Hook up the 4-pin connector to your lower Aux-1 pin (D0, D1, GNS, 5V). Beware! Don't reverse, or it will not work. It may damage your Arduino Nano!!</p> <p>Make sure, your Marlin Firmware is set to 250000 bps!</p> <p>If you want to use a different baudrate, change line 57 in the arduino-script accordingly and reupload.</p> <p>Case design was quick and dirty and by far not perfect. If you want to optimize, please feel free. OpenSCAD file is attached.</p> <p>Operation:</p> <p>On power on, system does a lamp-test. All five LED must light up for a second. Then, the blue LED is lighting.</p> <p>Press HomeXY to home the system. Press Home Z, if you have a tool-height thing attached on your Z-endstop.</p> <p>If you have set your spindleheight to 0, press reset coord button to zero XYZ.</p> <p>For manual driving:</p> <p>Blue LED on:</p> <p>Using Joystick advances Toolhead in +-0.1mm increments. Keep pushing and movement repeats. You can go diagonal as well!</p> <p>Push on joystick to switch to 1mm mode (green)</p> <p>Green LED on:</p> <p>Using Joystick advances Toolhead in +-1mm increments. Keep pushing and movement repeats. You can go diagonal as well!</p> <p>Push on joystick to switch to 10mm mode (yellow)</p> <p>Yellow LED on:</p> <p>Using Joystick advances Toolhead in +-10mm increments. Keep pushing and movement repeats. You can go diagonal as well!</p> <p>Push on joystick to switch to 100mm mode (red).</p> <p>Red LED on: (Red means DANGER!!!)</p> <p>Using Joystick advances Toolhead in +-100mm increments. Keep pushing and movement repeats. You can go diagonal as well! Be aware not to exceed your machine limits!! When moving 100mm increments, do it one move after the other!! I am not responsible for any damage you do to your machine!! At least I can say, I told you so! ;)</p> <p>Push on joystick to switch to Z-Axis and to 0.10mm mode (white and blue)</p> <p>White LED always indicates Z-axis is moving!!</p> <p>White&Blue LED on:</p> <p>Using Joystick in Y-direction advances Toolhead up and down in 0.1mm increments. Keep pushing and movement repeats.</p> <p>Push on joystick to switch to 1mm mode (white green).</p> <p>Push on joystick to switch to 10mm mode (white yellow).</p> <p>Push on joystick to switch to 20m mode (white red).</p> <p>Again, beware!! Don't exceed your machine's dimensions! Nothing prevents you from driving your spindle into the worktable!!</p> <p>Push on joystick again to return to XY-Mode 0.1mm again. Repeat!</p> <p>Pretty simple and fun!</p> <p>How it works:</p> <p>The Arduino Nano reads the joystick analog signals and the button signals and turns them into LED status and machine-commands.</p> <p>The commands (eg. G28 X Y) are physically sent to the onboard serial port (D0, D1). Marlin executes these commands directly.</p> <p>Enjoy driving your MPCNC with a Joystick and not with the stupid display-menu!</p> <p>Cheers</p> <p>Armin</p> <h3>Print Settings</h3> <p><strong>Printer Brand:</strong></p> <p>Creality</p> <p><strong>Printer:</strong></p> <p>Ender 3</p> <p><strong>Rafts:</strong></p> <p>No</p> <p><strong>Supports:</strong></p> <p>Yes</p> <p><strong>Resolution:</strong></p> <p>0.2</p> <p><strong>Infill:</strong></p> <p>15%</p> <p><strong>Filament:</strong> Noyes PLA</p> <p>grey Joystick controller MPCNC Operation, Part 1&2 ==============================================</p> Category: Machine Tools
With this file you will be able to print Manual Joystick controller for MPCNC with your 3D printer. Click on the button and save the file on your computer to work, edit or customize your design. You can also find more 3D designs for printers on Manual Joystick controller for MPCNC.