Maltese Falcon - Full Size - High Quality
prusaprinters
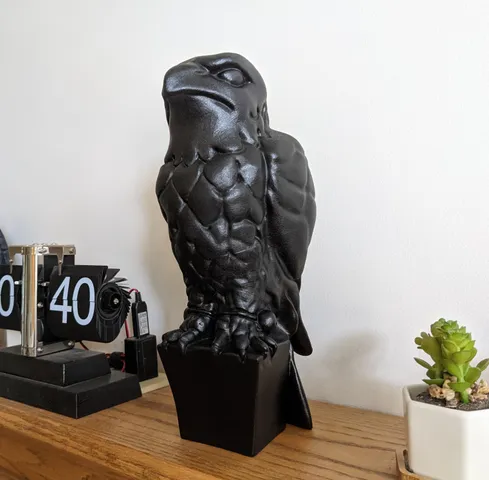
The important things to know about this print are the following :It worksIt can be improvedFilling and painting is needed for best resultAs can be seen from the referenced remix, I made a full size print of the Maltese Falcon some time ago. That print was pretty good, but the tools I had available at the time put some limits on what I could do with the original model. Since then, the OnShape CAD software that I use has added some new capabilities, so I decided to see what I could do to improve my previous print.I made a fresh start with the original model :Attribution : Based on this STL by Colin Freeman:https://www.thingiverse.com/thing:46631My approach was to “slice” the model into four parts, each of which could be oriented on the print bed for best results, without using supports. As with my previous print, there is a hollow “tube” running the length of the assembled model - the purpose of this is to enable the model to be filled with a weighted filler to give it “heft.”The four major parts are designed to glued together, with alignment pins to ensure that sections fit cleanly together.Finally, I printed the four major parts with a 0.15mm layer height to ensure a smooth exterior. Here are the estimated print times and costs for my printer :PartPrint TimeMaterial Usage - gramsEstimated Cost $USTop10h47m30$2.57Middle Top14h13m51$4.32Middle Bottom16h14m43$3.62Bottom24h58m182$5.07Assembly and FinishingThe parts are glued together with epoxy cement (use the long or short alignment ins as needed). Even with the use of alignment pins, I found it necessary to clamp the parts to get good alignment. I glued the two upper pieces and two lower pieces as sub-assemblies, and then glued those two sections together. Even with clamping and my best efforts to align the sections, I ended up with some visible “joins.” After an initial coat of filler/primer, I filled any gaps with “wood” filler (see photo), and then sanded the joins. I also sanded the entire thing with a medium “scotch-brite” pad. This was followed by a second coat of filler/primer, and then more sanding with the scotch-brite pad. Finally, I finished up with textured black paint (see the photos for the filler/primer and paint used). The textured black paint does a good job of hiding layer lines, and provides for the matte black finish I was looking for.Optional : (see last photo) I filled the interior with concrete to give the falcon some “heft”.Some related notes :Note 1 : It is not possible to print the entire model at once on most printers, as it is too large (about 12 inches or 30cm high). Even if it were possible, it would then be necessary to use supports and this would likely result in a degraded surface finish.Note 2 : I did some experiments with making “shell” versions of the major parts (essentially a hollowed out version of the model) with the idea that this would reduce material use and speed up print times, but I found that the differences were not significant (especially since it was still necessary to add alignment features).Note 3 : The files sizes for this print are quite large in some cases. I believe this is due to the relatively high resolution of the original model. These files sizes could have been reduced via simplification, and by increasing the layer height, but this would reduce the resolution of the final model. It is likely that the final quality could be retained, and still make improvements in print, time, etc., but I did not have time to do such experiments.Thoughts on Improving the PrintAlthough I am happy with the way this print turned out, I think there is still room for improvement. Some areas worth exploring are “cutting” the piece into more and smaller sections, so that any need for supports is eliminated, and all parts print in a good orientation on the print bed. Some work is also needed to improve the alignment pin method. I would also do more to reduce the large flat contact areas between sections, as these make it harder to bring the edges close together.Print InstructionsPrint in PETG using the gcode or emf files provided; in general :0.15mm layer height (0.2mm layer height for the alignment pegs)4 perimeters5% rectilinear infillvariable layer height - adaptiveseam position - randomno supports required except on the Bottom section CADThe OnShape 3D CAD files for this are here :https://cad.onshape.com/documents/ea930acabb415d1501e70129/w/f5cace9ecd97afe5c9915333/e/c90aef47e7bf8cc95287c544
With this file you will be able to print Maltese Falcon - Full Size - High Quality with your 3D printer. Click on the button and save the file on your computer to work, edit or customize your design. You can also find more 3D designs for printers on Maltese Falcon - Full Size - High Quality.