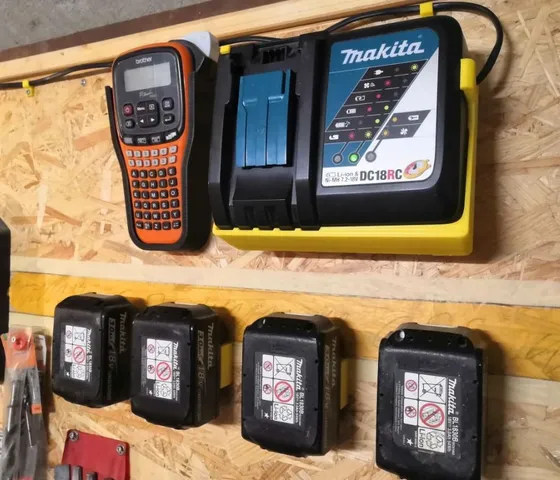
Makita Charger DC18RC Wall Mount
prusaprinters
I created this model for a friend, as he didn't like the much simpler wall mounts like this as they utilize the holes of the rubber feet, which have to be removed. And the charger is fixed permanently to the wall and can not be quickly removed..He wanted more like a holster or tray without any modification to the charger itself and the opportunity to just take it off the wall and use it as a mobile charger.So here it is - just click the charger to the wall and take it off again if needed.The charger is tilted 15 degrees so that it slightly leans against the wall,and doesn't tend to fall off even if the heavy battery is mounted.It is held by the slightly inward leaning walls plus two "arms" on upper left corner and the right side. As seen on the picture this holds perfectly well, but just in case I also added an optional "safety bracket" which can be inserted in the little pocked on the back side and holds the top of the charger.To avoid support, the tray is printed separately and the two two triangles need to be glued to it. For correct positioning, the triangles have two little pins that fit into corresponding holes of the tray. Additionally you'll need four 4mm screws to attach it to the wall.To mount the charger, first insert the bottom and then push it to the wall, slightly bending the arms to the outside until they click in.Add-on: To guide the cable I added little cable clamps which also allow to attach/remove the cable without unscrewing them. They also need a 4mm screw.P.S. The picture also shows four battery mounts found on Thingiverse and one of my other designs, a holster for a Brother P-Touch H100 handheld printer, which can now also be found here on Printables. Update 2023-06-12: Looks like not all chargers have a little hole on the back side (see comment from Ian Thackston), therefore I uploaded a new version without the little pin at the base tray. And I also uploaded a safety bracket that is curved at the front instead of having two angles as his charger seems to have a fillet, not a chamfer there. (bracket not tested yet and it is actually not really needed, the holder seems to work fine without) Print settings:To save material, the tray was printed with only two bottom and 3 top layers (layer height 0.2mm) and only 15% infill. The other parts (mount triangles, safety bracket and cable clamps) were printed with standard Cura settings, i.e. 20% infill. If uncertain, increase infill around the screw holes.Only minimal support was configured for the tray. I used thin concentric support for the hook of the left arm and the little pocked where the safety bracket can be attached. It might even work completely without support but for this really minimal amount of material I didn't want to challenge it.The rest was printed without support (mount triangles and cable clips lying on the side) -even for the mount triangles with the overhanging guide pins. Support might be an option for these, but I simply used a pocked knife to slightly scrape the pins.until they fit nicely into the corresponding holes of the tray.
With this file you will be able to print Makita Charger DC18RC Wall Mount with your 3D printer. Click on the button and save the file on your computer to work, edit or customize your design. You can also find more 3D designs for printers on Makita Charger DC18RC Wall Mount.
