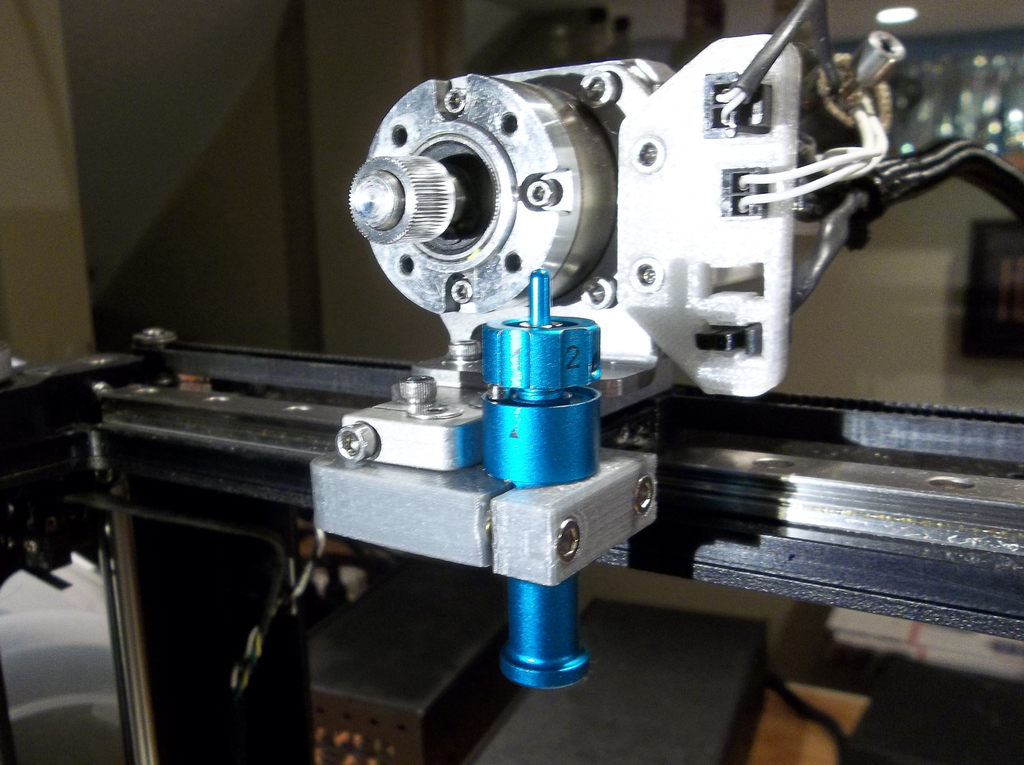
Makergear M2 Cricut Cutting Blade Attachment
prusaprinters
<p>Cricut Cutting Blade Attachment for the Makergear M2</p> <p><strong>First the Disclaimer........</strong></p> <p><strong>This is a work in progress (I am uploading this per request.)</strong></p> <p><strong>This attachment is NOT for the average user. It requires advanced knowledge of the M2 printer such as moving and calibrating your Z-stop. It also requires advanced g-code editing and slicer setting to make work...</strong></p> <p><strong>If you are not an advanced printer user and don't know what your doing please do not try to use this... I make no guarantees or warranties as to the accuracy or completeness of, or results to be obtained from accessing and using the Information herein.</strong></p> <p><strong>With all that being said........</strong></p> <p>Hardware Required</p> <p>(2) 8/32" x 3/4" Flat Head Screws</p> <p>(2) 8/32" Nuts</p> <p>(1) 6/32" x 7/8" Socket Head Screw</p> <p>(2) 6/32" x 1/2" Socket Head Screws</p> <p>(3) 6/32" Heat Set Inserts</p> <p>Cricut 2001401 Deep Cut Blade and Housing</p> <p>Cricut 2001974 Adhesive Cutting Mat</p> <p>For use on the Makergear M2 with V4 hotend. The Filamet Drive and Hot end are removed and printed blade attachment mounts to the V4 mount with the listed hardware.</p> <p>The blade holder has a certain amount of cutting depth adjustment that can be made by turning the top dial but your z-stop height my need to be changed to use this attachment. The adhesive mat (not shown) is clipped to the bed and the paper sticks right to it. For best results you need to use a thick craft type paper. Regular printer paper (even the thick stuff) will likely just tear instead of being cut.</p> <hr/> <p><strong>You'll have to figure out the correct setting for your printer/software</strong> (Some features to the start up script need to be removed such as the initial wipe feature, ect.) but other important basics I use are....</p> <p>Top and Bottom Layers = 0</p> <p>Outline/Perimeter Shells = 1</p> <p>Retraction Vertical Lift = 1-2 mm (very important so the blade lifts when crossing open areas.)</p> <p>No skirts or brims.</p> <p>You only what to run one print/cutting layer so I set my layer height to .10 mm and the stop printing feature (advanced tab) also to .10mm.</p> <p>Printing/cutting speed will have to be figured out for your paper type I think I used 2000 mm/min with the first layer set to 50% so it's actually probably 1000 mm/min.</p> <p>I've used this to make some lettering for signs from vinyl and it works great. It's a little tricky getting the z-height correct so it just cuts through the vinyl and not the backing and you have to have a perfect bed level but it works great once thats all set.</p> <p><strong>AGAIN - I make no guarantees or warranties as to the accuracy or completeness of, or results to be obtained from accessing and using the Information herein.</strong></p> <p><strong>USE AT YOUR OWN RISK.</strong></p> Category: 3D Printer Accessories
With this file you will be able to print Makergear M2 Cricut Cutting Blade Attachment with your 3D printer. Click on the button and save the file on your computer to work, edit or customize your design. You can also find more 3D designs for printers on Makergear M2 Cricut Cutting Blade Attachment.
