
Mailight
thingiverse
[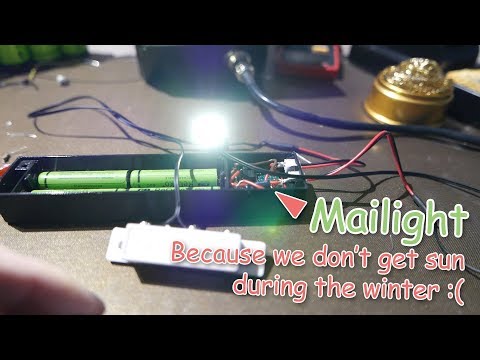](https://www.youtube.com/watch?v=k0oHYXkPr5Y) This is a solution for a small gadget to insert into your mailbox that illuminates when you open it to check for mail. This is useful since here in Sweden we only receive a few hours of sunlight every day during winter, which means I typically have to inspect my mail in the dark. Components required: - 1x Sparkfun PRT-08808 prototype board - 2x 3mm x 12mm screws - 4x rechargeable AAA batteries - 1x resistor with a resistance of 1M ohm - 1x resistor with a resistance of 10-22 ohm (You'll want it to be around 60 mA to ensure it doesn't overheat) - 1x 100 mF capacitor - 1x through-hole 555 timer - Plenty of wire - 1x NC magnetic switch (some stores may label this incorrectly, you want the one that closes the circuit when not affected by an external magnet). I often use Standex-Meder Electronics (MK04-1B90C-500W). Be sure to purchase a flange if it's sold separately. - Some battery contacts such as Keystone Electronics AA ones. The AAA ones will likely work just as well. They're quite flexible. - 1x Computer M3 chassis screw - Super glue - 2x JST female connectors - 2x JST male contacts - 1x 1W Power LED - Heat shrink or isolating tape Tools required: - A 3D printer (yeah, yeah) - Screwdriver - Soldering equipment - Something to strip/cut wires with.
With this file you will be able to print Mailight with your 3D printer. Click on the button and save the file on your computer to work, edit or customize your design. You can also find more 3D designs for printers on Mailight.