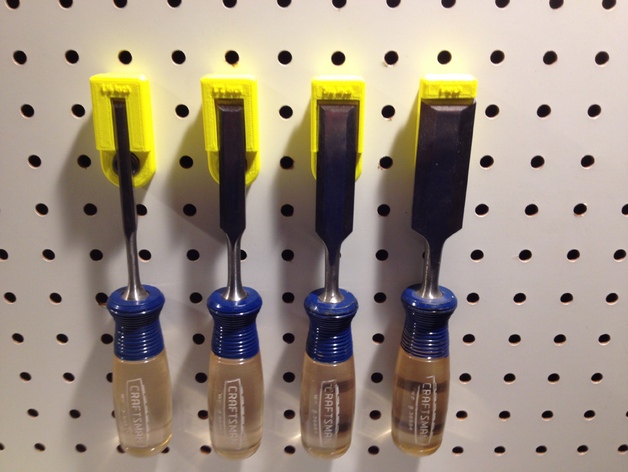
Magnetic Pegboard Chisel Holders
thingiverse
Magnetic chisel holders designed for a standard set of wood chisels including 1/4, 1/2, 3/4 and 1 inch sizes.The printed device involves two main components; the pegboard attachment that goes into a pegboard and the chisel holder secured with a strong magnet. A rare earth magnet from Lee Valley Tools is used along with a magnetic cup to keep the tool secure.I made this for users who own pegboards with one-inch spacing like those commonly sold by Home Depot stores and similar home improvement centers.www.leevalley.com To purchase, visit: leevalley.com/US/wood/page.aspx?p=32065&cat=1,42363,42348These parts are specifically made to match a pegboard with one inch hole spacings:http://www.leevalley.com/US/wood/page.aspx?p=32066&cat=1,42363,42348Here is a list of necessary components: High Friction Discs for 3/8-inch magnets - Part# 99K34.51 1/2" diameter for 3/8" magnet steel cup - Part# 99K32.52 Circular magnet - Part# 99K32.03 with a 3/8-inch diameterInstructions:Follow these simple steps to create your magnetic chisel holders: Settings (Recommended) Raft: On Supports: On Infill: Set it at 80% so that 'pegs' turn out strong. Shells: 3 layers is a good starting point. Layer Height: Keep it low, around 0.20mm.Now, here's how to assemble the tool holder: 1) Print four base pieces using your preferred method of printing. After they are finished, carefully remove them from the printer and clean the raft thoroughly around both pegs.Next step is filing for a perfect fit into a pegboard: 2) Remove supports as you clean out the peg area. 3) Drilling small holes on back part with a #43 drill will create holes to put chisels through. Make sure not to hit any screws so the holders turn into solid bodies. 4) Using an inexpensive tap like 4-40, fill in these tiny holes. Do not forget that each has two sides and the material could easily strip so do this with caution - use plenty of lubrication on the parts you're going to turn! 5) Finally drill the remaining hole at a certain point in the holders (for attaching magnetic cups). Then proceed drilling through 4 corresponding spaces in base where machine screws go in to connect both halves together. Do all these things carefully as there will likely be no 'give'. Now get ready to make those holders level: 6) On flat surfaces using sandpaper rub until no visible lines are seen. 7) Make sure the rounded sides don't obstruct magnets from properly locking onto base parts and cups inserted afterwards. Next, we will be inserting a magnetic cup: 8) Insert half inch diameter steel magnetic into appropriate hole in the holder where there should ideally still be a little clearance. Be gentle not too much or it won't stay attached due to slight spring force on sides from plastic molding.
With this file you will be able to print Magnetic Pegboard Chisel Holders with your 3D printer. Click on the button and save the file on your computer to work, edit or customize your design. You can also find more 3D designs for printers on Magnetic Pegboard Chisel Holders.
