Magnetic MMU - Drybox Interface
prusaprinters
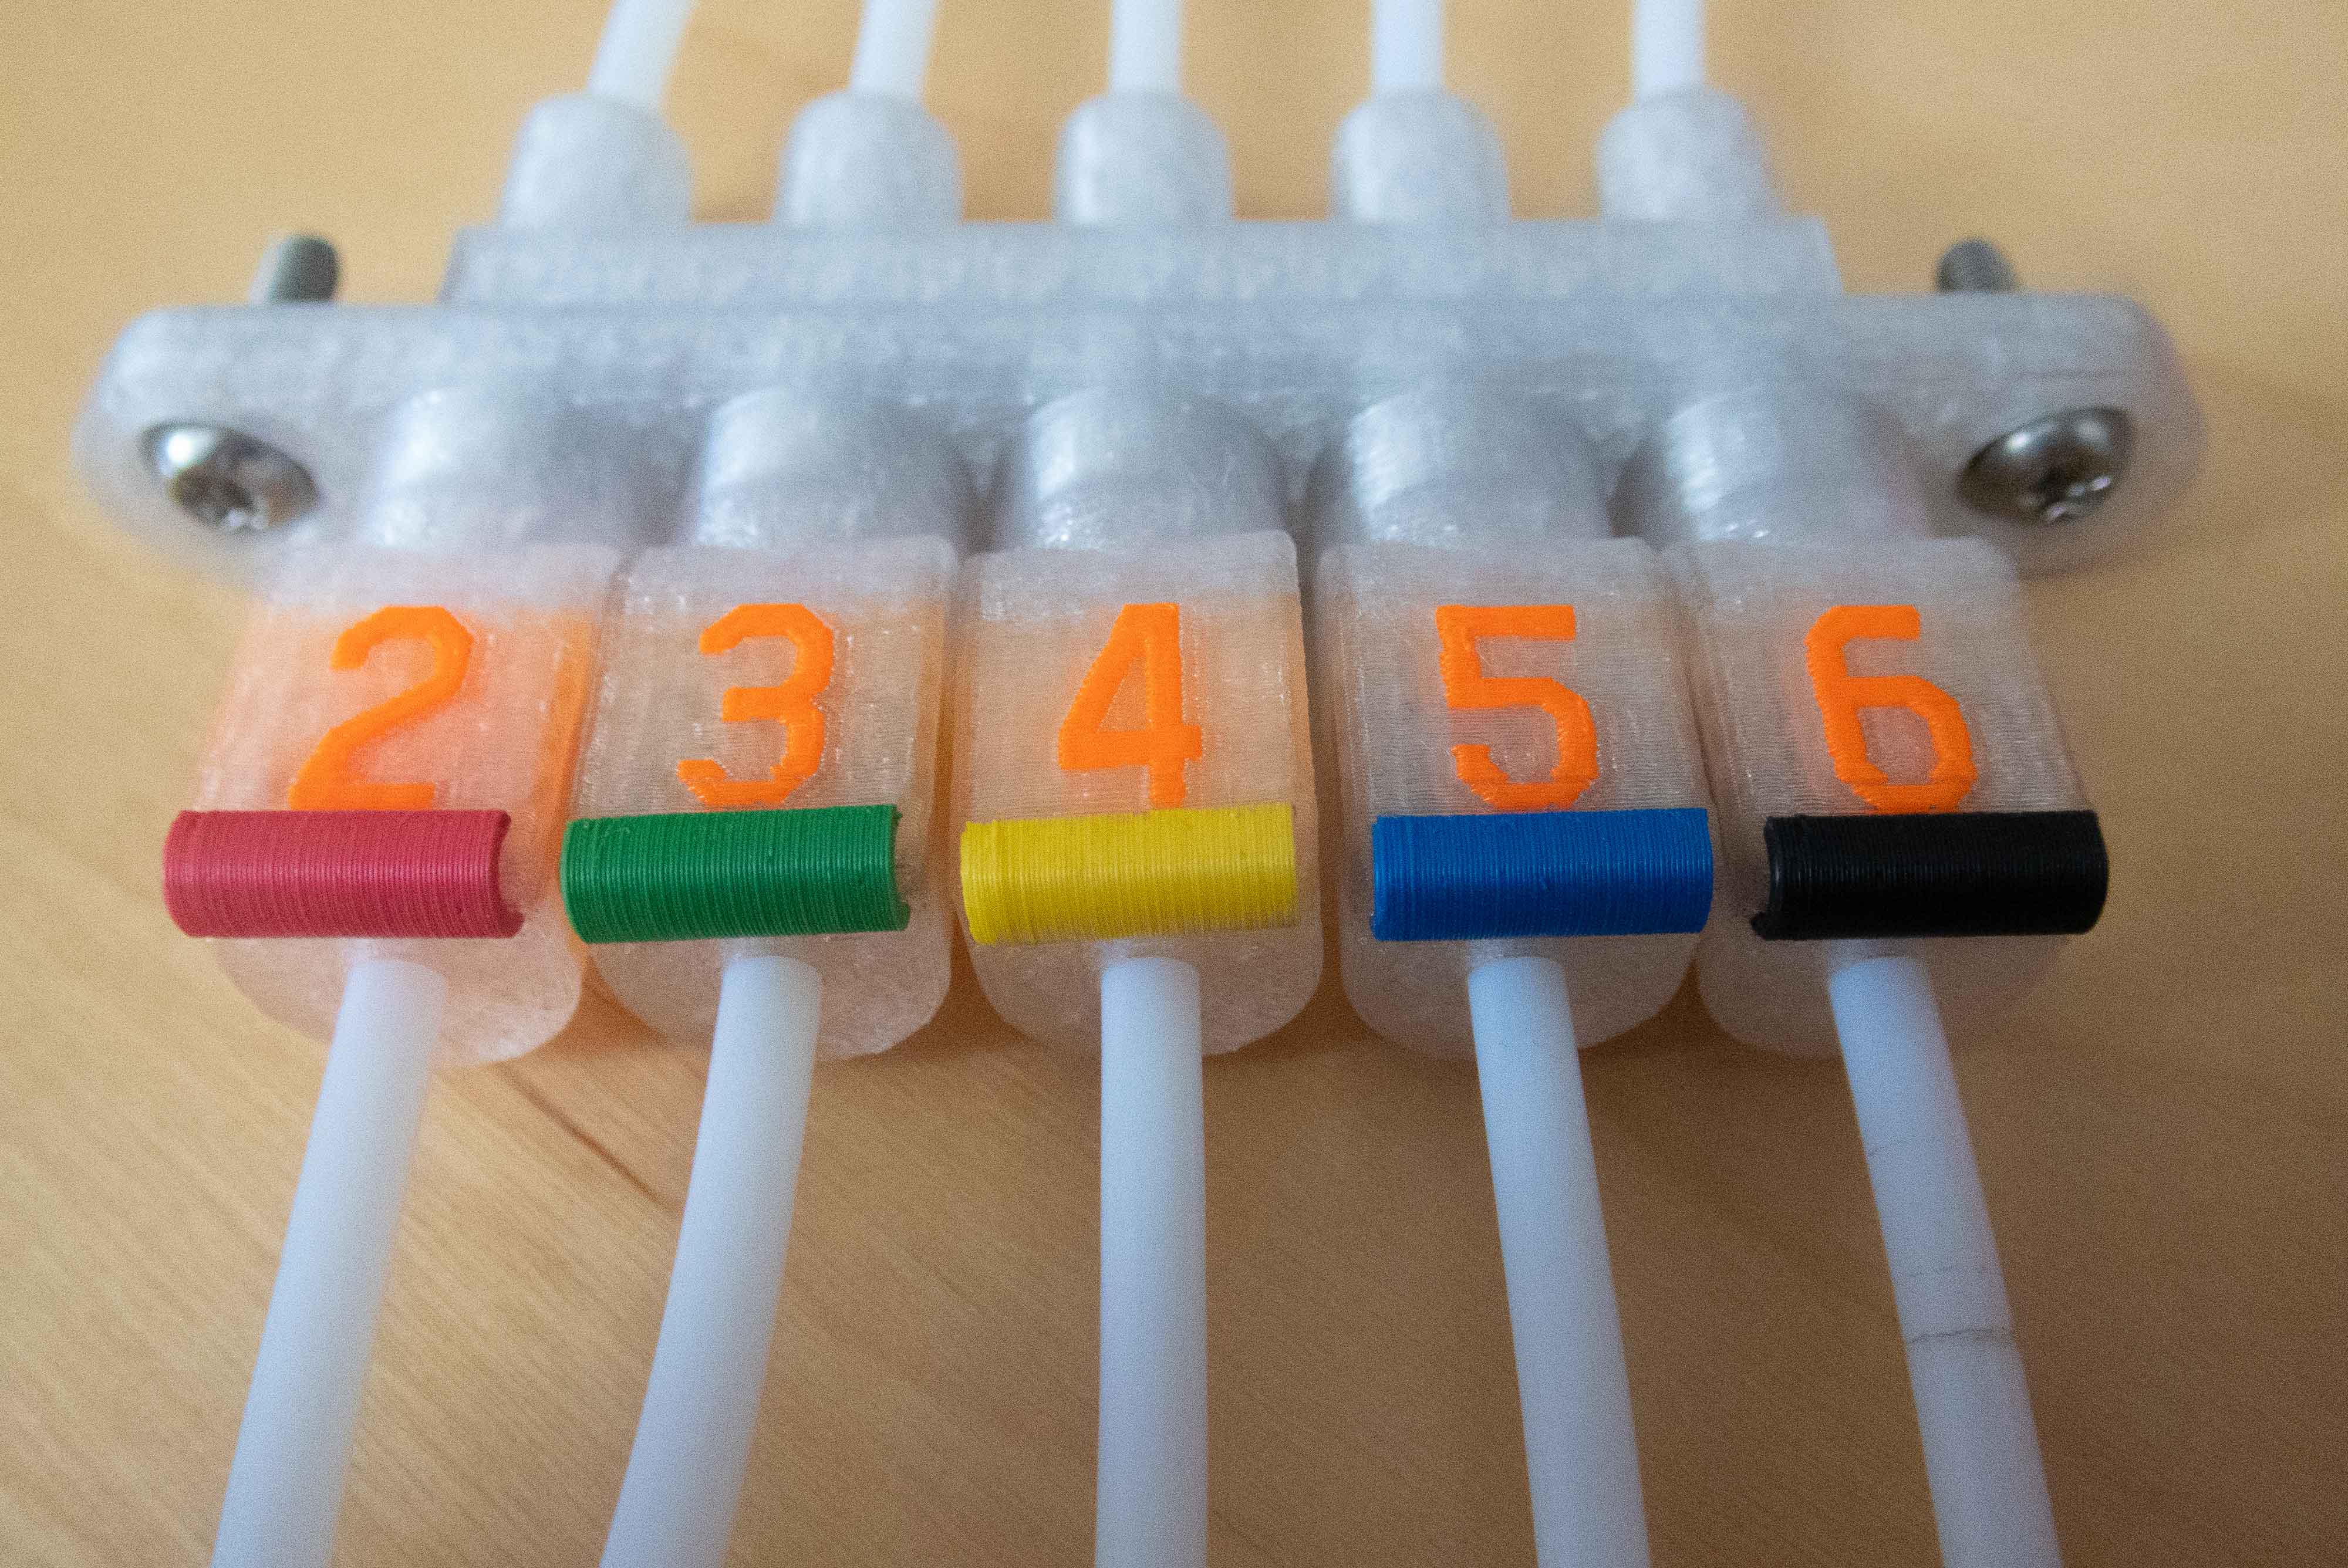
<h3><strong>Summary</strong></h3><p>Comfortably connect a drybox to a MMU inside of a 3D printer enclosure. Each PTFE tube can easily be identified by a number tag and can carry a color tag that can be taken from the tube end and be placed onto your MMU slot to indicate the loaded filament.<br>All PTFE tubes snap magnetically to the MMU interface and are sealed against moisture with magnetic end caps if not connected to the MMU interface.</p><h3><strong>Main Characteristics</strong></h3><ul><li>airtight filament path from drybox through the MMU interface up to the MMU</li><li>quick connect/disconnect of PTFE tubes making use of ring magnets</li><li>magnetic end caps for all PTFE tubes not connected to the MMU interface</li><li>possibility to use any metal surface to just snap all your PTFE tube ends to</li><li>number tags for the drybox slots</li><li>number tags for the PTFE tube ends</li><li>removable color tags on the PTFE tube ends to quickly identify the filament color</li><li>same color tags can be removed from the tube end and put to your MMU (when using a remix of the "underslung" MMU version)</li><li>designed for extending/connecting my <a href="https://www.prusaprinters.org/de/prints/146367-ikea-samla-45l-filament-buffering-dry-box">Ikea Samla 45l Filament Buffering Dry Box</a> to the MMU via a MMU enclosure interface</li></ul><h3><strong>Parts and Function</strong></h3><h4><strong>PTFE Tube End Connector</strong></h4><p><img class="image_resized" style="width:50%;" src="https://media.prusaprinters.org/media/prints/148893/rich_content/fe028a18-895f-4262-ad16-276400dd578f/p3110354.jpg#%7B%22uuid%22%3A%22a35469df-64ff-4b77-97d8-9e0cc3edd2a4%22%2C%22w%22%3A3040%2C%22h%22%3A2031%7D"></p><p>Multi-material print that holds a ring magnet that is used either to snap to a partner ring magnet in the MMU enclosure interface or to a partner ring magnet in a tube end cap. The PTFE tube can be pushed through connector and magnet.</p><p>The connector has a printed filament number on it to indicate the filament slot of the corresponding drybox.</p><p>If you print the dry box and all the parts connected to the drybox in the same color it is even directly visible which drybox is the source of a PTFE tube.</p><p>The ring magnets push fit in the connector. I recommend to stack all ring magnets in one row and take one off from the very same side as all magnets must be oriented in the same direction. </p><h4><strong>PTFE Tube Ring</strong></h4><p><img class="image_resized" style="width:18.8%;" src="https://media.prusaprinters.org/media/prints/148893/rich_content/8e0e3c2c-d66b-4e73-950e-836dcfcfebcf/p3110370.jpg#%7B%22uuid%22%3A%22e2ef46bc-7526-4f36-8e0a-b1e0a7188cf0%22%2C%22w%22%3A2672%2C%22h%22%3A4000%7D"></p><p>Multi-material print for indicating the filament number where the filament comes out of your drybox.</p><p><strong>PTFE Tube End Cap</strong></p><p><img class="image_resized" style="width:50%;" src="https://media.prusaprinters.org/media/prints/148893/rich_content/1814b7d4-5019-4c77-a2c2-a3c53f65c95c/p3110373.jpg#%7B%22uuid%22%3A%22ac5e9a0c-5537-4f02-91db-78881db90228%22%2C%22w%22%3A4000%2C%22h%22%3A2672%7D"></p><p>The tube end cap closes any open, not connected PTFE tubes against moisture.</p><p>When pressing in the magnet into the end cap please mind the magnetic orientation, which is opposite to the tube end caps.</p><h4><strong>MMU Enclosure Interface</strong></h4><p><img class="image_resized" style="width:50%;" src="https://media.prusaprinters.org/media/prints/148893/rich_content/9299b22c-c7f2-4ad2-91c6-cff1b0f22d22/p3110359.jpg#%7B%22uuid%22%3A%225f7e2ce9-6dd0-423f-ab2d-40952f926ba2%22%2C%22w%22%3A4000%2C%22h%22%3A1726%7D"></p><p>The MMU enclosure interface is designed to be screwed on a 3D printer enclosure and offers to snap on the PTFE tube end connectors of those filaments that shall be forwarded to the MMU slots.<br>Try to keep the filament path from the MMU to the MMU enclosure interface as short as possible as this filament path will have to be added to the filament length that is retracted from the MMU from the extruder and defines the filament length that has to be buffered. The additional filament path length is needed when you manually push back the filament between MMU enclosure interface and the MMU when you perform a filament change for the MMU. Please note that you don't have to take care of your filament buffer when changing filament on your MMU as long as the buffer is located inside your drybox or somwhere before your drybox.</p><p>When pressing in the magnet into the end cap please mind the magnetic orientation, which is opposite to the tube end caps.</p><h4><strong>Optional: Color Tag</strong></h4><p><img class="image_resized" style="width:50%;" src="https://media.prusaprinters.org/media/prints/148893/rich_content/98c7c5b7-6707-44fb-9bc6-ad9ed2bb1ee0/p3110361.jpg#%7B%22uuid%22%3A%2288d1d6c8-d3ef-4bff-8a45-8bbc69faa01e%22%2C%22w%22%3A3182%2C%22h%22%3A2126%7D"></p><p>The color tag is a small hook that is printed for every filament you are using. It either can sit on the tube end connector (when not connected to the MMU enclosure interface) or it can sit on the MMU itself at the corresponding LED of an underslung MMU control panel. I print one of these after I purchased a new filament or directly after doing filament calibration.</p><h4><strong>Optional: Tubes Separator</strong></h4><p><img src="https://media.prusaprinters.org/media/prints/148893/rich_content/de0a3231-f79e-42ab-8c5c-b016595d23e7/img_5723.jpg#%7B%22uuid%22%3A%22bb8366d6-12c4-4bf0-a7d4-fdf4395d231e%22%2C%22w%22%3A3971%2C%22h%22%3A2978%7D">The more tubes you have hanging around your dryboxes - the more you should use these to keep an overview. Choose combination and amount of separators from the original project so that it fits your needs. I also put some of these on the printbed in the 3MF project. You might need to apply some sanding before you close the parts so that the parts still glide with reasonable force applied.</p><h4>Print Instructions</h4><ul><li>Print tube end connectors and tube rings in one go to minimize the wipe tower when printing multi material. Use attached 3MF project file. Otherwise you manually have to split the included STL files in their parts and assign colors to the parts. </li><li>Use some brim if printing in PLA. Printing in PETG worked for me without any brim.</li><li>Supports are only needed for the MMU enclosure interface. You can easily break them off by pushing a screw driver through from the opposite side of the tube hole. Be sure to clean out any filament rests to get a flat surface for the ring magnets that are pushed in after print. </li></ul><h3><strong>Remixed Projects</strong></h3><ul><li><a href="https://www.prusaprinters.org/de/prints/111346-ptfe-tube-numbers-for-mmu2s-and-ercf">PTFE Tube Numbers for MMU2S and ERCF von Snympi | PrusaPrinters</a>: Here I used the idea of tube rings with two embossed numbers on each. I remixed to have the same character set for both ends.</li><li><a href="https://www.prusaprinters.org/de/prints/52352-magnet-filament-coupler-for-drybox">Magnet filament coupler for drybox von Fransiscus | PrusaPrinters</a>: This was the starting idea for having a magnetic MMU interface on the 3D printer enclosure. It reinterprets the work of Kenneth Henderick for his <a href="https://www.prusaprinters.org/de/prints/56687-filament-guide-with-magnets">filament guide</a> as "enclosure filament interface" for a MMU driven setup.</li></ul><h3><strong>Directly Reused Parts</strong></h3><ul><li><a href="https://www.prusaprinters.org/de/prints/25492-remix-prusa-mmu2-ptfe-tubes-separator/files">Remix: Prusa MMU2 PTFE Tubes Separator von trv | PrusaPrinters</a> for keeping your PTFE tubes organized.</li><li><a href="https://www.thingiverse.com/thing:4160261">Geert Font - A Font for 3D Printing by pbzJ - Thingiverse</a> for printer friendly numbers on tube ends and number tags.</li></ul><h3><strong>Related Projects</strong></h3><ul><li><a href="https://www.prusaprinters.org/de/prints/146367-ikea-samla-45l-filament-buffering-dry-box">Ikea Samla 45l Filament Buffering Dry Box von Canislupus | PrusaPrinters</a> is what I am using to store and buffer my filament spools.</li><li><a href="https://www.prusaprinters.org/de/prints/131601-never-lost-ikea-samla-clip-45l-65l">Never lost Ikea Samla Clip (45l + 65l) von Canislupus | PrusaPrinters</a> is for airtightness of Ikea Samla boxes.</li><li><a href="https://www.prusaprinters.org/de/prints/148879-mmu2-underslung-control-panel-color-code-clip">MMU2 Underslung Control Panel + Color-Code Clip von Canislupus | PrusaPrinters</a> is the part where the color tag moves to when unplugged from its tube end connector.</li><li><a href="https://www.prusaprinters.org/de/prints/56687-filament-guide-with-magnets">Filament guide with magnets von Kenneth Henderick | PrusaPrinters</a> is the project that inspired me to use a similar approach when using a MMU.</li></ul><h3><strong>Non-printed Material</strong></h3><ul><li>Some meter of <a href="https://www.ebay.de/itm/292531241606">PTFE tube (outer 4mm, inner 2-3mm)</a> from drybox interface to MMU interface, depending on your setup</li><li>2 <a href="https://www.amazon.de/dp/B08XLT9TY3/ref=pe_27091401_487024491_TE_item?th=1">Screws Torx / M4 x 16 mm DIN ISO 7380-1</a> with nuts and 2 washers each</li><li>Optional - but highly recommended: Magnetic wall or surface as part of your 3D-printer enclosure for snapping all loose PTFE tube ends to your enclosure</li></ul><h3><strong>Tipps and Lessons Learned</strong></h3><ul><li>Preferred inner diameter for PTFE tubes from MMU to MMU interface is 3mm. This eases retraction of thicker filament tips form MMU to the MMU interface for subsequent closing with the filament caps.</li><li>Preferred outer diameter for PTFE tubes from MMU interface to drybox is 2mm. These tube not tend to bend.</li><li>Be sure to have addtional filament buffer capacity for the additional retraction path from MMU to the MMU interface if you do not use my <a href="https://www.prusaprinters.org/de/prints/146367-ikea-samla-45l-filament-buffering-dry-box">Ikea Samla 45l Filament Buffering Dry Box</a>.</li><li>Use the same color you use for printing your drybox (except for the MMU enclosure interface that can match your enclosure color). Doing so, you quickly identify the the drybox you are looking for. Together with the number tags on the tube end connector and the drybox end you do not have to follow the tube paths to quickly find the corresponding box and drybox slot. If you locate all PLA in one drybox and all PETG in another drybox it is also possible to quickly select the filament material as well.</li><li>Using tube separators like <a href="https://www.prusaprinters.org/de/prints/25492-remix-prusa-mmu2-ptfe-tubes-separator/files">Prusa MMU2 PTFE Tubes Separator</a> is highly recommended - at latest if you are using multiple dryboxes.</li><li>If you use a magnetic wall or sheet of metal for snapping your filament onto for quick access, you cannot line them up in one exact row because of the magnets. Either you keep distance between the tube ends or you line them up in two offset rows as shown on one of the pictures.</li></ul><figure class="image image-style-align-center image_resized" style="width:75%;"><img src="https://media.prusaprinters.org/media/prints/148893/rich_content/231c454f-5006-4055-beb3-21ec2a7f9bf4/p3110371.jpg#%7B%22uuid%22%3A%227dc79193-2dd4-4107-8071-995618071de4%22%2C%22w%22%3A4000%2C%22h%22%3A2672%7D"></figure><ul><li>There might be changes on this project as I didn't decide on the concrete type of enclosure yet. So the MMU enclosure interface may be subject to change.</li></ul><p> </p><p> </p><p> </p><p> </p><p> </p><p> </p>
With this file you will be able to print Magnetic MMU - Drybox Interface with your 3D printer. Click on the button and save the file on your computer to work, edit or customize your design. You can also find more 3D designs for printers on Magnetic MMU - Drybox Interface.