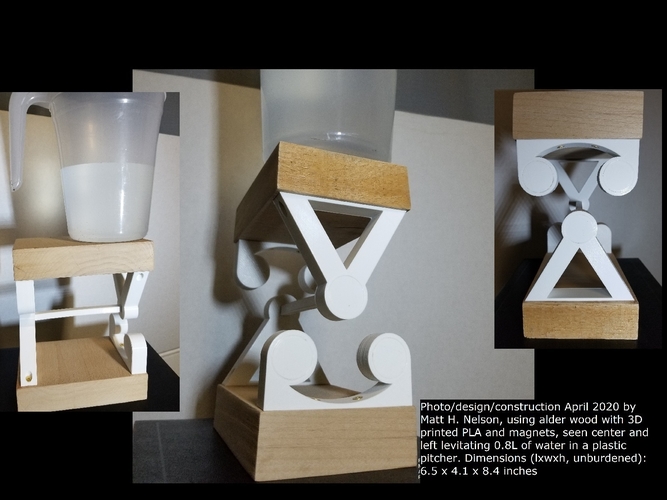
Magnetic levitation system by Matt Nelson, April 2020
pinshape
The world's first levitating platform using permanent magnets! DIY -- you buy the magnets, screws, and wood yourself. If you are able to build these and sell them, congratulations. Please Paypal me a 15% gratuity from your revenue to matthnelson@yahoo.com (donations accepted!) -- Otherwise, enjoy this challenge! The final placement of the hovering platform is quite satisfying, if a little stressful. Read all instructions below carefully before contacting me, please. Heed the safety warnings. Find better photos here: https://www.flickr.com/photos/... I'm not applying for a patent because I can't afford the lawyers. This arrangement of magnets is however my intellectual property. If you can think of a good application for this design besides art, let me know. My best idea is a levitating display case. I made one out of plexi and smaller magnets -- different dimensions. Image here: https://www.facebook.com/photo... If you want to partner in a business enterprise, please shoot me a message with ideas on how to proceed. I don't think Kickstarter would generate much interest. Thanks. Included with download are the stl files for the 2 magnet holding pieces (print 2 of each), plus the magnet covering caps in two thicknesses, and the central beam. 4 each of the magnet caps are included in the files, the thicker for the 2-magnet pieces. So you will have 2 extra thin disc pieces unless you can edit the file. When printing the magnet holding pieces, I used rafts and supports everywhere. I'm only a beginner in 3D printing (4 months), by the way. The central beam is critical. It should be 9 mm square to fit the hole as designed, but that size didn't fit my PLA hole. Therefore the stl file is smaller than it should be. It must be a tight fit, so I apologize ahead of time if you must fiddle with the beam width. Print the beam last in order to measure the hole. The design is symmetrical, so it can be turned upside down and be virtually identical. It looks good using black for the 2-magnet pieces and white for the singles. See an example of an early design using smaller magnets here: https://www.flickr.com/photos/... Magnets required -- 6 of the 1-in. diameter by 0.5 in. thick, N52 strength Neodymium iron boron, which cost about 8-10 bucks each. (Lower strengths untested.) Build at your own risk. These magnets are powerful (each has a 61-lb. pull strength) and therefore dangerous. By downloading you accept the risk. Protective glasses should be worn when handling, because the magnets can break if allowed to snap together from a distance. Keep magnets away from children. When placing them in the 3D printed pieces, make sure the 3 outer facing sides (on each side of the platform) all repel each other. I use a compass to check that north always faces outward, toward the caps (all south works, too). Caps face out for aesthetic reasons, also. Wood or other platform material required -- dimension: 6.5 inches by 4.1 in., allowing for about 2 mm of space on the edge around the 3D printed pieces, which are both 100 mm, or 3.94 inches wide. (Or you can build two sets and put one at each end of a shelf! ... which unfortunately lowers the capacity the longer/heavier the shelf. Likewise, lengthening the central beam and the platform lowers the capacity.) One of the 6-magnet designs with these dimensions can hold a cup of coffee on one side, but do so at your own risk! The pitcher of water I sat on top (see image) had about 0.8 liters, so about 2 lbs. total -- and only sat for 2 minutes. I recommend displaying the platform with nothing on top. Screws required -- #6 (brass is easier to install) 3/4-in. or shorter if you use a thin platform material. You will need a drill. The holes through the 3D printed material are set at 15-degree angles, FYI -- angled inward on the triangular pieces, outward on the scroll-like pieces with 2 magnets. Do not drill straight down. Super glue required. Take precautions when handling. Use a small amount in each square hole for the beam(s), about one drop spread over the inside surfaces. Insert magnets before applying glue, so during the final placement the glue will set with the beam at the proper angle. During the final placement hold each side and compress for one minute. Carefully remove your hands to see if the beam is still loose, in which case you remove the assembly and repeat with another small amount of glue. (Compress for 2 minutes the next time, in case you used too much glue!) The magnet caps shouldn't need to be glued, but if so, then apply a very small amount (about half a drop on 2-3 points of the inside lip of the magnet hole, not on the sides of the caps. Do not glue the magnets, in case you want to use them for another project, like perhaps an upgraded version of this design! The sense of satisfaction upon completing the build (a brand new design April 2020) should be well worth the cost -- and hopefully worth the challenge of aligning the magnets. Be careful. If you want to buy one complete, see my Ebay listing. Bidding starts at $500.00 -- https://www.ebay.com/itm/Magne...
With this file you will be able to print Magnetic levitation system by Matt Nelson, April 2020 with your 3D printer. Click on the button and save the file on your computer to work, edit or customize your design. You can also find more 3D designs for printers on Magnetic levitation system by Matt Nelson, April 2020.
