Magnetic Label holder with glass insert / Magnetisches Schild mit Glas Einsatz
prusaprinters
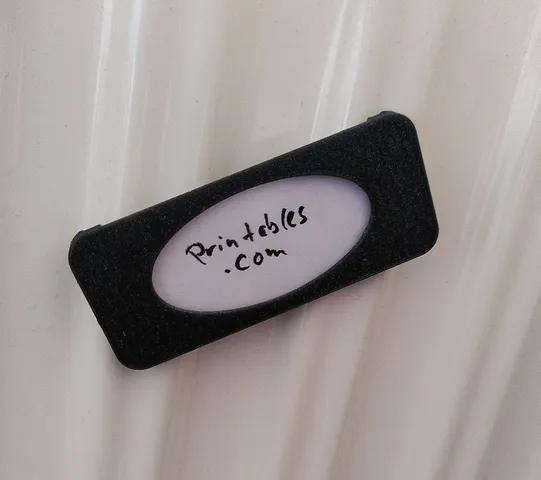
This print enables you to put nice labels on closets, fridges, doors, drawers, boxes, whatever. The label is protected by a glass plate, so it looks a bit more shiny. And when it is touched, the paper does not crumble. It can print without support, and if you have the workflow dialed in, it takes only about 30min per label from start to finish. You might get away with printing just the modell without the support stuff…. didn't try. Depending on your bridging it might just work out ok. DisclaimerYou will work with glass here. It can be sharp around the edges. It can break and be extra sharp then. There are sharp blades involved and so on. If you feel not comfortable with this, don't do it. You are the decider of what you print and build. I just show you what i came up with. BackstoryIn the video about the gridfinity system, Zack Freedman mentioned that he will publish something with uses microscopic slide / specimen holders as window. That got my attention. I ordered those holders, but i picked the wrong kind, they have a holding area which is milkglas. ("Mattrand" in german) I have a glass scoring pen, which I use to score and break the glass (pretty clean cuts). Then I came up with the idea of a label holder. Using the glass as protection for the paper label in the back.While designing and testprints the idea of adding magnets came to me, so thats what I did.Preparation and Printing instructionsYou will need:1x specimen holder (objektträger). They are usually sold in 25x75x1mm, sometimes 25x50x1mm. Depending on the holder you print you might need to cut the glass to fit. See next.optional: 1x glass cutter and print the jig. I printed the jig in PLA and modified the infill to be 50% in the upper area to have enough support, but thats not really needed I think. Score the glass multiple times at the top from both sides. Tap tap tap, if it does not break, score some more, tap tap tap. Repeat until Pling. If you are a risktaker, there seems to be a way to stress and break scored glass with fire and water…. but that's totally on your own risk.optional: 2x round magnets 2mm x 5mm in diameter.the support helper in the correct sizehairspray, or other bed adhesion provider, but also separator. (i only tested hairspray)Preparation of the support helperTake the printed support helper for your size, spray it with hairspray on one side. This is needed, to get the helper out of the holder again. It keeps the plastic from sticking to the plastic of the helper. PrintingPrint laying with the opening down. I set the bottom infill pattern so something I liked (Hilbert Curves).Insert a pause 3,2mm (When using 0,2mm layers, thats layer #16) Or where the layer is printed which covers the magnets and the back. When paused, insert the magnets (maybe use some glue, for me it was a tight fit, no glue needed). The red arrow shows where the tap of the helper should be sticking out. The picture is from a previous testprint, without a tap and printed support. Didn't work so good, it's very hard to get the glass out. I broke in my attempt. With the tap, no problem there. Lay the support helper in the opening. In my test the tolerances were fine. If there are some lumps in your print, this might be a problem. Check if the support helper is below the side of the print. Finishing MovesAfter the print is done, remove the support helper, this might take some tools. Depending on your hairspray, it might be enough to wiggle the helper out. I just needed to pull and it came out easily. Maybe go between the helper and the print with an x-cato knife. Be careful, it is sharp. Put a clean glass in (or dont… you can put in just a paper or card or whatnot), add the label in the back and enjoy. Either put it on metallic surfaces or use tape to glue it in place. Or drill a hole (or make it in the slicer) and nail or screw it somewhere. Also maybe rivets will work?! You could also use it as a nametag. Just use another set of magnets on the back of your shirt and attach it to it. If you do it, please post a make. That should be it. UPDATE 3rd May 2022Added two versions for 25x75mm slidesAdded rectangular window versionUPDATE 4th of May 2022Added the support helpersPlanned updatesVersion for the full size 25x75mmVersion with screwholesmore opening options (rectangular, double etc.)Fancy frontplateFeel free to add a remix.
With this file you will be able to print Magnetic Label holder with glass insert / Magnetisches Schild mit Glas Einsatz with your 3D printer. Click on the button and save the file on your computer to work, edit or customize your design. You can also find more 3D designs for printers on Magnetic Label holder with glass insert / Magnetisches Schild mit Glas Einsatz.