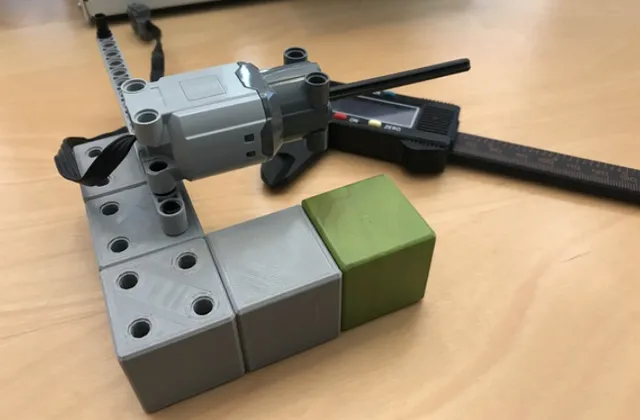
magnetic block (Tegu compatible, with pin sockets)
prusaprinters
SummaryCombine magnetic blocks with pins and beams!The model uses up to six 12x3 mm neodymium magnets that are embedded in print (for safety). Six-sided cubes will work with magnetic toys (e.g., tegu) and has pin holes designed to work with with popular pins-and-beams building toys (e.g., technic).Please see the mag_block adapter (https://www.thingiverse.com/thing:3939667) to combine it with stud-block style toys (i.e., with duplo).Don't have any other magnetic toys to play with? Print some gears (like in the photo)! (https://www.thingiverse.com/thing:3939688)Print SettingsPrinter brand:Monoprice Printer:Select Mini Rafts:Doesn't Matter Supports:No Resolution:0.2625 mm Infill:10% Filament brand:Hatchbox Filament color:Cool Gray (discontinued?) Filament material:PLA Notes:HOW TO EMBED MAGNET IN YOUR PRINTYou'll need to pause the printer at the correct height to insert the magnet, right before the layer that closes the magnet hole (see pictures of some of magnetic projects I made, which are magnetic pin and gear).If you are using CuraIn order to find the correct height to pause to insert magnet, go to preview menu and find out which layer to stop (mine was layer 15, but you should check). If you are using Cura, use Extensions>Post-Processing>Modify_G_code to pause the printing at the correct height (use layer height instead of mm to ensure precise step to stop).Printing TipsIMPORTANT: Make sure you park the head AWAY from the model so you won't burn your fingers when placing magnets!I've used MP Mini Select V2 - the x-axis arm is metallic and tends to pick up magnets if it comes too close to the build. In order to prevent this from happening, you can use three approaches. 1) If the model is small enough, you can print multiple models by placing it side-by-side so arm will never be close enough. 2) use painter's tape (e.g., Blu-Tape) to hold the magnet in place. The head will print over the tape and will help hold the magnet in place, and has no noticeable effect on the quality of the print (blue tape will be entombed in the print along with the magnet). 3) For vertical surface magnets, you can use extra magnet to hold the interior magnets from outside (see pictures). How I Designed This I've started with basic magnetic block design using FreeCAD, but decided to try my hands on learning OpenSCAD. While coding was effortless, rounding the edges using Minkowski algorithm was imprecise and had to make prototypes to ensure that the cubes had the correct dimensions (could have used stl files to see the final dimensions, but generally applicable automation may be difficult).
With this file you will be able to print magnetic block (Tegu compatible, with pin sockets) with your 3D printer. Click on the button and save the file on your computer to work, edit or customize your design. You can also find more 3D designs for printers on magnetic block (Tegu compatible, with pin sockets).
