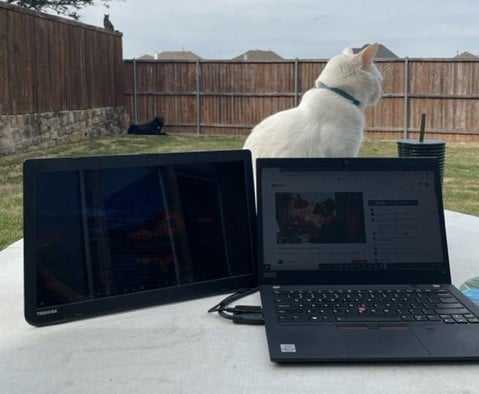
LVDS Case - Portable/Wall Mount Computer Monitor
thingiverse
Portable computer monitor so you can be outside with your 4-legged coworkers! This is built out of an old laptop screen/housing using a plug and play LVDS board. Can be used with kickstand or mounted to the wall on thumb tacks. **I used the threaded inserts linked at the bottom, but included files that should work for tapping. I also used hex standoffs to mount the housing/board, but added files for printed spacers to be used instead.** Steps: 1) Get an old laptop with a working screen and make sure the model number is compatible with the LVDS board linked at the bottom. (If you take the laptop apart, you should find a model number on the back of the screen). 2) Separate the laptop screen and its housing from the rest. (I used a grinder to trim the metal hinges from the screen mount). 3) Print the parts. Hole guides are just to help line things up and confirm accuracy with holes on the LVDS board. If you have decent bridging, the mounting spot for the smaller board is the only thing that needs support. 3 spacers, 2 hangers, 1 of everything else. 4) Add threaded inserts or test tapped holes. 2 on the main housing where the small board with buttons sits, 2 for the kickstand base, 2 for each spacer, 2 for each hanger. 5) Plug the smaller board in through the hole on the printed housing and screw it into its spot. 6) Attach the main LVDS board to the housing using spacers 7) Decide on placement for each part. The top of the kickstand base should be 5" from the bottom of the monitor housing. (Remember to leave clearance for the hdmi/power supply cords). 8) Drill out the holes in the screen housing. A long slot will also be needed underneath the main housing for the LVDS wires to pass through. 9) Attach the parts. The kickstand is made to be squeezed into the hinge base. 10) Plug the monitor in and put the housing back together. Tools: - Drill/Drill bits - Grinder if removing hinges - Soldering Iron if using threaded inserts - Dremel to cut slot for LVDS cable Hardware: - 3 m3x6 bolts for top of printed housing - 11 m3x3 bolts (3 to attach printed housing to monitor housing, 2 for the small board, 2 for the kickstand, 4 for the wall hooks) Optional: - 14 m3 threaded inserts $9 https://www.amazon.com/gp/product/B01IYWTCWW/ref=ppx_yo_dt_b_asin_title_o01_s00?ie=UTF8&psc=1 - 3 Hex Standoffs $3 + Shipping Harwin Part Number: R30-3001802 Other: - HDMI/VGA - LVDS Controller Board $26 https://www.amazon.com/gp/product/B01N5J57YP/ref=ppx_yo_dt_b_search_asin_title?ie=UTF8&psc=1 - USB/Power Cable for LVDS $8 https://www.amazon.com/CCYC-Voltage-Converter-Supply-Adapter/dp/B075YMHXQZ Compatible monitors: o 14inch 1366*768: o LTN140AT02 o LTN140AT07 o LP140WH1 o BT140XW02 o HT140WXB o HSD140PHW1 o N140B6 o B140XW01 o B140XW02 o B140XW03 o LP140WH1 o LP140WH3-TL o LP140WH4-TL o 15.6inch 1366x768 o LTN156AT17 o LTN156AT02 o LTN156AT24 o LP156WH2 o LP156WH4 o BT156GW02 o N156B6 o B156XTN03 o B156XW02 o B156XW04
With this file you will be able to print LVDS Case - Portable/Wall Mount Computer Monitor with your 3D printer. Click on the button and save the file on your computer to work, edit or customize your design. You can also find more 3D designs for printers on LVDS Case - Portable/Wall Mount Computer Monitor.
