Lucky 13 remix: Rush
prusaprinters
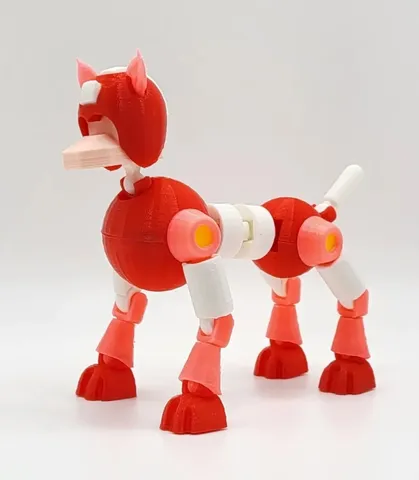
I'm going back to retro video game characters for a minute and making some Mega Man skins. If you're looking for the other skins in the pictures, you can find the Mega Man skin here and the Mets skin here.Recently I made a Lucky 13 Spider-Man skin that used 5mm x 3mm magnets in his hand and feet. That worked so well that I think I'm going to use magnets in more of my skins going forward, starting with this skin. I've made two different versions of the Chest and Waist. The first is the standard snap together version. The other version uses 3mm x 1mm neodymium magnets. You will need a total of 16 magnets (4 for each half of the Chest and Waist) to use the “Mag” versions of the Chest and Waist. The model would assemble the same way. LUCKY 13 PIECES NEEDED On top of downloading my files, you will need to download just a couple of the pieces from the original Lucky 13 model. I've separated them by color to help make it easier. If there is a [2X] or [4X] in the title, that means you need either two or four of that piece. That goes for both the files that I've uploaded as well as the Lucky 13 pieces I'm linking to below. WHITE00A04 [2X] armature abdomen.stl00A09 [4X] armature upper arm.stl RED00A05 armature waist.stl00A06 armature hips.stl ASSEMBLY Assembly of the Rush model isn't too difficult. Start by taking Chest - Red and fit it between Chest 1 - Red and Chest 2 - Red. Put that off to the side for a minute and assemble the waist in a similar fashion. Connect 00A05 armature waist.stl to 00A06 armature hips.stl and then fit the waist/hips between Waist 1 - Red and Waist 1 - Red. Attach Tail - White as seen in the picture below and put that to the side.Combine Abdomen [2X] - White with 00A04 [2X] armature abdomen.stl and then attach the completed chest, abdomen and waist together as shown in the picture below. The leg assembly is fairly simple. Start by taking Front Clavicle [2X] - Yellow and fit it into Shoulder [4X] - Pink. Next, fit Upper Leg [4X] - White onto 00A09 [4X] armature upper arm.stl and then fit Shin 1 [4X] - Pink onto Shin 2 [4X] - Pink.Then fit the shoulder, upper arm, shin and foot together as seen in the picture below. The only difference between the front leg assembly and rear leg assembly is the use of Rear Clavicle [2X] - Yellow in the rear legs rather than Front Clavicle [2X] - Yellow. Assembly of the helmet is super easy. Fit Ears - Pink, Helmet part 1 - White and Helmet part - White into Helmet - Red as seen in the picture below. NOTES:The Mag Chest and/or the Mag Waist will only be able to be printed at 100% due to it using 3mm x 1mm magnets. Any size other than 100% will require the pieces to be altered. Be sure to check out all of my Lucky 13 skins hereShoulder [4X] - Pink, Helmet part 2 - White, Mag Waist 1 - Red (optional), Mag Waist 2 - Red (optional), Mag Chest 1 - Red (optional), Mag Chest 2 - Red (optional), Waist 1 - Red, Chest 1 - Red and Helmet - Red will all need supports.I'm sure there are things I'm missing so this will probably be updated over the next couple days.
With this file you will be able to print Lucky 13 remix: Rush with your 3D printer. Click on the button and save the file on your computer to work, edit or customize your design. You can also find more 3D designs for printers on Lucky 13 remix: Rush.