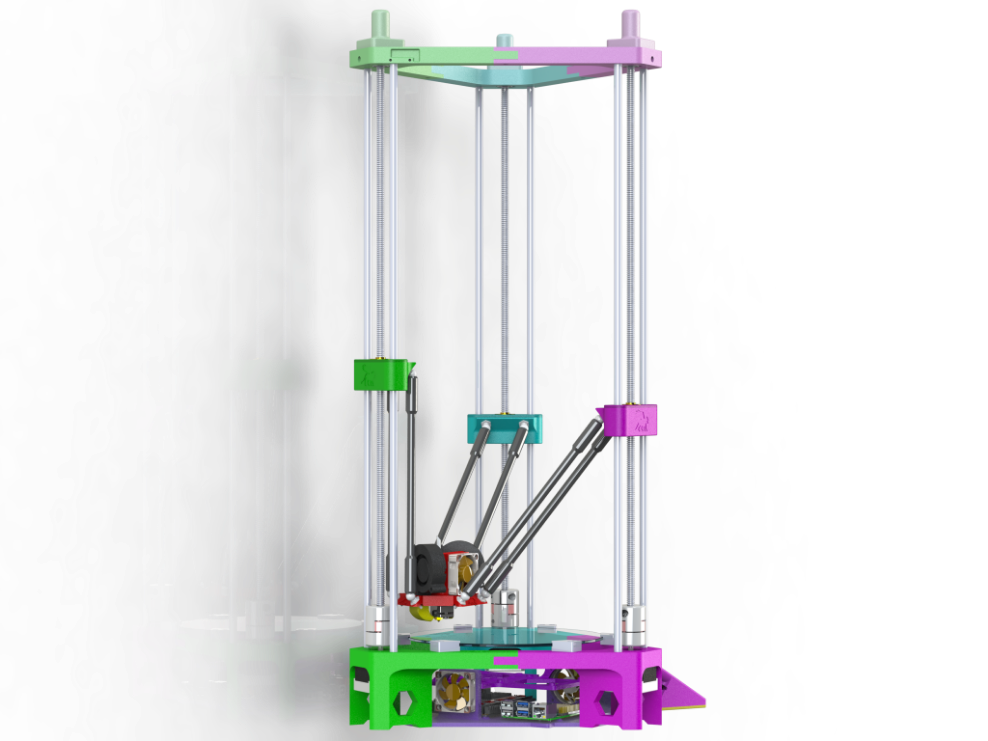
LSD! Lead Screw Delta Printer
thingiverse
So sitting at the table watching my little [Rostock Nano](https://www.thingiverse.com/make:715849) go one of my friends says "Hey! Why not [3DLS](https://www.thingiverse.com/thing:4031698) that?" and I got mad, then I did. #[Introduction Video!](https://youtu.be/7AYym_ZAdas) This machine is a mini, it's 200x300 build volume or so. I'm sure it can be scaled up but I have no need for a large delta. It's all printed and since I have a lathe I set it up to use the 8mm rods as structure. They are drilled and tapped M4 to bolt the machine together. Parts are sized to fit snug and may require additional hand work to get a perfect fit. This is to maintain tight tolerances. It's designed to use [Haydn Huntley’s MagBall Arms](https://www.magballarms.com/) at 215mm for the smoothest and tightest operation. Electronics wise it's got a SKR 1.3 with TMC2209 drivers and a 24v supply. It uses large steppers to drive the leadscrews. #BOM: Lots of filament. This is setup to run a BLtouch but it's optional. E3D V6 or equivalent. Your favorite extruder and motor! Lots of wires.... M4x12 screws to hold the uprights. M4x25 screws to secure the upper and lower sections together. Assortment of M3 screws to attach motors. [Some 608ZZ Bearings](https://www.amazon.com/gp/product/B07DZDLB3N/ref=ppx_yo_dt_b_search_asin_title?ie=UTF8&psc=1) [3 Collar Locks](https://www.amazon.com/gp/product/B012T3FHXK/ref=ppx_yo_dt_b_search_asin_title?ie=UTF8&psc=1) [12864 LCD kit](https://www.amazon.com/BIQU-Version-Graphic-Display-Controller/dp/B01FH8KTZU/ref=sr_1_2?dchild=1&keywords=12864+lcd&qid=1615822525&sr=8-2) [Large 2.1a stepper motors](https://www.amazon.com/gp/product/B00PNEQUZ2/ref=ox_sc_act_title_3?smid=AWQBCGWISS7BL&psc=1) [200mm Glass Bed](https://www.amazon.com/gp/product/B076BL3LC8/ref=ox_sc_act_title_4?smid=A3HCJ70Z0RHBT6&psc=1) [600mm 4 start lead screw](https://www.amazon.com/gp/product/B07FTH7T9M/ref=ox_sc_act_title_2?smid=A31QZVWR40HWH8&psc=1) [600mm x 8mm smooth rods](https://www.amazon.com/gp/product/B07SKMBKWJ/ref=ox_sc_act_title_5?smid=A31QZVWR40HWH8&psc=1) [Igus Drylin LM8UU bearings x12](https://www.amazon.com/Pieces-Igus-RJ4JP-01-08-Printer-Bearing/dp/B076NWK2NK/ref=sr_1_3?dchild=1&keywords=drylin&qid=1615819098&sr=8-3) 2x [50mm 24v Blowers](https://www.amazon.com/WINSINN-Bearings-Brushless-Cooling-50mm15mm/dp/B08R9G2VDR/ref=sr_1_4?dchild=1&keywords=50mm+24v+blower&qid=1615822317&sr=8-4) 3 x [Noctua 40x10mm 12v fans](https://www.amazon.com/Noctua-Cooling-Blades-Bearing-NF-A4x10/dp/B009NQLT0M/ref=sr_1_1?dchild=1&keywords=noctua+40mm&qid=1615829349&sr=8-1) or some other brand but these ones are so nice. [Endstops](https://www.amazon.com/CHENBO-Endstop-Mechanical-Switches-Printer/dp/B01CS82B8K/ref=sr_1_2?dchild=1&keywords=end+stops&qid=1615820215&sr=8-2) I decided to run the [BTT S42B Closed Loop Control](https://www.biqu.equipment/products/bigtreetech-s42a-42-stepper-motor-closed-loop-driver-board-with-oled-display?variant=31362657484898) on all 3 axis. You'll need some M3 Self threading or Plastite screws about 4mm long for mounting endstops and circuit boards and 10mm long for mounting the bearing caps and other plastic parts to each other. I used a 360watt 24v power supply. There's space in the electronics tray for a Raspberry Pi, SKR, [Quad MOSFET board](https://www.amazon.com/NOYITO-4-Channel-MOSFET-Isolated-Arduino/dp/B07CRJLJWY/ref=sr_1_18?dchild=1&keywords=4+mosfet+board&qid=1615819298&sr=8-18) and 2 voltage converters. [One for 12v from 24v](https://www.amazon.com/EPBOWPT-Converter-Regulator-Module-Transformer/dp/B07V6X6L89/ref=sr_1_6?dchild=1&keywords=24v%2Bto%2B12v&qid=1615822101&sr=8-6&th=1) and [one for 5v from 24V](https://www.amazon.com/EPBOWPT-Converter-Regulator-Supply-Transformer/dp/B01M03288J/ref=sr_1_6?dchild=1&keywords=24v+to+5v&qid=1615822110&sr=8-6) to power lights, fans and the RPI from a single 24v power supply. #Optional Filament Switch This uses the same switches as the endstop and mounts to the top with some of the extruder mounting holes. The inlet side is nicely curved and the output side is sized to take a M6 compression fitting for bowden tube to keep things neat. Definitely needed for the flying extruder. #Optional Heated Bed You can get a heated bed made to about 180mm round 24v from China on Ebay pretty cheap. I used some thermal glue to put a thermistor same as the hotend in the middle of the heater on it's back side. This is fine and plenty close enough for a bed. You should insulate it though, I just used [these cheap 220mm square ones](https://www.amazon.com/Self-Adhesive-Insulation-220mmx220mm-Waterproof-Compatible/dp/B07KSPNZGM) cut to fit. Set the bed limit in Marlin to 60c if printed from PLA or PETG and 80c for ABS to not melt the printer. #Optional Strong Base This is just a big fat reinforced base. It uses the same M5x30 screw in the top but also a M4x25 screw in the side. It just has a lot more beef to it. #Optional Chain Link Wire Management This goes between top and bottom to keep things neat. You need 36 links for this with one of the link top mounts and lower link mount. #Settings for Marlin are as follows: Delta Height = 313mm Delta radius = 220mm Delta diagonal rod = 215mm Delta Printable radius = 195mm I added 2 x 10mm holes and a 13mmx40mm recessed area on the effector to pass wires through and install a small LED light strip under it. I uploaded a screenshot of the electronics base in Priusaslicer for the 3DLS. It's a 235x235mm bed and fits with plenty of room. #I have not yet finished mine so consider this subject to change. I just changed everything in fact to give it more room to move within it's own self. #Thank you! #For more information join our [Discord](https://discord.gg/SW4AhK2UsY) #Parts are ordered and printing has begun! -Update 4/17/2021 Added a LED Light strip mount that slides over the smooth rod uprights to hold 55mm or so strips of LED light tape.Also added captive nuts for the upper and lower mounts. They use M5 hardware. Made an extruder mount that screws to the top parts with M3 plastite screws. Can be mounted inside or outside of the bar. There's a 0 degree and a 90 degree extruder mounts. -Update 4/19/2021 Added a flying extruder option for those who might want it, Also added a filament sensor that uses the same switches as the end stops. -Update 4/3/2021 Added 1 piece top and bottoms. Found a thin spot in the effector, re uploaded with improved design. - Update 4/10/2021 I'm putting it together and finding my errors. Many small changes and files uploaded. Soon it will be done and once it's no longer a work in progress everything is verified to fit. - Update 4-18-2021 Removed flying extruder for now, will work on that later. Made some minor changes to the carriage to make it easier to print and stronger. - Update 7-25-2021 Damn it's been a minute. I have been super busy with things but I would say structurally this printer is ready to go. I uploaded a new electronics base and base files so you can screw it together now! I also added a split electronics base plate for smaller beds. - Update 9-29-2021 Updated the carriages to use double bearings on each side for better stability. Also redesigned the caps to fit nicer.
With this file you will be able to print LSD! Lead Screw Delta Printer with your 3D printer. Click on the button and save the file on your computer to work, edit or customize your design. You can also find more 3D designs for printers on LSD! Lead Screw Delta Printer.
