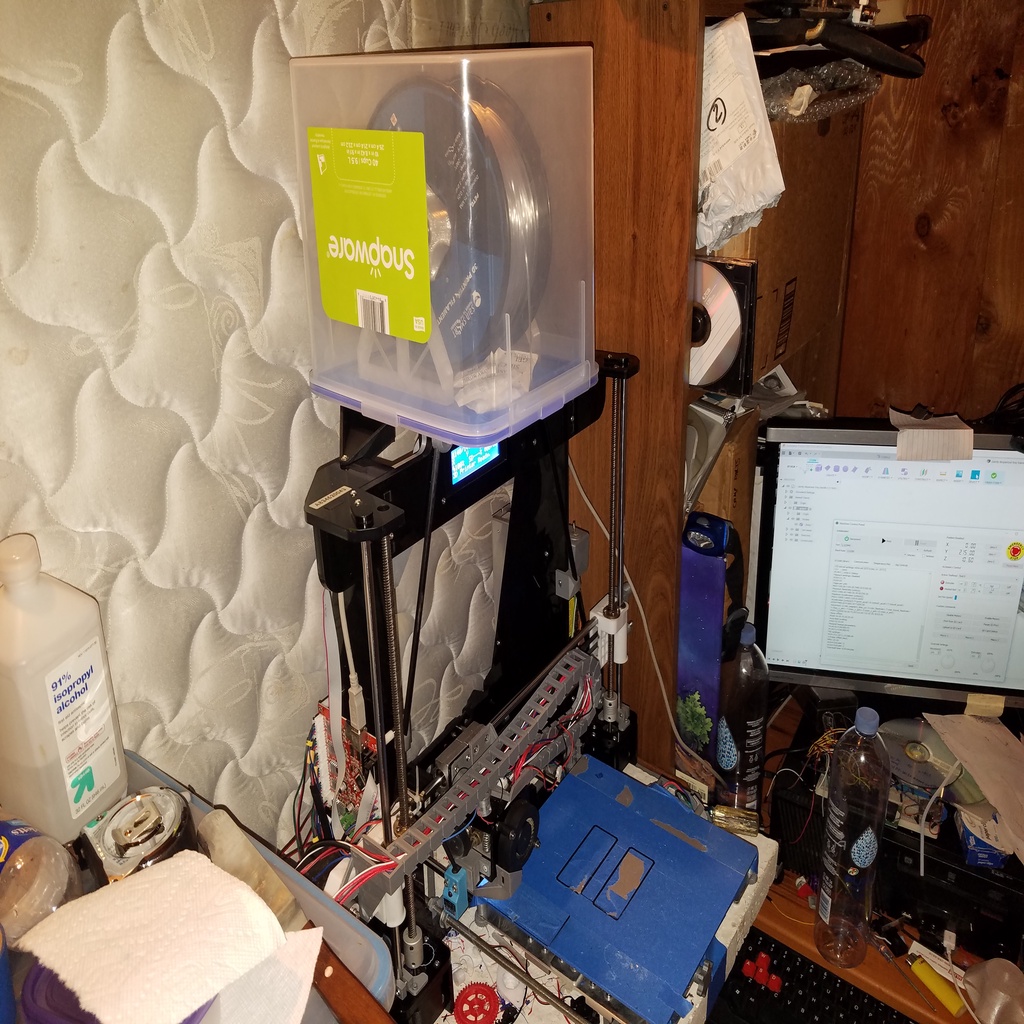
Low-friction drybox dispenser/storage for Anet A8
prusaprinters
<p>I have been using gasketed Sterilite containers to keep my filament dry while in storage and also while printing. Each one holds four spools and is relatively airtight even when printing through PTFE tubes sticking out of bulkhead fittings. I have since had to mash my A8 into a less-than-illustrious place where space is even more at a premium. Although it's only designed for one spool of filament, this project helps move the drybox above the printer where it provides almost hassle-free hands-off moisture resistant printing and post-printing storage conditions.</p> <p>The setup goes above the printer and is directly lined up with the printhead (in the Y-axis) for two reasons. One, the footprint of the drybox becomes zero as it shares its space with the A8. The previous Sterilite system sat off to the side and was almost have the size of the printer itself. Two, with the most direct path to the extruder, the filament experiences less friction when bending through the bulkhead fitting. At least with the stock extruder that comes with the A8, extrusion can be affected by tension on the filament. I would like to eliminate that inconsistency as much as possible.</p> <h3>Print Settings</h3> <p><strong>Printer Brand:</strong></p> <p>Anet</p> <p class="detail-setting printer"><strong>Printer: </strong> <div><p>A8</p></div> <p><strong>Resolution:</strong></p> <p>0.2mm and 0.32mm</p> <p class="detail-setting infill"><strong>Infill: </strong> <div><p>various</p></div> <p><strong>Filament:</strong> various PETG and PLA <br/> <p class="detail-setting notes"><strong>Notes: </strong></p> </p><div><p>Print support pieces on their rectangular flat sides. The overhangs should be ok for 90% of printers out there.</p></div> Description =========== <p>The drybox itself is a <a href="https://www.snapware.com/product/airtight-40-cup-plastic-food-storage-container">Snapware 40 cup/9.5L storage container.</a> I consider it on the more costly side (~20 USD) but it was hard to find a container that fit all the criteria that I had.</p> <p>For the spool holders I use two remixed models, <a href="https://www.thingiverse.com/thing:3697541">a small one</a> and a <a href="https://www.thingiverse.com/thing:3457805">larger one.</a> Between the two I've yet to meet a spool that doesn't fit. When you press fit an 8mm 608 bearing in them they fit over the 8mm threaded rod that came with the A8. The rod clips came from the <a href="https://www.thingiverse.com/thing:767317">original thing</a></p> <p>The spool holder sits atop two support arches utilizing several of the clips. The bottom sides of the support arches have locating pegs that fit in one of several pockets that are found in the rails. This gives some adjustability regarding the angle that the filament enters the bulkhead fitting and thus reducing the friction encountered as much as possible. In the pictures I used a bunch of blue painter's tape to temporarily attach the rails to the containter's lid. I intend on using double sided tape or maybe some servo tape in the end for more permanence.</p> <p>The bulkhead fitting should be bolted down onto a gasket (I printed three layers of the bulkhead itself out of TPU for my gasket). Use two M3x10 screws, two M3 hex nuts and two M3 flat washers. The bulkhead fitting is meant to be used with a short piece of PTFE tubing cut flush and press-fit into the center of the fitting. This reduces the amount of air allowed to enter the drybox as well as reducing friction as well.</p> <p>There is a cap that screws onto the outlet of the bulkhead fitting that conveniently provides airtight conditions when printing is done. Be sure to cut away enough of the storage container's lid material to allow proper fitting of the cap.</p> <p>The drybox assembly rests on the top of the A8 frame held up primarily by two rear support pieces and it rests on the part of the frame around the LCD screen. The rear support pieces are attached using the same screws that hold the top piece of the frame to the frame legs. These support pieces have rails the rest just inside the part of the storage container's lid that sticks up to accomodate the container edge. This provides some resistance to side-to-side bumps although it is far from secured down. The front of the drybox simply rests on the frame. Line it up so the filament takes the straightest path possible to the extruder.</p> <h3>Post Printing</h3> <p>The drybox system works fine. I would make the bottoms of the support rails wider next time to give more material to stick to the lid surface.</p> <p>The rear support pieces still flex a little under the weight of the drybox but they seem to be surviving. Those could be improved for sure.</p> <p>Also I recommend a longer piece of PTFE tube in the bulkhead fitting so the filament doesn't pop out of the fitting and wind around the spool unchecked. Maybe a 5-6mm piece would be good.</p> <p>UPDATE: Apr. 29, 2020-</p> <p>There is a modest amount of friction when the X axis is at its extremes. In actuality a shorter piece of PTFE tubing would probably reduce this. Also the cap is a little janky as the threads are a loose fit.</p> </p></p> Category: 3D Printer Accessories
With this file you will be able to print Low-friction drybox dispenser/storage for Anet A8 with your 3D printer. Click on the button and save the file on your computer to work, edit or customize your design. You can also find more 3D designs for printers on Low-friction drybox dispenser/storage for Anet A8.
