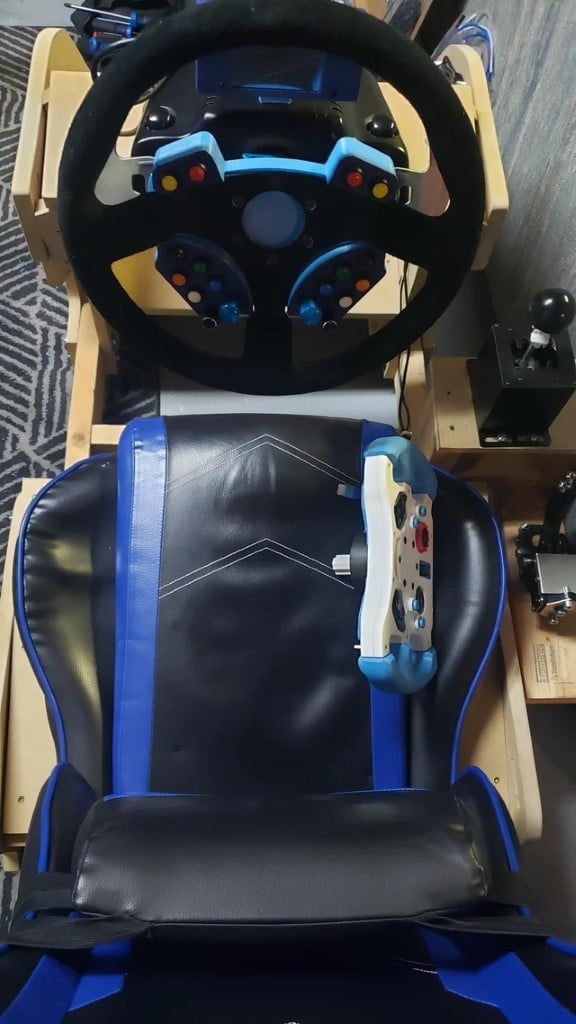
Logitech G27/G29/G920/G923 Custom Racing Wheel
thingiverse
***********If you love this, please consider tipping me, as a lot of work when into this:*********** paypal.me/Mathewdelapa *****************PARTS LIST***************** 1) Vinyl Wrap (Color is your preference, I went with Blue). https://www.aliexpress.com/item/32260499629.html?spm=a2g0o.9042311.0.0.2c3a4c4dfez9AX 2) M3 Screw Kit, as all the hardware I used was M3. https://www.aliexpress.com/item/1005002115505388.html?spm=a2g0o.9042311.0.0.2c3a4c4dfez9AX 3) 14 momentary push buttons. https://www.aliexpress.com/item/1005002671842887.html?spm=a2g0o.9042311.0.0.2c3a4c4dfez9AX 4) **Optional 2/4 Rotary Encoder Knobs.** https://www.aliexpress.com/item/32749281108.html?spm=a2g0o.9042311.0.0.2c3a4c4dfez9AX 5) Arduino Pro Micro Controller (For all the button Wiring). https://www.aliexpress.com/item/32768308647.html?spm=a2g0o.9042311.0.0.2c3a4c4dfez9AX 6) An Aftermarket Wheel of course, I used this one. https://www.aliexpress.com/item/1005003669405026.html?spm=a2g0o.9042311.0.0.27424c4dx00bCZ 7) 11x5x4 mm bearings, you will need 8. Alternatively you can print this out of plastic.These are for the paddle shifters. https://www.amazon.ca/MR115-2RS-Bearing-5x11x4mm-Compatible-Bearings/dp/B08531G3GT 8) 2x 30mm x 5mm Rod. This is also for the paddle shifters. Or you can 3D print this alternatively. Something comparable to this. https://www.mcmaster.com/rods/diameter~5mm/ 9) 2x Micro Switches, Also for the paddle shifters. https://www.amazon.ca/gp/product/B06XMQG4TC/ref=ppx_yo_dt_b_asin_title_o07_s00?ie=UTF8&psc=1 10) 4x Rotary Push button encoders (these come with buttons, but I opted to order the aluminum ones from Aliexpress, see item #4). https://www.amazon.ca/gp/product/B08728K3YB/ref=ppx_yo_dt_b_asin_title_o08_s00?ie=UTF8&psc=1 11) You will need 4x screws <1.9mm in diameter x 10mm long to mount the micro switches. 12) You will need a micro USB to USB cable to connect the rim with your PC. 13) You will need a 35mm bicycle seat clamp to work as the quick release mechanism. I went with blue, but color is your preference. https://www.amazon.ca/gp/product/B07QLTZRXD/ref=ppx_yo_dt_b_asin_title_o00_s01?ie=UTF8&psc=1 14) You will need some 9.5mm x 1.6mm (0.375"x0.063") magnets, I used 2 of these per paddle (4 total). https://www.ebay.ca/itm/294603272161?chn=ps&mkevt=1&mkcid=28 15) ******Optional you can use some 8mm springs to provide a progressive pull on the shifter****** https://www.amazon.ca/Anti-Backlash-Spring-Elimination-Threaded-Printer/dp/B074JYFW6B ******For the Nextion Display****** A) I used a 3.5" display and that is what I designed in CAD. https://www.aliexpress.com/item/1005003457376097.html?spm=a2g0o.9042311.0.0.2c3a4c4dfez9AX B) CP2102 5PIN to Micro USB connector https://www.aliexpress.com/item/4000120687489.html?spm=a2g0o.9042311.0.0.2c3a4c4dfez9AX *****************INSTRUCTIONS***************** For the Wheel, I wired it up according to this video by ARMSTUDIO: https://www.youtube.com/watch?v=Z7Sc4MJ8RPM For the Nextion Display, I wired it up according to this video by ARMSTUDIO: https://www.youtube.com/watch?v=wtXcwcOjaF0 Note: Ground goes to Ground 5v goes to 5v RX goes to TX TX goes to RX You will need SIMHUB + the Arduino sketches to flash the boards. They are available on ARMSTUDIOS video links. For using this wheel while the stock logitech wheel is disconnected, remove all bindable buttons in GHUB and set it as the default profile. *****************Build should be pretty self explanatory, as there are not many parts, but I will provide a write up as follows***************** I recommend Printing 'TEST ME' file first, to ensure this will work with your wheel. If you can print test me without issues, then the button panel will fit over your hub. For the 'Button Plate' I recommend tinning all the buttons and cleaning with isopropyl alcohol prior to install. It will make soldering the wires easier. You will need 6 M3x18 screws to fasted the backplate to the front button plate. For the 'Back Plate' I recommend installing: the magnetic shifters, the shifter left/right lower/upper and wiring the micro switches as it will be easier to do this before all the button wiring is in place. As for screws, you will need 24x M3x10 screws. For the paddles, you can use the stock G29/G27 etc paddles, or you can print the ones I have modeled. You will need 4x M3x10 screws for this. The quick release adapter I provided uses a 70mm bolt spacing. **********While this is still technically a WIP, I have printed this and have been using it. I will make updates as I come across them********** UPDATE 1: 03/23/2022. Wheel side quick release broke. Reprinted at 75% cubic infil and has been holding up fine. Only sight issue encountered so far.
With this file you will be able to print Logitech G27/G29/G920/G923 Custom Racing Wheel with your 3D printer. Click on the button and save the file on your computer to work, edit or customize your design. You can also find more 3D designs for printers on Logitech G27/G29/G920/G923 Custom Racing Wheel.
