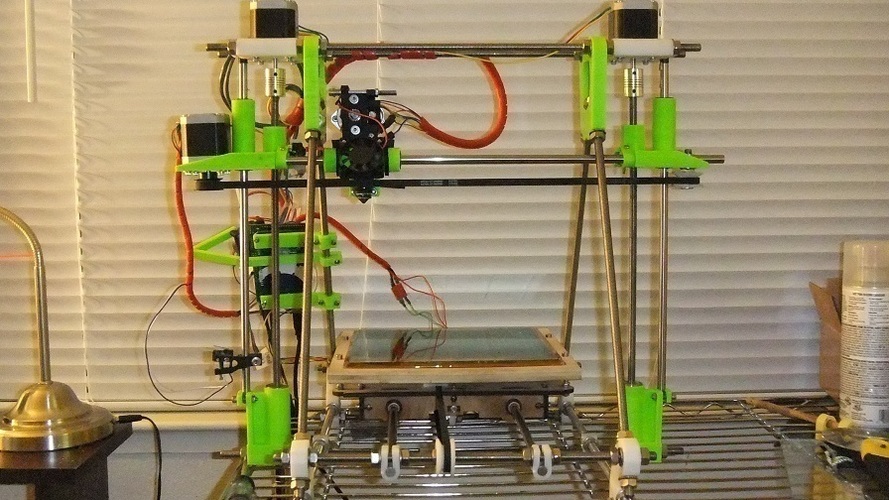
Loches Z Axis Upgrade for MakerGear Prusa Mendel
pinshape
Summary Update May 20, 2012: I uploaded a new X-Carriage Endstop holder designed for attaching and providing clearance with the triangle frame at the top. Update May 13, 2012: A new X-Carriage version was added that requires no support. It assumes good bridging capabilities and needs material cutting at the end. Note: I haven't printed it yet, so I'm not sure if it works properly. Update May 12, 2012: Here is a video of me printing the Pink Panther Woman at full size (147.535mm tall): http://youtu.be/c93jLzPYmBQ Goals: Increase the Z Axis Build Range. Modify Plastic Parts only and re-use the current Vitamins. Comments: So many plastic parts have been modified, I'm not sure if this is an upgrade or a full-blown new printer version. It's possible that this change isn't limited to the MakerGear Prusa, but I'll leave that to you. I had issues with X and Z endstops and had to jury-rig my own solutions. Perhaps I'll design some new mounts for these. Summary: My original build area was about 80mm, but a print required more height, so I designed a modification to give it to me. Looking at my printer, I noticed areas that could be improved, so I went to work! My new and improved build height is now 150mm! Problems and Solutions: Problem 01: The rear-mounted X axis belt collided with the threaded rod on the triangle frame vertex assembly, causing a clearance issue when raising the nozzle. To fix this, I moved the belt's location underneath the X track rods, which are already used by the extruder nozzle. Problem 02: A good amount of rod space on the Z axis is un-used. The motor mount blocks the Z axis from going beyond the two threaded rods on top of the printer. To fix this, I extended the upper frame vertex piece to raise the two top rods and extended the lower Z bar clamps to compensate. Problem 03: My current extruder mount caused a clearance issue because the side-mounted motor would go underneath the upper frame vertex. Since my new vertex still blocks this, a new extruder mount was needed. To fix this, I designed a new X-End-Motor Bushing and attached it to the motor. Problem 04: The carriage from binding due to uneven smooth rod length. To fix this, I added clamps to the X-track bars to keep them in place and prevent the carriage from binding. This modification works well and causes no noticeable change in print quality. Instructions Build of Materials: 2x Loches_Upper-Frame-Vertex.stl 1x Loches_Lower-Z-Bar-Clamp-Left.stl 1x Loches_Lower-Z-Bar-Clamp-Right.stl 1x Loches_X-Carriage.stl or Loches_X-Carriage_NoSupport.stl 1x Loches_X-End-Idler Bushing.stl 1x Loches_X-End-Motor Bushing.stl 4x Loches_X-Track-Bar-Clamp.stl 1x Loches_X-Track-Endstop-Holder.stl Various nuts and bolts, mostly re-used from the original setup. Various vitamins re-used from the original setup. Steps: Print out the above parts with 50% infil. Remove your current Z axis rods and assembly. This includes the Z smooth rods on either side, the threaded rods attached to the Z motors, the Z motor mounts on top, and the Z rod clamps on the bottom. Take out all the bearings, nuts, screws, brass bushings, motors, pulleys, belt, rods, and etc from the removed parts. Take off the two upper frame vertex pieces and replace them with the new versions. Re-mount the Z motor mount plates on top. Mount the new lower Z bar clamps on the bottom, don't forget to attach the bearings to them. Note that the new version has the lower rod hole in the center and is not offset from the Z axis bar clamps like the original part, so you will have to adjust accordingly. Assemble the brass bushings and Z axis nuts into their respective places on the new X-ends and X-carriage. Thread the Z axis threaded rods into the X-ends so they protrude about 1/3 of their length from the bottom of each end. Place the bottom of each Z axis threaded rod into their respective locations on the lower Z bar clamps (where the bearing goes) and attach the tops to the motor Z couplings. The motor mount should be on the left side of this assembly. Slide and clamp the Z axis smooth rods through the top motor mount, X-ends, Z endstop, and lower Z bar clamps. The smooth rods should be almost exactly the length to clamp in. Level both X-ends with each other and slide both X smooth rods through their respective locations on the upper frame vertex pieces. Install the bearings into the new X-track-bar-clamp parts. Attach the belt to the pulleys and motors. Reattach the Z endstop to its location. Tighten all the nuts, screws, and bolts in order to secure everything in place.
With this file you will be able to print Loches Z Axis Upgrade for MakerGear Prusa Mendel with your 3D printer. Click on the button and save the file on your computer to work, edit or customize your design. You can also find more 3D designs for printers on Loches Z Axis Upgrade for MakerGear Prusa Mendel.
