Lithophane Photo Lamp
prusaprinters
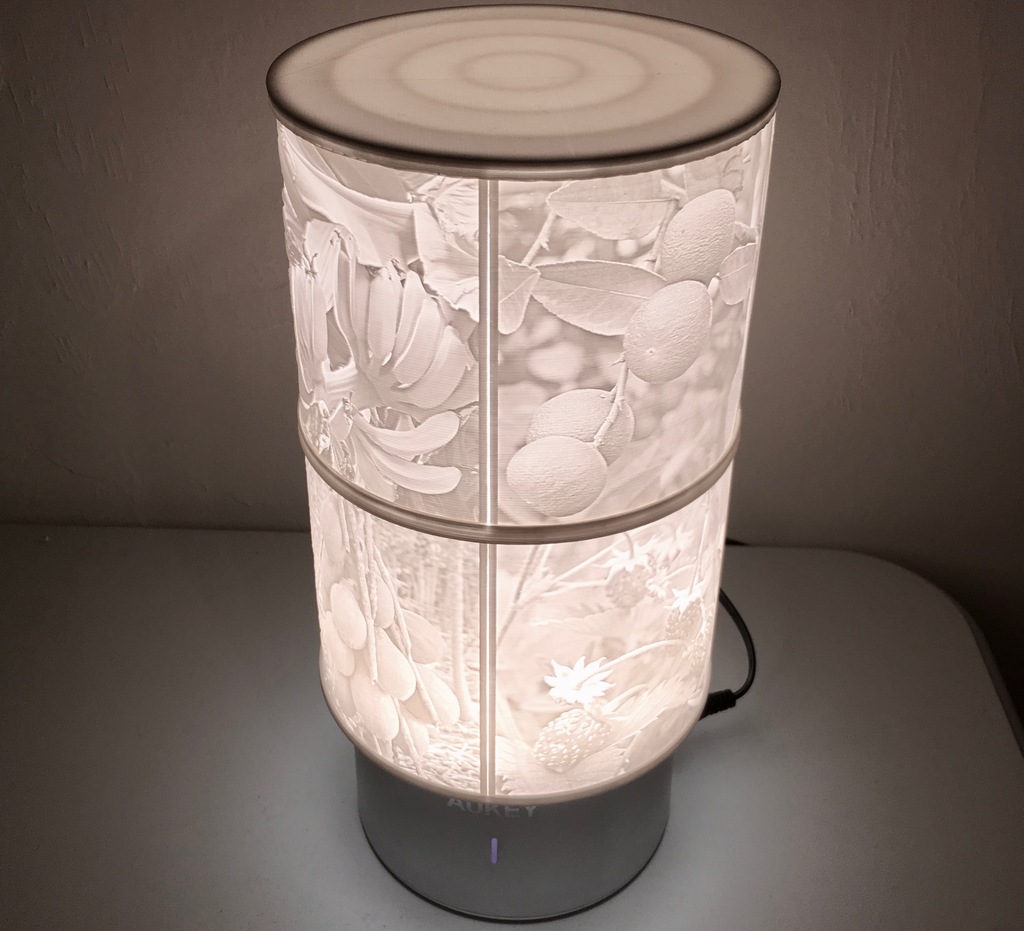
<h4>Lithophane Lamp</h4> <p>This is a lithophane lamp shade I designed to work with this lamp: Aukey Table Lamp (Edit Nov 2021: no longer available on <a href="https://www.amazon.com?linkCode=ll2&tag=thingiverse09-20&linkId=e4759bff1fa9a55a0f897d801ce2d765&language=en_US&ref_=as_li_ss_tl">Amazon</a>, but can be <a href="https://www.walmart.com/ip/AUKEY-Table-Lamp-Touch-Sensor-Bedside-Lamp-with-Color-Changing-RGB-Dimmable-Warm-White-Light/562650104">found at Walmart</a>)</p> <p>The lamp shown in photos is one I made with 8 lithophane images of (mostly) tropical fruits. Aside from the 8 lithophanes, the lamp consists of two support rings, and an upper surface. Follow the directions below to make your own.</p> <p>Also, I included the G-code files I used with my MP Select Mini. You can import my slicer settings into Cura by going to Preferences > Profiles > Import and choosing the G-code file.</p> <h4>Lithophane photo panels</h4> <p>Choose a photo and crop it to a perfect square. I did this in Photos on Mac, but it could be done in an photo editing software. It’s important that it has equal width and height. It may also help to increase the contrast a bit depending on your photo, but not necessary.</p> <p>Use this <a href="http://3dp.rocks/lithophane/">awesome site</a> to generate a lithophane panel (STL) from your image. Here are the settings I used:</p> <p>*<strong>Model:</strong> Choose "Outer Curve" *<strong>Model Settings:</strong></p> <p>Maximum Size (MM): 87</p> <p>Thickness (MM): 2</p> <p>Border (MM): 2</p> <p>Thinnest Layer (MM): 0.8</p> <p>Vectors Per Pixel: 10 (could set this lower for a smaller STL)</p> <p>Base/Stand Depth: 0</p> <p>Curve: 90 *<strong>Image Settings:</strong></p> <p>Positive Image</p> <p>Mirror Image Off</p> <p>Flip Image Off</p> <p>Manual Refresh</p> <p>Repeat X Count 1</p> <p>Repeat Y Count 1</p> <p>Mirror Repeat Off</p> <p>Flip Repeat Off</p> <p>Repeat for all your images.</p> <p>For the best quality, I strongly recommend printing the lithophane panels in high quality (I used 0.0875 mm layer height), 100% infill, standing upright, and with the z-axis seam set so that each layer starts on the edge of the image. I've included my G-code files which you can import into Cura to use as an example.</p> <h4>Support rings and upper surface.</h4> <p>The lower and middle rings can both be printed in lower quality (I used 0.175 mm layer height) and without support.</p> <p>The upper surface is probably best printed upside-down. My print bed isn't perfectly level, so I printed the upper surface right side up with supports and got nice results.</p> <h4>Assembly</h4> <p>Clean any excess plastic or rough edges off the lithophane panels. Four lithophane panels should fit into the outer groove of the lower ring, completing a circle. These will be the panels for the lower part of the lamp shade. I had to trim a bit of plastic off the bottom of the lithophanes and sand the side edges just a little (it’s a tight fit).</p> <p>Fit the middle ring on to the top of the same four panels. Once it is perfect, use a few drops of super glue to permanently attach the lithophane panels into the groove of the lower and middle rings.</p> <p>Place the other four lithophane panels into the top groove of the middle ring. Then fit the upper surface onto the top of these panels. Again, lock it in place with super glue.</p> <p>The lamp shade should fit perfectly on this lamp. It is designed to be snug, so you may need to sand/trim the inner rings a little if it won’t slide onto the lamp.</p> <h4>Links</h4> <ul> <li>Lamp: Aukey Table Lamp (Edit Nov 2021: no longer available on <a href="https://www.amazon.com?linkCode=ll2&tag=thingiverse09-20&linkId=e4759bff1fa9a55a0f897d801ce2d765&language=en_US&ref_=as_li_ss_tl">Amazon</a>, but can be <a href="https://www.walmart.com/ip/AUKEY-Table-Lamp-Touch-Sensor-Bedside-Lamp-with-Color-Changing-RGB-Dimmable-Warm-White-Light/562650104">found at Walmart</a>)</li> <li>Lithophane generator: <a href="http://3dp.rocks/lithophane/">Image to Lithophane</a></li> <li>Tinkercad:<ul> <li><a href="https://www.tinkercad.com/things/4UiZjlpoWcz">Upper Surface</a></li> <li><a href="https://www.tinkercad.com/things/ewG1eS6wqTn">Middle Ring</a></li> <li><a href="https://www.tinkercad.com/things/0gwQAynuAKO">Lower Ring</a></li> </ul> </li> </ul> <h4>Update Dec 2017</h4> <ul> <li>Added Upper Surface V2, which has a stronger groove edge and a slightly wider groove for easier assembly.</li> <li>Added Gap Filler which can be glued to the inside between the lithophane panels to keep light from coming through between the panels.</li> </ul> <h3>Print Settings</h3> <p><strong>Printer:</strong></p> <p>MP Select Mini</p> <p><strong>Rafts:</strong></p> <p>No</p> Category: Household
With this file you will be able to print Lithophane Photo Lamp with your 3D printer. Click on the button and save the file on your computer to work, edit or customize your design. You can also find more 3D designs for printers on Lithophane Photo Lamp.