Lithograph Lighted Old Time TV Frame
prusaprinters
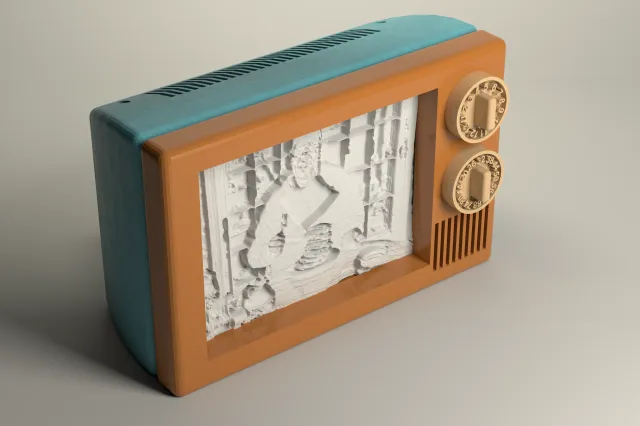
This is a lighted lithograph frame that looks like an old style TV from the 1960s and 1970s, even the early 1980s.Since this looks like an old tube TV it makes a great gift for someone that remembers watching TV on one of these. It requires the lithograph to be 1200mm X 900mm (a 4X3 ratio like the old TVs) and must be 5mm thick. The reason for it being 5mm thick is because of the remote control. Wait, what - a remote? Ya, while the old TVs did not have a remote (well, my dad used me as the remote: "Hey, put channel 9 on, the Cubs are starting!") this one does. I designed this to use an LED disk that uses three AAA batteries and can be turned on and off (as well as changing the color.) By keeping the lithograph at 5mm thick allows the remote to work through the lithograph.I know that lithographs should be printed with 100% infill, but it lights up more evenly if you use around 15%. Try both, I guess, and see what you like better. It all comes down to the material you use. I have had great success with PrintedSolid's Jessie Quarter White.You can get four of the LED disks, with four remotes, for less than $20.00. See "Assembling And Using The TV" below for more information on what is needed.Using this particular LED disk has some very nice advantages. One reason is that it's bright because it is made with ten LEDs. And it has a setting that I like a lot which allows the color to slowly transition from color to color. However, the batteries last for only six hours (Please read my "Final Comments" below for an alternate solution.) This LED disk is also waterproof so the entire TV can be used under water! (OK, probably not useful.)I have a lithograph that I wanted a frame for my mom and dad, but wanted to do something really special. Then I remembered I modeled an old TV for a visual effect a few years ago in Cinema4D and used that model as a starting point. After finally getting it into Fusion 360, I began to modify it for printing. This turned out really well and thought I would share this for others that might find a use for it.Please keep in mind that this is a massive print, taking almost a day and a half to print everything. Very few projects I do are small, and this is no exception. Go big or go home, right? The dials are set up for North American channels (Canada, US, Mexico, and other countries that use VHF 2-13 and UHF 14-80. Since the dials are each a separate part, you can easily design new ones that fit your country's channels.The first two images are renders done in Cinema4D using the Arnold renderer. The next three pictures are of an actual print. The remaining images are renders done in Fusion 360 showing each part. (Sorry about the quality of the picture with the LEDs turned on, it just does not photograph well in my work area.)Print instructionsOne thing I would recommend is using a different color for the back. This will give it a more realistic look. Additionally, I would not use white for any of the parts because the light may shine through the print. You really only want the light to go through the lithograph.Using The Included gCodeThe gCode I have here is set up for PLA on the MK3/s printers. Since it is a large print, please make sure you have good bed adhesion or it will warp. The smooth steel sheet worked great. The other advantage of using the smooth sheet is that it makes the front of the TV look better. While I love the look of prints from the textured sheet, it just doesn't look right for this particular model.The model has two gCode files. The first file is the back of the TV and the other file is the front of the TV with both dials (this means the dials will be the same color as the front, which still looks great.) The gCode for the back of the TV does use supports, which is something I tried to avoid. I worked hard to design it so it does not need them, but there are some large overhands inside the TV (something you will never see once assembled) but was a little too much for my liking. So I decided to add the supports. The gCode for the front of the TV and the dials do not use supports.The Included AMF FileI included one AMF file for the back of the TV because I setup supports for it. I did not include the AMF file for the front of the TV or the dials because these are easy prints and you can just use the included stl files. The AMF file has a cylinder used as a support enforcer with another cylinder used as a support blocker in the middle of the enforcer. I did this to try to save some unneeded plastic. Also make sure the material, infill, and layer height are set properly for your print. I recommend using a layer height of 0.15 and and infill of 10% to 15%.If you have not used an amf file in PrusaSlicer, simply go up to the 'File' menu, and select 'Import'. Under the Import menu, select 'Import STL/OBJ/AMF/3MF…' and select the file called "tvbackv8zip.amf". Remember you will still need to print the included stl files for the front part of the TV and both dials.Using The stl FilesI have six stl files included which includes three options for the back of the TV. The files are oriented for printing. While supports are optional, I used them on the back print of the TV. The bridging is a bit much in the middle of the TV. Use a layer height of 0.15 and an infill of 10% to 15%.The reason I included three versions of the back of the TV is to give you some options. The file called "tvbackv1.stl" is the one I have used for the gCode and amf file. This is for the LED disk that is powered by batteries. The file called "tvbackv1withhole.stl" is for use with the LED disk but has a hole if you want to power the LED disk with an external power supply. The third file for the back is called "tvbackv1nodiskwithhole.stl" and is there for you to use LED strips.Assembling And Using The TVYou will need to purchase the LED disk (unless you use the version for LED strips.) Search for B06XWVD5NT on Amazon. The back of the TV is designed to fit this disk perfectly. No glue or tape is needed to hold it in place, but is also designed to make it easy to remove when it's time to change the batteries.Use a small amount of super glue on the back of each dial and place them on the front part of the TV. Use one of the images attached for proper orientation.Once the glue is dry on the dials, place your lithograph on the inside of the front part of the TV. Don't worry if it is too loose as the back of the TV will hold it in place when assembled. Then place the front of the TV on the front of the back component of the TV (again, refer to the images.) I made this a somewhat loose so you can remove the front part to change batteries. You are done! Now hit the power button on the remote and play around with the colors and setting. If the remote does not work, make sure you removed the clear plastic battery saver on the remote, and make sure you have three AAA batteries installed correctly in the LED disk.Final CommentsUPDATE: A request was made to include an F3D file, which I have included.While I really like this setup, I don't like that the batteries last only six hours. One change you can make is to use the stl with a hole through the back and wire up a 5v power supply to it. I included the STEP files for you to use if you need to make any modifications, and this could be a nice upgrade. If you don't want to use the LED disk, you can use LED strips by using the stl file called "tvbackv1nodiskwithhole.stl".Another change you can do is to make the VHF and UHF antennas. I did not make these because they would probably break off. But a fun modification is to use the STEP files and place holes for some real antennas. It's all up to you, that's what makes 3D printing so great!Again, please feel free to contact me with any suggestions to help improve this print for others. I know this is a big print, but owning a 3D printer is not about printing models of little cats. Well, not for me anyway.Good luck with your 3D printing journey!
With this file you will be able to print Lithograph Lighted Old Time TV Frame with your 3D printer. Click on the button and save the file on your computer to work, edit or customize your design. You can also find more 3D designs for printers on Lithograph Lighted Old Time TV Frame.