Light Table - Fully PrinTable
prusaprinters
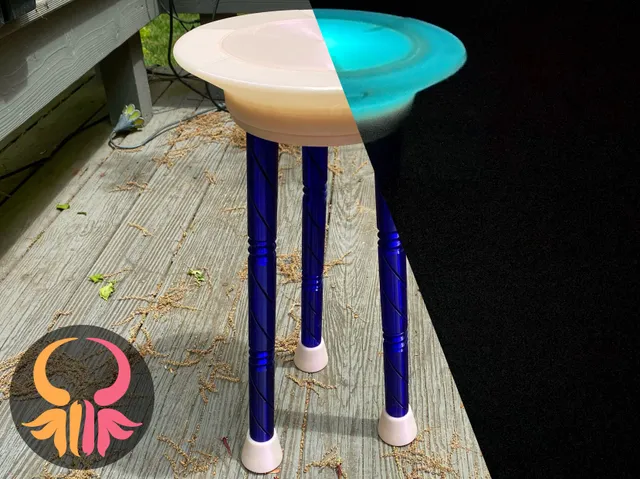
It's a lightweight table that lights up When I started designing this, the idea I has was to make a small table that also works as a nightlight, to keep by my bed to place and retrieve small items in the dark. (I wear glasses for being very nearsighted, so in the dark, once I remove them, there are no faint outlines, only a world of dark blur.) I also just love anything you can light up with an LED—thank you, 3D printing and PLA!The other thing I had in mind when designing this is exploring my idea of using vase mode printing to make a modular rod that prints quickly and yet is still fairly durable. My tests with PLA did not hold up, but I am very happy with the results I got with PETG. The legs of this table each consist of three connected rods (Part A), which take a little over an hour each to print (in total, the legs take about ten hours.)With the regular feet, this table is 49.2cm high; with the weighted feet, it's slightly taller. It's about 26.5 cm wide at its widest.(Filaments in photos are Ultramarine Blue Transparent Prusament PETG—absolutely gorgeous, I’m in love with this stuff, it looks like blue glass —and Atomic Filament Iridescent Pearlescent PLA.)Update May 14: Solid versions of Part A for the table legs, which can be printed in PLA, are now uploaded here, plus updated compatible versions of the feet.What you will need to make this:PETGPLA, translucent0.8mm nozzle (or bigger)18 cm wide circle of build surface spaceA light to fit inside, ideally battery operated or rechargeable, and that turns on and off with a remote. E.g.: A light string, or light puck smaller than 9cm wide.Optional: sanding suppliesOptional: Weight filler, e.g. marbles, pennies, gravel, hex nuts, etc.Caveats: I would not use this table to hold anything especially heavy, fine porcelain, or open containers of liquid. It's good at staying upright, but when pushed will wobble a bit. Also, you probably shouldn't try to sit on it.Printing InstructionsPart APETG and 0.8mm nozzle or larger, to ensure strength0.4mm layer height~0.9mm line width—I used Prusa's automatic line width settings here.Print in vase mode (with 3 bottom layers and no top layers, as is standard) with your best settings for layer adhesion. (Scroll down to the bottom for more info on printing in vase mode.)No supportsYou will need 9 of these, 3 per leg. These are designed to get a fairly strong long rod with least material and print time. They need to be PETG; PLA breaks too easilyThey are already oriented correctly for printing - the smaller screw side is closed because of the bottom layers, and the larger is on top and open. The smaller, closed end screws into the larger end. Be careful when attaching them; if they don’t fit right away there may just be a small bit of stray filament to trim. These are most likely to break when screwing together and unscrewing, so don't force them.When attaching to the other parts: the smaller, closed side points up and screws into Part B, the body, and the larger, open side screws together with the feet.The rest of this is designed for PLA; although these other parts may work in PETG or other materials, they haven’t been tested beyond PLA. (In particular, Part C may end up being too flexible without some modification.)All the PLA parts are printable with a standard size (0.4mm) nozzle, but it’ll take a lot longer to print. Part BThis is the biggest part. Note that while most of this part needs to be sturdy and is too thick for much light to pass through, there is a ‘window’ in the middle at the bottom that is about 2mm thick and 9cm wide.PLA0.8mm nozzleAt least 2 perimeters0.4mm layer heightInfill: at least 20%; I used adaptive cubic, but consider whether you have aesthetic preferences for what infill pattern shows when backlit.18 cm wide at widest (a bit smaller at the base)No supportsIf you use a skirt, remember to keep it at 1 line and move it in close If you ever have trouble with big pieces and infill and extruder jamming like I do, remember to turn on ‘only retract when crossing perimeters’Potential modifications: if you want to use a light source with a power cord or a switch, you can slice Part B so it prints with a hole in the bottom. Figure out the size you need. Then right click the name of Part B in the righthand column in PrusaSlicer and select “Add negative volume.” Choose a cube or a cylinder, size it to your needs, and place it where you want it in the bottom window area of Part B. Make sure it’s flush with the virtual bed; the slicing preview will show you if it’s doing what you want.Part CPLA0.8mm nozzle 0.4mm layer heightNo supports, no raft, 100% infill2 perimeters, at leastOptional: set ‘Infill > Bottom fill pattern’ to Archimedean Chords or Concentric. Set ‘Infill > Top fill pattern’ to Archimedean Chords.This piece is 18cm wide.If you use a skirt, remember to reduce it to 1 line and bring it in close.This is the top of the table, and the part touching the bed is what will be on top. Make sure to clean and prepare your bed fresh, and relevel it before the print.I recommend freezer removal for this one, as it would be easy to bend while removing from the bed. Part DThis is the part that extends the top of the table past most home printer bed limitations, and also makes up the sides of the table body. These are designed and angled to not need supports.Download PartD_WSeams.3mf rather than the stl if you want the model with painted seams already included.You will need 6 of these; however, note that for #6, you may want to print the modified, shorter version (PartD_ShorterAlt.stl or PartDShorterAlt_WSeams.3mf). You’ll want to clean and trim (possibly sand) these pieces where they touch each other so they lay flush side to side; get 5 of these printed and situated and pushed together, attached to Part B. Then measure the distance remaining for the 6th piece, along the top outside rim of Part B as shown in the photo to the right. If you're at about 94mm, you're good to go on the regular size. If you’re at around 92mm, PartD_ShorterAlt is your better bet. (For other amounts, especially if you don’t want to sand a lot: compare the length to 94.2 mm. Use prusa slicer to remove the difference from the bottom of the model for Part D.)PLA0.8mm nozzle0.4mm layer height2 perimetersFor best strength, 100% infill; to retain some translucency in thick areas, pick infill keeping in mind that the light will shine through and reveal the pattern.No supports.Strong bed adhesion, as it has a small footprintMake sure you have ‘Layers and Perimeters > Avoid crossing perimeters’ turned OFF; with this model and this line width, you’re only going to get a single perimeter in most areas here, and when you have a very thin section with a single perimeter, PrusaSlicer glitches that to mean ‘sit on top of and cross this visible external perimeter constantly.’ It’s not pretty, folks.Seams: I recommend blocking off seams on the visible outer areas, and painting a seam on the inside. Also I’ve already done this, so download PartD_WSeams.3mf and discard the other settings as needed to get your seams pre-painted.For the record, I tested a less reinforced iteration of Part D with PETG and found it too flexible.Part E / Parts FThere are two options for feet here. The simpler one is Part E. Part(s) F is a foot designed in two parts so it has an open area inside to which you can add weighted filler (pennies, marbles, stones, whatever’s easy and cheap for you) and then screw it closed. This version is larger and will make the table slightly taller, and has a narrower footprint in use. The table balances fairly well with Part E feet, but adding the weight with Part F makes it a lot harder to knock over.The settings are the same for either:PLA0.8mm nozzle0.4mm layer heightInfill: 40% cubic2 perimeters Whichever version you choose, you will need 3 of them.Optional: Right click the model in the righthand column in PrusaSlicer and select ‘Height range Modifier.' Input [Part E: 40.6 to 43.2] or [Part F: 58.4 to 60.6] and set to 0.2mm layer height. These are designed to always be able to sit parallel to the ground, even if the screw-together connections going up the leg vary in small amounts; it’s about a 5° angle, so smaller layers are helpful here for a less severe gradation. No supportsRecommended: Seams: alignedFor the record, I did successfully print Part E in PETG.ConstructionEvery part of the table connects via friction fit or threaded screw shapes. The only components that aren't 3D printed are the light and the optional weight filler for the feet. The top of the table (Part C) fits loosely enough that you should be able to remove and replace it to access the inside.Legs and feet: Part A x9, and either Part E x3 or Part F x3 Connect the leg rods in groups of three, screwing the small and closed end into the larger and open end. Take care not to force it when you screw them together. You may need to trim the outside of the bottom/closed/smaller end if it picked up an extra blob or two. If you are using Part F (the green pieces shown on the right), select a weighted filler and fill up to below the visible threads. (You may also use scraps of tissue or plastic to fill gaps left by the filler, if it shifts around a lot inside. I used marbles and a bit of paper towel smushed between them and the top when you screw it closed. Marbles aren’t necessarily the cheapest or best option, btw, I just happen to have an absolute ton of them for miscellaneous reasons )Screw closed (via the smaller threads). For each leg, find the larger/open end and screw the feet onto them. Set aside.Body: Part B, Part D x6, and Part CTake Part B and prepared Part D x5. A ring of space runs around the outer area of Part B, and this is where you insert your Part Ds. The longer section on the bottom inserts into this space, and the shorter will fall on the outside of Part B. (Scroll back up to the printing instructions for Part D for details on measuring and fitting your sixth Part D.)Part C rests on the inside edges of your circle of Part Ds, and also has three tabs that insert into corresponding holes in Part B; make sure all three are lining up as you lower it.The area between Part C and Part B is where you put your light. (Plus possibly around the edges of Parts Dx6, if you want to experiment with string lights.)You shouldn't need glue for any of this construction, but if you choose to use some anyway, note that this is the part you want to be able to remove in the future.Join the legs to the bodyWhen you flip over Part B, there are three large threaded holes in the bottom. Take each leg, find the end that is smaller and closed, and screw them in. (Keep in mind the legs are angled slightly away from the center of the table, so you’re not screwing straight down/up but gently finding that angle to screw it in.) Ta-da! I think a range of light options could work for this. I’ve tried with puck lights; you can face them down for more light on the table legs, or up for more light in the table body/top. I’m planning to experiment with putting lights in a container that’s clear/translucent all the way around, and with string lights.I have more alternate versions of parts I want to explore: possible lithophane designs for the top, a solid version of the legs you can print in PLA, a version of both leg versions that you can run a string light down, possibly a nicer hole in the bottom for if you want to use a USB rechargeable light? Any additional stuff at this point will be posted as a remix.I also do want to make this fully printable in PETG so it can be used as a little light-up table outdoors ___New to vase mode or still learning?Spiral vase mode takes the outside wall of a solid, continuous model and calculates a continuous single spiraling path to print to the top. (Usually this is after a few standard solid layers at the bottom.)In Prusa slicer, this is the “Spiral vase” option you can check off in Print Settings > Layers and Perimeters. It will automatically change several of your settings to be compatible with the mode.In Cura slicer: Special Modes > Spiralize Outer ContourTo get a good vase mode print, you'll want to refine a couple more settings. You want to print slow and steady, and at a lower extrusion rate than normal printing. Too much extrusion will get you tiny bumps around your print; too little can make it too fragile and prone to cracking between layers.If you're getting weirdly evenly spaced bumps on the outside, especially if you're on a more basic machine like an Ender 3: a few things can cause this, but most likely, the printer is pausing for a split second to save information to your SD Card, or send information elsewhere, if you use something like OctoPrint. Fixes include:Update your firmware (to Marlin 2.0 if necessary) and change the settings to turn off power failure recovery mode, disallow the printer from writing to the SD card, and turn on arc calculation. (Also make sure your Printer Settings in PrusaSlicer have G-code flavor set to Marlin 2.)Using a faster microSDBeing hardwired to the printer, if you use OctoPrint
With this file you will be able to print Light Table - Fully PrinTable with your 3D printer. Click on the button and save the file on your computer to work, edit or customize your design. You can also find more 3D designs for printers on Light Table - Fully PrinTable.