Light brackets for Traxxas Rustler
thingiverse
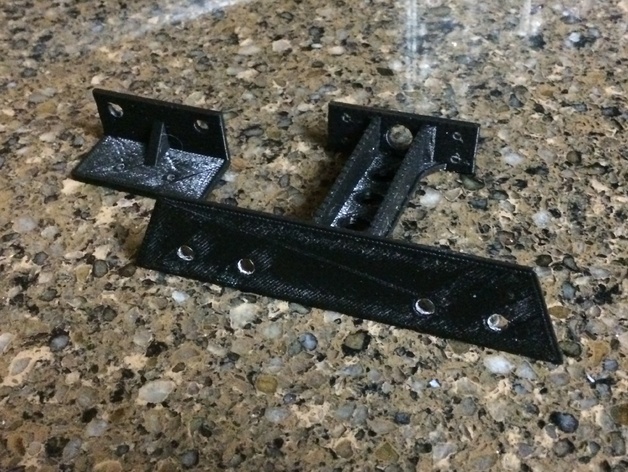
I created these brackets to add tail lights and front running lights to my Traxxas Rustler. Fortuitously, the track area for our Saturday night drag races is adequately lit, yet the slow down and turn around section lacks sufficient illumination, making lighting an invaluable aid in retrieving the car safely. Even if your requirements differ from mine, the addition of these brackets undoubtedly enhances the appearance of the Rustler. The rear bracket attaches securely to the existing four holes in the rear shock tower. To secure the front bracket, two holes must be drilled into the servo cover plate. The LED positions in the front bracket align perfectly with the fog light decals on the front grill of the Traxxas Rustler. Simply drill through these locations, and when you install the body, the front LED lights protrude naturally through the fog light openings. Once the rear bracket is installed and the body is secured, line up the tail light plate and adhere it firmly to the rear bracket using super glue. I utilized 5mm LED's from Radio Shack for illumination and servo mounting screws to fasten both brackets. The LED holes and screw holes might need minor enlargement to ensure a secure fit. To prevent LED burnout, the LEDs are connected in parallel with a 330 Ohm resistor in place. This critical component prevents overloading of the LED's. I connect a male servo lead to both the front and rear light assemblies and plug them into a Y-connector, which is then plugged into a spare channel on the receiver. Following assembly, I protect exposed wiring from vibration and moisture by applying a layer of hot glue.
With this file you will be able to print Light brackets for Traxxas Rustler with your 3D printer. Click on the button and save the file on your computer to work, edit or customize your design. You can also find more 3D designs for printers on Light brackets for Traxxas Rustler.