Leonardo da Vinci inspired glider
thingiverse
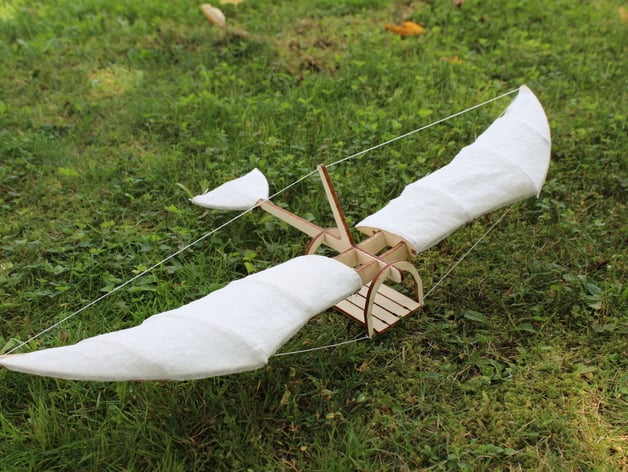
I designed this glider for a short workshop at a young university aimed at 11 to 14 year olds. It's inspired by Leonardo da Vinci's flying machines, but I kept things simple despite being new to aerodynamics. Even so, the glider flies surprisingly well and is missing only one thing: a vertical tail wing that would stabilize flight. To make it more fun, I added a gondola where kids can add their favorite toy figure that flies right alongside the glider. You can learn more about this project on my blog at https://regendrogenbogen.wordpress.com/2015/10/02/flugmaschine-nach-den-entwuerfen-von-leonardo-da-vinci-flying-machine-inspired-by-the-designs-of-leonardo-da-vinci/. If you don't have access to a laser cutter, I've also posted this kit on Etsy at https://www.etsy.com/shop/DaVinciModelShop. Instructions: Step 0: Cutting the Parts Cut all the wooden parts from 4mm plywood sheets. You can pick any fabric for the wings as long as it's slightly elastic - a rough woven one looks pretty good to me! Step 1: Assemble the Wings Begin with the wing assembly, which should be put together like you see in this picture below. It works best if you place two spars on a flat surface (like a table) and then attach the ribs, extending beyond its edge so they can go further down when needed. Step 2: Make the Center of the Wing Just glue four pieces together - easy peasy like shown below! Step 3: Attach the Gondola You only need to put two curved parts together, attach floorboards with precise cuts for spacing, and you're good to go. Step 4: Build the Fuselage Get the long fuselage piece into the gondola, secure it with glue, then attach the rear wing as seen below.
With this file you will be able to print Leonardo da Vinci inspired glider with your 3D printer. Click on the button and save the file on your computer to work, edit or customize your design. You can also find more 3D designs for printers on Leonardo da Vinci inspired glider.