Lego Track Adapter (blue / gray-area to 9V / RC / Power Functions area tracks)
thingiverse
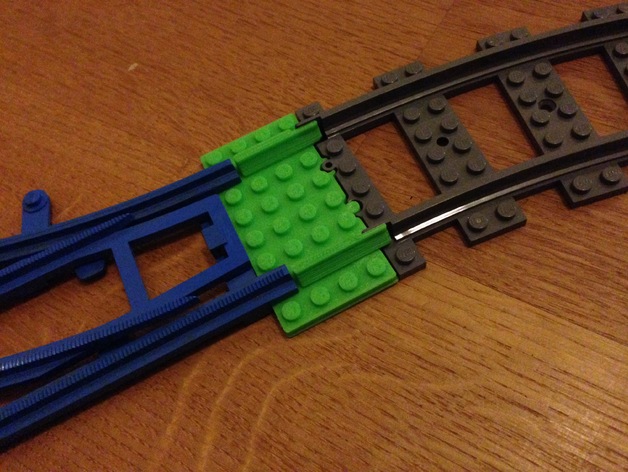
I created this track adapter so my son could connect our old blue-area tracks with his newer RC train's tracks, which also work for 9V tracks. I built the adapter so he can play with all his trains on the same track system. To make the track adapter, I designed it with precise measurements: it uses a nozzle at 210 degrees Celsius and speeds of up to 80 meters per second during infill printing. Note that when drawing the Lego knobs, they are slightly smaller than their original size, as our 0.4 nozzle extrudes small features larger than they actually are. I used Slic3r 1.1.7 for STL slicing with the following settings: ABS, 25% honeycomb infill, and no cooling during printing. When you slice your own track adapter using Slic3r 1.1.7, use these exact settings: Layer height is 0.2 millimeters, support is enabled, bed temperature at 100 degrees Celsius with the first layer set to 110°C. The print starts at speeds of up to 80 meters per second for infill and continues with a lower speed when printing small features. When designing your own track adapter STL file, draw the Lego knobs smaller than their actual size to account for nozzle expansion. To correct for ABS shrinkage (0.5% in total), either scale up the STL by 1.005 before printing or insert the commands M92 X80.4 and M92 Y80.4 at the start of your G-code to compensate during the print process. When I was making this adapter, my son got so excited to connect his old blue-area tracks with his newer RC train's tracks that we ended up building a track layout just for fun. He is really happy now.
With this file you will be able to print Lego Track Adapter (blue / gray-area to 9V / RC / Power Functions area tracks) with your 3D printer. Click on the button and save the file on your computer to work, edit or customize your design. You can also find more 3D designs for printers on Lego Track Adapter (blue / gray-area to 9V / RC / Power Functions area tracks).