LED Tower Lamp (21cm)
prusaprinters
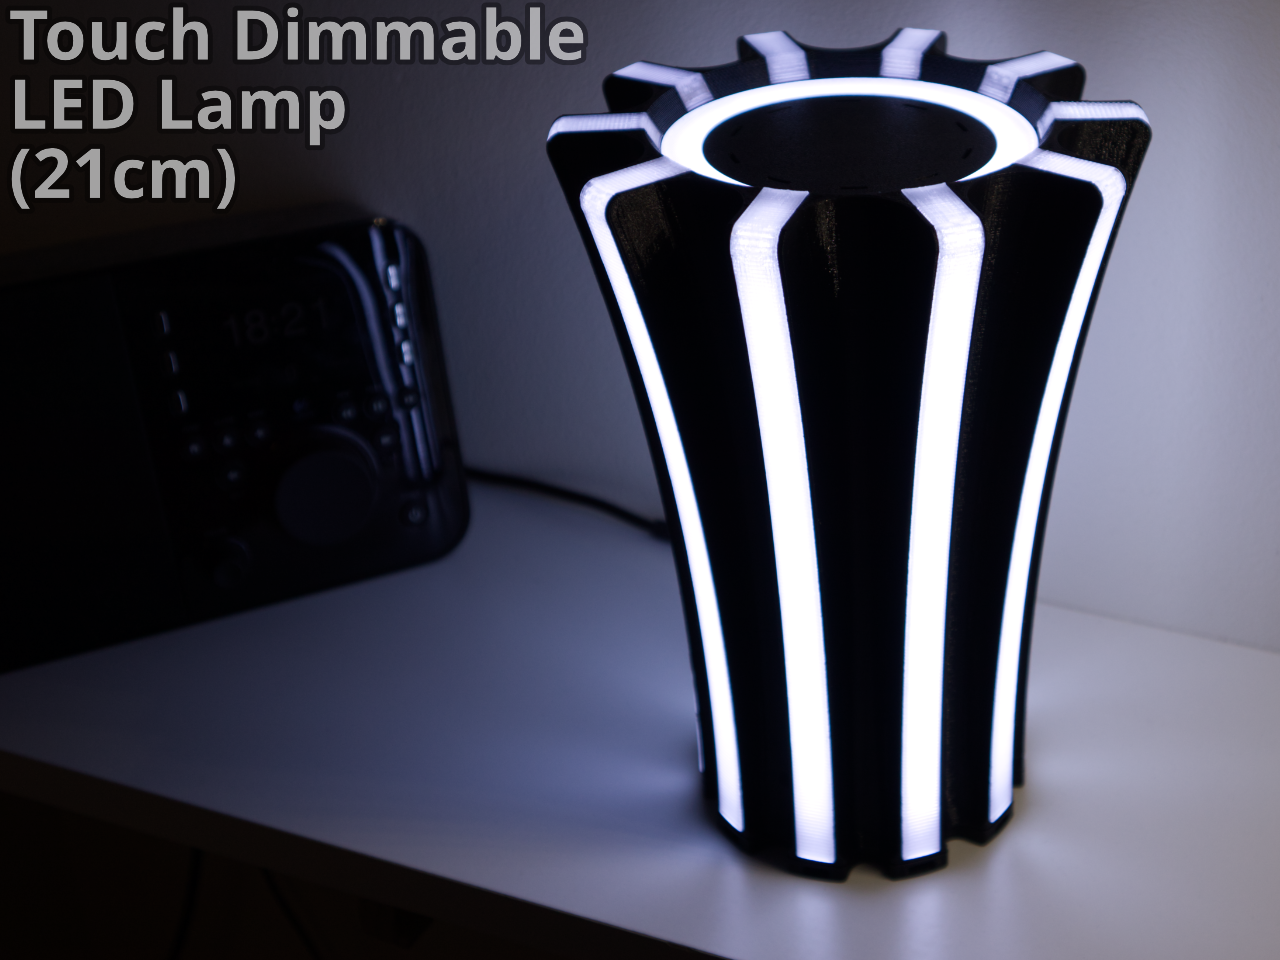
<p>I wasn't sure if I wanted to release this. I'm not quite sure if I like it or not. Figured I would release it anyway, just to see what happens. If you make one, consider uploading a picture.</p> <ul> <li><strong>Note:</strong> The light is far brighter then it appears in a photo.</li> </ul> <p>Hmm.. It looks like this will become a series of items with this style. I will be making more items like this in the coming days. Seems like some people like it.</p> <p>It's a fairly large lamp (21cm high, the full build height of the MK3) that has 10 lit vertical line segments rotated around it, as well as a lit ring on top (optional). It uses common 10mm wide LED strips, mine happen to be very dense 24v white ones. The lamp has an invisible touch switch under the top lid. It senses when your finger is on the lid, and will turn on or off, as well as dim the lights. The dimmer board is taken from a common touch dimmer that you can find on eBay, so there is no programming necessary. Note that this dimmer will only work with single color strips. If you want to use colored lights, you will need a different way to control them, like an RF remote. Or you can print the side emitters in a transparent color.</p> <p>You can also use addressable led's if you want a more advanced light that has animations, is controllable though WiFi, reacts to music, etc.. There is a lot of space inside for a microcontroller. Heat might be a concern with the 5v strips, since the current for these can be quite high.</p> <p>It takes a pretty long time to print. The base took about 20 hours on very fast settings (too fast I think. The surface could be much nicer). Each side emitter takes about 30min (10 of those). And the internal reflector panels I think was 10min (20 of these, 10 should be mirrored). So it would take a couple days to make.</p> <p>There are a few different configurations on the top to choose from, depending on if you want the touch dimmer or not, as well as the lit ring. The pictures show the various types.</p> <p>I will not cover how to solder wires, as it's just positive and negative connections. All strips are connected in parallel. I would not use 12v strips, because of the higher current and heat.</p> <p><strong>Note:</strong> When you power the light up the first time, you need to keep a close eye on the temperature. LED strips can get very hot when they are closed in like this. I cannot run my strips at 24v. The temperature passes 80°C inside.. which is enough to warp my CPE. Keep in mind that I'm using very hot strips though. Dense white lights is the worst in this regard.</p> <p>PLA is very likely to warp unless you underpower it, so I would use PETG or better. It might be possible to use ABS with the new design, as most surfaces are now pretty short. (long surfaces would want to contract more).</p> <p>I've added a few features after I printed mine that should help with the temperatures - I opened the internal back wall where the LED strips are, so now the heat is not dumped into the wall, but is transferred to air. The strips are now only held at the edges. Since the internal wall is not a continuous surface anymore, it should also help limit expansion as it warms up.</p> <p>Also added a vented base that the light can stand on. Air comes in here and flows out the vents on the top lids. It's passive cooling, so not very effective, but it does lower the temperature a few degrees. Top vents are shielded so light wont be visible through them.</p> <p>The lamp is very bright so you can easily run it at a lower voltage and not loose much light. Then the heat issues are of little concern. It's meant to be more of a decorative light, so not having it at full power should be fine.</p> <p>There is a test print I recommend you print first to see if your strips and barrel connector fits. The LED strips need to be 10mm or up to 11mm max.</p> <h3>Print instructions</h3><p><h3>The parts</h3><br/> <br/><br/> <br/></p> <p><strong>Base:</strong><br/> I printed mine with 0.3mm layers, which might be to coarse. My finish is not very good, as it was a new material (CPE), and was printed too fast. Should have enough perimeters to make the side chamber walls solid. Should be printed in a very dark color, unless you want light too bleed trough the walls.</p> <p><strong>Base Test Piece:</strong><br/> This is a small section of the base that can be used to see if your led strip and connector fits. This should be the first thing to print.</p> <p><strong>Middle Separator (optional):</strong><br/> This is a plate that fits in the center inside the lamp. This is for keeping stuff like a microcontroller from falling out the bottom. Not compatible with the long container. Not pictured.</p> <p><strong>Side Emitter:</strong><br/> These are the side "lenses" the light comes out from. They are printed in a transparent material, like PETG. They are printed on the side. There are two versions of these. One with internal, and one with external serrations (spreads the light). The light will be different between them. Try both and see what you prefer. Printed with only perimeters to make it solid. You might need to tweak the perimeter extrusion width so the printer doesn't divide the lines into a billion islands, which will take over 1h to print. Adjusting the width will fuse the perimeters into a continuous line. Each emitter should take about 30min to print.</p> <p>They have a tendency to warp, so I added a version that has a larger area at the end, to prevent it from lifting (this would be cut away after printing). Might not want to use the power coated sheet for this, as it has weaker adhesion. Alternatively, they can be printed with a brim.</p> <p>They should be held by friction, but can be glued if necessary.</p> <p>The printer might sound like a tiny space gun while printing these..</p> <p><strong>Side Reflector:</strong><br/> The purpose of these is to increase the amount of light inside the side chambers, and to diffuse the light and make it more even. These are printed in white. Can be glued or taped in place. Printed solid.</p> <p><strong>Base Vented Plate (optional):</strong><br/> This was made to lower the internal temperature a few degrees. It has 10 vents to let air in. The lamp has a tab so it will only fit on one way. This plate might not be necessary for you. Depends on how hot the light gets.</p> <p><strong>Top Dimmer Lid:</strong><br/> A vented lid for the touch dimmer. The dimmer is glued or taped to this. Has some brackets that wires can be zip-tied to, so the wires doesn't pull on the dimmer. Printed solid. Looks best printed with the powder coated plate.</p> <p><strong>Top Emitter:</strong><br/> This is the lit ring on top. If you want this, it's printed in transparent PETG. Can be printed in black if you don't want to use it with lights. This area is the hottest, so I would check often to see if it gets soft in testing. Printed solid.</p> <p><strong>Top Reflector:</strong><br/> Same purpose as the side reflectors. Increases the light and diffuses it. It has holes and a gap to let some air through. Printed solid.</p> <p><strong>Alternative Tops:</strong><br/> If you don't want to use the dimmer lid, then there is an alternative top that has a small or large container that can be used to store a few items. The large one can be used as a pen holder. These are also vented, so I would be careful not to block them all. The emitter ring and reflector for these is slightly different. This ring can also be printed black if no led's are used on top.</p> <p><br/></p> <p><h3>What you need:</h3><br/> <br/></p> <p><strong>10-11mm LED strips</strong></p> <p>Finding these should be easy. I recommend using 24 volts strips, since they have a much lower current than 12 volts. I would also look for very dense strips. The light will be more even the denser they are. My side strips have 24 led's each, plus 36 with the top one. Each side strip is 20cm long, so 276 led's in total.</p> <ul> <li><strong>Note:</strong> I would not use silicone covered strips. They are likely to get hotter and could jam in the mounting track.</li> </ul> <p>Consider removing the adhesive tape from the side LED strips. It serves no purpose, and probably insulates the strips, causing higher temperatures.</p> <p>I would avoid strips with resistors that are right at the edge. It might interfere with the track the strip sits in.</p> <p>The tracks for the strips are 11mm wide so it may fit strips up to this size if the slots are printed clean. Keep in mind that a tighter fit will transfer more heat to the plastic.</p> <p><strong>12-24v Touch Dimmer (optional)</strong><br/> eBay Search: led touch inline dimmer</p> <p>The dimmer can be used as is, or you can take it out of the enclosure and install it in the dimmer lid. It works through the plastic. The enclosure is just pressed together.</p> <p><strong>Barrel Jack Connector</strong><br/> eBay Search: 5.5 (2.1,2.5) panel connector</p> <p>The connector was added after I printed my lamp, but you can still see it in the test model. I just used a wire in my lamp, which doesn't look as nice as the connector. I think the current rating on these is 3a, so this is one reason to use 24v strips. 12v strips might go over this limit. These are available with a 2.1 or 2.5mm center pin. Choose what fits your power supply.</p> <p>Wires should be soldered on the inside of the connector tabs so the wires doesn't get wedged in the connector hole.</p> <p>Connector is glued in place. No space for the nut.</p> <p>My lamp uses 2.1 amps with 24 volts, but as stated, it cannot run at this voltage since it gets too hot. I can run it fine at 20v, where it uses just 1 amp.</p> <p>It is possible to run the lamp with <strong>USB-C Power Delivery</strong> if you use an adapter cable. Search eBay for "5.5 usbc pd" to find it. This would be convenient if you have a PD capable power supply, since it would run at 20v.</p> <p><strong>Wires</strong></p> <p>I'm using 26AWG silicone wires for the strips, and 18AWG going to the connector (or wire in my case). You might want to solder the wires higher up on the side strips. Soldering them on the bottom can put a lot of stress on the joint, especially if they are fiddled with.</p>
With this file you will be able to print LED Tower Lamp (21cm) with your 3D printer. Click on the button and save the file on your computer to work, edit or customize your design. You can also find more 3D designs for printers on LED Tower Lamp (21cm).