LED Table Lamp
prusaprinters
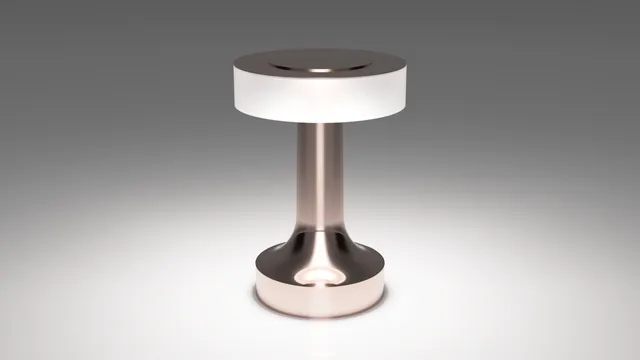
Recently I went to Vegas for some fun and came across a lamp in my hotel room. This lamp was quite lightweight and almost portable. The only issue was it was connected to a long cord. So, I decided to create my own portable LED lamp that I can light up using batteries and also be able to recharge the lamp without having to take batteries out and replacing. With that vision in mind, I designed this lamp.I printed multiple of these lamps, and I use them on my work desk, dinner table and different places in my house. I also wanted to avoid 3D printed look on this lamp, so I have done some post-processing which I will explain in detail below.Also, as usual, I have uploaded RAW step files for anyone to be able to customize it based on their needs. (I hope more and more makers start sharing step files for easier modifications.)Print SettingsUse 0.16mm or less layer height for better look and quite less post processing.Main Body doesn't need supports as printer can bridge without any issues, but if you're having issues with bridging, then enable supports. Very small surface requires supports anyway.Top Cover should be printed with larger circle on plate and supports enabled.Diffuser must be printed in Spiral Vase mode with 2 bottom layers, 0 top layers and 0.45mm line width for all.Required Hardware18650 Rechargeable Battery 3.7V -- https://amzn.to/3Sbe3mCConstant Current Adjustable Module -- https://amzn.to/4b7lGDdHigh Power Led Chip 3W (Different temp and colors as per your desire) --- https://amzn.to/3SfUHN0LED Heat Sink -- https://amzn.to/3HxTXhfType-c USB 5V 1A 18650 Lithium Battery Charger Module -- https://amzn.to/494u4Bw18650 Battery Clip -- https://amzn.to/3u3gWxNRocker Switch ON/Off -- https://amzn.to/3u5qcBuSoldering materials and wirePost-Processing StepsRemember, these are the steps that I took. You do not have to do this, but it will surely make the lamp look much better and additionally the time required will be quite less if you printed with 0.16mm high quality profile. Overall time for post-processing was little less than hour excluding the drying wait time.Lightly sanded main body at the seam with 180 gritFill the seam with Bondo Spot Putty – https://amzn.to/4b6PmjHLightly sanded seam again to make it smooth with 180 gritUsed filler primer on all bodies – https://amzn.to/3Oir1O2Lightly sanded all bodies with 180 grit for final timeFinally sprayed all bodies with regular primer and metallic rose gold paintAssembly and Circuit Connection StepsRefer to circuit diagram for electrical connections.First insert “Rocker Switch ON/Off” and “Battery Charger Module” in main body. Use hot glue to secure it if needed.Insert “Battery Clip” and “Current Adjustable Module” in bottom cover and secure them using hot glue.Glue top disk onto top cover.Secure LEDs on LED Heat Sinks. Connect LEDs with each other as per diagram. (I used 8 LEDs, but you can choose more or a smaller number of LEDs. Note that higher number of LEDs will discharge the battery faster.)Secure LEDs at the bottom of top cover.Finish circuit connections now. Make sure to insert diffuser before putting on top cover and running LED wires.Turn on LEDs and adjust current appropriately. The higher current will make LEDs brighter and will make them run hotter. Make sure the current doesn't exceed LED max current limit. I used white (6000K) LEDs with max current for my desk and warm white (3000K) LEDs with lower current for soothing light on dinner table.Once the current is adjusted, you can finish the assembly of the lamp.
With this file you will be able to print LED Table Lamp with your 3D printer. Click on the button and save the file on your computer to work, edit or customize your design. You can also find more 3D designs for printers on LED Table Lamp.