LED Strip Holder for Prusa Lack Enclosure
prusaprinters
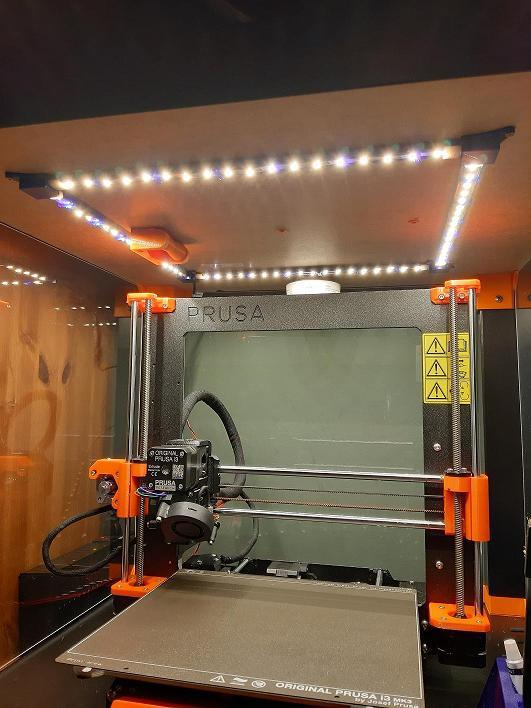
<p>Rather than let the LED strip dangle untidily from the lid of the Lack enclosure I decided to make a more rugged job.<br/> I have used PETG for my example as I know PLA will warp by the heat generated within the enclosure.</p> <p>No soldering is required.</p> <p>Apart from the printed parts you will also need</p> <p>LED Strip (24v)<br/> <a href="https://www.amazon.co.uk/gp/product/B07B9ZD6N5/ref=ppx_yo_dt_b_asin_title_o06_s00?ie=UTF8&psc=1&tag=tv-auto-20">https://www.amazon.co.uk/gp/product/B07B9ZD6N5/ref=ppx\_yo\_dt\_b\_asin\_title\_o06\_s00?ie=UTF8&psc=1</a></p> <p>Right angled connectors<br/> <a href="https://www.amazon.co.uk/gp/product/B077X7ZQLC/ref=ppx_yo_dt_b_asin_title_o02_s00?ie=UTF8&psc=1&tag=tv-auto-20">https://www.amazon.co.uk/gp/product/B077X7ZQLC/ref=ppx\_yo\_dt\_b\_asin\_title\_o02\_s00?ie=UTF8&psc=1</a></p> <p>16 x Screws<br/> <a href="https://www.amazon.co.uk/Stainless-Crosshead-Drilling-Self-Tapping-Woodworking/dp/B079PPJTZF/ref=sr_1_14?dchild=1&keywords=wood+screws+m3+3mm&qid=1602973003&s=diy&sr=1-14&tag=tv-auto-20">https://www.amazon.co.uk/Stainless-Crosshead-Drilling-Self-Tapping-Woodworking/dp/B079PPJTZF/ref=sr\_1\_14?dchild=1&keywords=wood+screws+m3+3mm&qid=1602973003&s=diy&sr=1-14</a></p> <p>Note<br/> The LED strip has polarity. See photographs.</p> <p>To aid insertion of the strip into the right angled connectors it is advised to slightly lift the connector pins. They will close and make correctly when the connector is closed up.<br/> If you have cut the strip too short at any point just use remaining strip on the reel, there is absolutely loads left over so don't worry about cutting incorrectly.</p> <p>2 methods of power connection are available. Either hard wire or use a 2.1mm jack.</p> <p>One of the corner covers has an opening for the cable, so make sure you identify this one and reserve it for the correct corner.</p> <h3>Print instructions</h3><h3>Category: 3D Printer Accessories Summary</h3> <p>Rather than let the LED strip dangle untidily from the lid of the Lack enclosure I decided to make a more rugged job.<br/> I have used PETG for my example as I know PLA will warp by the heat generated within the enclosure.</p> <p>No soldering is required.</p> <p>Apart from the printed parts you will also need</p> <p>LED Strip (24v)<br/> <a href="https://www.amazon.co.uk/gp/product/B07B9ZD6N5/ref=ppx_yo_dt_b_asin_title_o06_s00?ie=UTF8&psc=1&tag=tv-auto-20">https://www.amazon.co.uk/gp/product/B07B9ZD6N5/ref=ppx\_yo\_dt\_b\_asin\_title\_o06\_s00?ie=UTF8&psc=1</a></p> <p>Right angled connectors<br/> <a href="https://www.amazon.co.uk/gp/product/B077X7ZQLC/ref=ppx_yo_dt_b_asin_title_o02_s00?ie=UTF8&psc=1&tag=tv-auto-20">https://www.amazon.co.uk/gp/product/B077X7ZQLC/ref=ppx\_yo\_dt\_b\_asin\_title\_o02\_s00?ie=UTF8&psc=1</a></p> <p>16 x Screws<br/> <a href="https://www.amazon.co.uk/Stainless-Crosshead-Drilling-Self-Tapping-Woodworking/dp/B079PPJTZF/ref=sr_1_14?dchild=1&keywords=wood+screws+m3+3mm&qid=1602973003&s=diy&sr=1-14&tag=tv-auto-20">https://www.amazon.co.uk/Stainless-Crosshead-Drilling-Self-Tapping-Woodworking/dp/B079PPJTZF/ref=sr\_1\_14?dchild=1&keywords=wood+screws+m3+3mm&qid=1602973003&s=diy&sr=1-14</a></p> <p>Note<br/> The LED strip has polarity. See photographs.</p> <p>To aid insertion of the strip into the right angled connectors it is advised to slightly lift the connector pins. They will close and make correctly when the connector is closed up.<br/> If you have cut the strip too short at any point just use remaining strip on the reel, there is absolutely loads left over so don't worry about cutting incorrectly.</p> <p>2 methods of power connection are available. Either hard wire or use a 2.1mm jack.</p> <p>One of the corner covers has an opening for the cable, so make sure you identify this one and reserve it for the correct corner.</p> <h3> Print Settings</h3> <p><strong>Printer Brand:</strong> Prusa</p> <p><strong>Printer:</strong> I3 MK3S</p> <p><strong>Rafts:</strong> No</p> <p><strong>Supports:</strong> No</p> <p><strong>Resolution:</strong> 0.2mm</p> <p><strong>Infill:</strong> 15%</p> <p><strong>Filament:</strong> Prusament PETG Ultramarine Blue Transparent<br/> <strong>Notes:</strong></p> <p>I used Prusa Pretty PETG Profile with a textured sheet.</p> <p>Retraction length : 1.2mm<br/> Retracton Lift Z : 0mm<br/> The bed was heated to 90 degress for the first layer and 85 degrees for subsequent layers</p> <p>Total print time was 9hrs</p>
With this file you will be able to print LED Strip Holder for Prusa Lack Enclosure with your 3D printer. Click on the button and save the file on your computer to work, edit or customize your design. You can also find more 3D designs for printers on LED Strip Holder for Prusa Lack Enclosure.