LED Power Supply Mounting Brackets for MendelMax
thingiverse
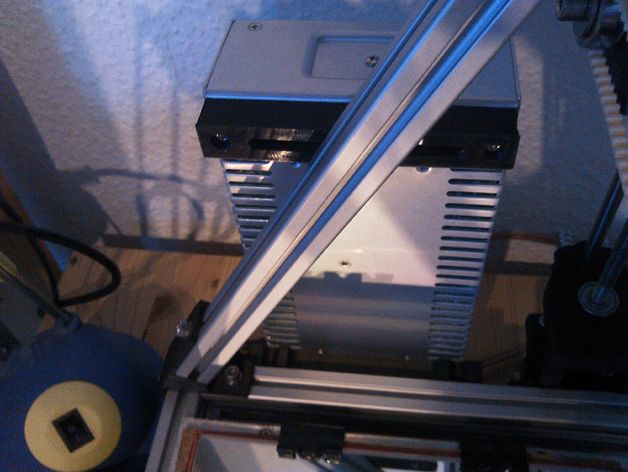
Quickly attach your LED power supply to your Mendel Max with these two simple brackets. Print them easily, but assembly might be a bit tricky. Once mounted, they'll be rock solid and leave room for neat cable management. You'll need 4x M3 screws & washers, 3x M5 screws & washers, and 3x M5 captive nuts. To assemble, follow these steps: 1. Print the top and bottom parts or a complete set with recommended settings (3 perimeters, 0.3mm layer height, 25% infill). 2. Remove all cables from your power supply. 3. Screw the bottom part to the back of your power supply using M3 screws and washers near the cable terminals. Tighten firmly. 4. Attach the top part to the side of the diagonal extrusion with a M5 screw, washer, and captive nut. Fasten slightly for adjustment. 5. Screw the power supply to the top extrusion of the bottom frame using M5 screws and captive nuts. Again, fasten lightly for adjustment. 6. Align the top part with the power supply by tightening both M3 screws. 7. Remove the power supply from the printer without moving the top part from its aligned position. 8. Securely fasten the top part in its aligned position while still keeping it stationary. 9. Reattach the power supply to the bottom frame and secure it slightly. 10. Fasten the top part to the power supply firmly. 11. Finally, tighten the bottom screws fully. 12. Reconnect your wires to the power supply terminals. Note: The design file is compatible with FreeCAD 0.12, but may have issues opening in versions above 0.12. STL files are unaffected.
With this file you will be able to print LED Power Supply Mounting Brackets for MendelMax with your 3D printer. Click on the button and save the file on your computer to work, edit or customize your design. You can also find more 3D designs for printers on LED Power Supply Mounting Brackets for MendelMax.