LED Ornament Topper
pinshape
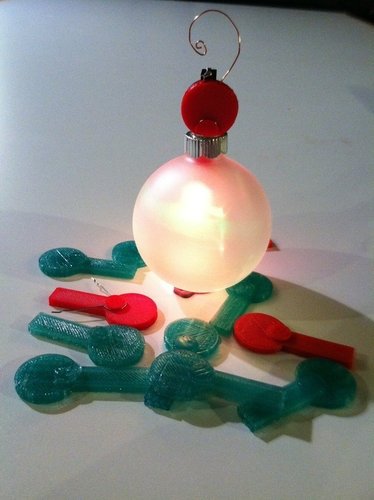
Summary This is the LED ornament topper that was created by CCCKC Hackerspace in collaboration with Hammerspace Hobby & Community Toolshop, our new home in Kansas City. It's a fun, quick 4 soldering point ornament insert that cycles between several colors and modes with each on and off cycle. We kept it awesome by printing the body and using only two components (LED and battery holder) and copper wire to extend the leads and create an ornament hanger and integrated switch. We created this holiday-themed project as a fun way to learn soldering while making a gift. It's a blank canvas waiting for customization, ripe to become many different characters and uses. One idea is to leave one of the copper leads untrimmed and use it as a second switch. Add some googly eyes, and you've got reindeer! Or turn them upside down and create a Menorah with 9 prints. I used Autocad 123d to design this project, mainly to learn the program better. Try it out; you might like it! This project is brought to you by Cowtown Computer Congress of Kansas City - http://C3KC.org and Hammerspace Hobby & Community Toolshop - http://www.hammerspacehobby.com. We specified two different LED's for this project, but you can use Radioshack's in-store option or order from http://microelect.net/ over the phone. Yeah, over the phone! Instructions A picture is worth a thousand words, so check out this flickr set for more details. http://www.flickr.com/photos/luiserodriguez/sets/72157628366373613/with/6514354733/ *Print in ABS or PLA in any color you like. *Attach the battery holder with the + tab facing toward the ornament. Use hot glue or double stick tape. *Extend the outer leads with stiff wire. Use a bit too much and trim it later if needed. *Solder just enough to fish the leads through the body. *Insert the LED into the holes in the end, bending the middle (+) lead slightly to help it go through the middle hole. *Solder the right-angle lead (-) to the battery clip tab. The middle (+) lead gets soldered to the +. *Short the downward pointing 45 degree angel lead (switch) to - to turn the LED on and off in a cycle. *Bend or extend the leads out of the top to create your desired design. Get creative! *Use any glass ornament, frosted or clear. *Remove the clip and attach it to the nub on the insert. It should snap into place but don't worry if it doesn't. *Squeeze the insert together as you put the completed ornament topper into a glass ornament. Insert the completed ornament topper and... Rejoice in your awesomeness or give the print and components as a gift to another Maker! We're sure we've missed something, so ask any questions you may have. HAPPY HOLIDAYS!
With this file you will be able to print LED Ornament Topper with your 3D printer. Click on the button and save the file on your computer to work, edit or customize your design. You can also find more 3D designs for printers on LED Ornament Topper.