LED Light Pipe and Lens for Original Prusa MMU3
prusaprinters
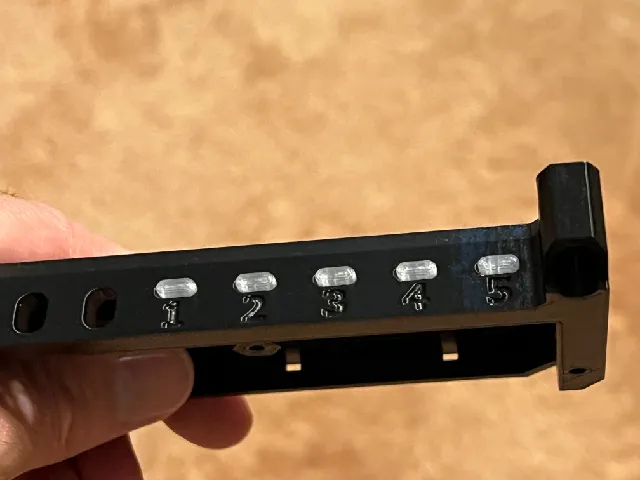
The LEDs on a stock MMU3 are difficult to see unless looking directly into the holes, especially when viewed from the front with the MMU mounted at the standard angle. These light pipes and lenses disperse the light over a wider angle allowing the LEDs to be more easily seen.I tested this on both the R3 and R4 models of the MMU3 cover. The LED holes on the MMU3 cover are a slightly different shape than the MMU2S cover (angled vs. rounded ends); if you are looking for LED lenses that fit the MMU2S, download my other model (900903-led-light-pipe-and-lens-for-original-prusa-mmu2s).Installation Procedure:Press the lenses into the holes until the flange that connects the individual lenses is flat against the inside surface of the cover (as shown in the picture).The lenses are friction-fit and should stay in place by themselves. However, if they are loose due to printing tolerance (or you are concerned about pushing on the lenses from the outside), add a couple drops of CA glue between the flange and the inside surface of the cover to hold it in place.Miscellaneous Notes/Comments:Print with PETG using 0.2 mm layer height and a 0.4mm nozzle. Set perimeters to at least 4 so that the light pipe is solid (my print was set to 5 perimeters).The filament I used was MatterHackers Translucent Clear PETG.Please don’t use the .bgcode file that has been provided (always slice your own files for your specific printer, filament, environment, etc.). The file was included to provide a reference for approximate print time.
With this file you will be able to print LED Light Pipe and Lens for Original Prusa MMU3 with your 3D printer. Click on the button and save the file on your computer to work, edit or customize your design. You can also find more 3D designs for printers on LED Light Pipe and Lens for Original Prusa MMU3.