LED Channel Standoffs for bespoke striplighting installations
prusaprinters
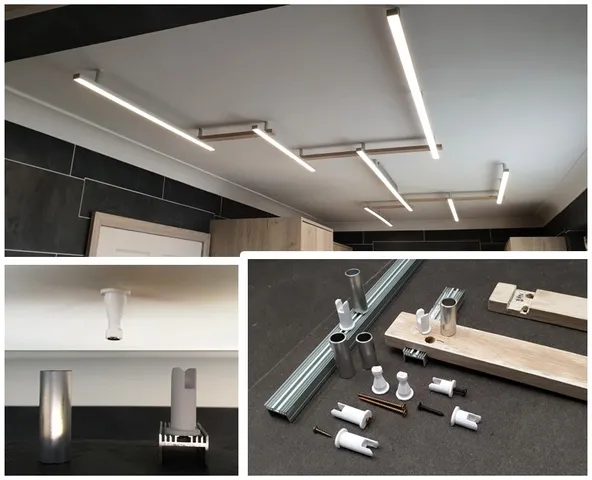
Standoff overviewThe basic elements are quite simple:A “Stalk” piece that fastens to the ceiling.The Ø3.5 x 50 mm woodscrew is the weight-bearing elementA “Head” piece that pushes onto the Stalk and then twists a quarter turn to retain.The Head also receives a smaller woodscrew that engages the LED channel.An aluminium Barrel or sleeve.It looks nice, but also constrains the ears of the head-piece so they can't splay open.But ….A large lighting project (incorporating multiple linked channels, PSU and controller) can quickly become unsimple. That's for the experienced DIY-er who is prepared to …Plan aheadMeasure carefully and re-checkAdapt according to wishes and circumstancesThink on their feetSwear a lotBacktrack, adjust and bodge where necessaryI have created a few assembly aids which are shown in the pictures. They're not perfect but can be made useable with a bit of faffing. If you really want to try this stuff, then ask about anything that's unclear. PrintingI printed the main parts in PET for resilience and long life.It's important to print the “Head” pieces laying down as shown in the image. The thin ears will carry the weight of the lamps in tension, so need to benefit from the fibre direction.HardwareThe LED Channel is one that has an upper T-slot for suspension (they are sometimes hung on wires). I used this : https://www.ultraleds.co.uk/chunky-aluminium-channel-20168-1956.html You'll need to add your choice of LED tape, diffuser, wires and endcaps.The Barrels are cut from extruded aluminium tube having inner diameter 12.5 mm (± 0.2 should be ok). Outer diameter approx 16 mm (this is less important). I used this tube : https://www.ebay.co.uk/itm/192888033120?var=493045007844 (it says 16 mm OD x 1.5 wall, but what I recieved and worked with was ≈ 15.85 OD [5/8" ?] and ≈ 1.6 wall [16 SWG?] )See below for cutting lengths.ElectricsKnow what you are doing here, or have it wired by a qualified person. Perhaps the best option electrically would be to provide a switched low voltage DC supply at the ceiling, i.e. with a remote PSU.If the supply at the ceiling is mains voltage, then using the longer standoff option it's possible to mount a slim PSU above the LED channel. In my installation this one: https://www.ultraleds.co.uk/tagra-super-slimline-linear-professional-24v-constant-voltage-led-driver-100w.htmlBut be sure to use the correctly rated PSU suiting your own project. Overspecifying the wattage by 25% is advisable.I also added this (optional) wireless dimmer/controller : https://www.ultraleds.co.uk/mains-powered-single-colour-wall-plate-5-in-1-receiver-bundle-4-zone.html If doing likewise, again select correctly rated equipment and also any functions you might want (CCT, RGB…).Also if using wireless, remember that the mains connections could be different to those of a regular switch. Read the documentation.For the terminal block I found this : https://www.ebay.co.uk/itm/115501906995 which was actually a little too thick and I had to “adjust” it slightly. Maybe look for a more compact alternative.I have enclosed my electrics between two aluminum plates that I made from stair tread nose: https://www.ebay.co.uk/itm/273982287869?var=573966866339 (need to be trimmed to size). They have nonconductive anodisation but anyway I earthed them, and the LED channel.I printed 2 x “Lighting_PSU_Spacer” which mount the side-plates to the channel.Length optionsI have made two standoff lengths, total lengths 40 and 50 mm.Cut the aluminium barrel to be 4 mm shorter in each case, the plastic parts have a 2 mm flange at each end of the standoff.Slat option (multi luminaire)With the 10 mm length difference it's possible to accommodate a wooden slat to connect adjacent LED channels. I used 15 x 40 mm oak : https://www.oakstoredirect.com/solid-white-oak-15x40mm-par-planed-all-round-31017-p.asp If the slat is thicker than 10 mm then it needs to be notched, so that the remaining wood under the notch is 10 mm thick. See images.FreeCAD source includedFreeCAD users could easily adapt the design for:Other lengths of standoffDifferent sizes of aluminium tube
With this file you will be able to print LED Channel Standoffs for bespoke striplighting installations with your 3D printer. Click on the button and save the file on your computer to work, edit or customize your design. You can also find more 3D designs for printers on LED Channel Standoffs for bespoke striplighting installations.