Learning Clock
prusaprinters
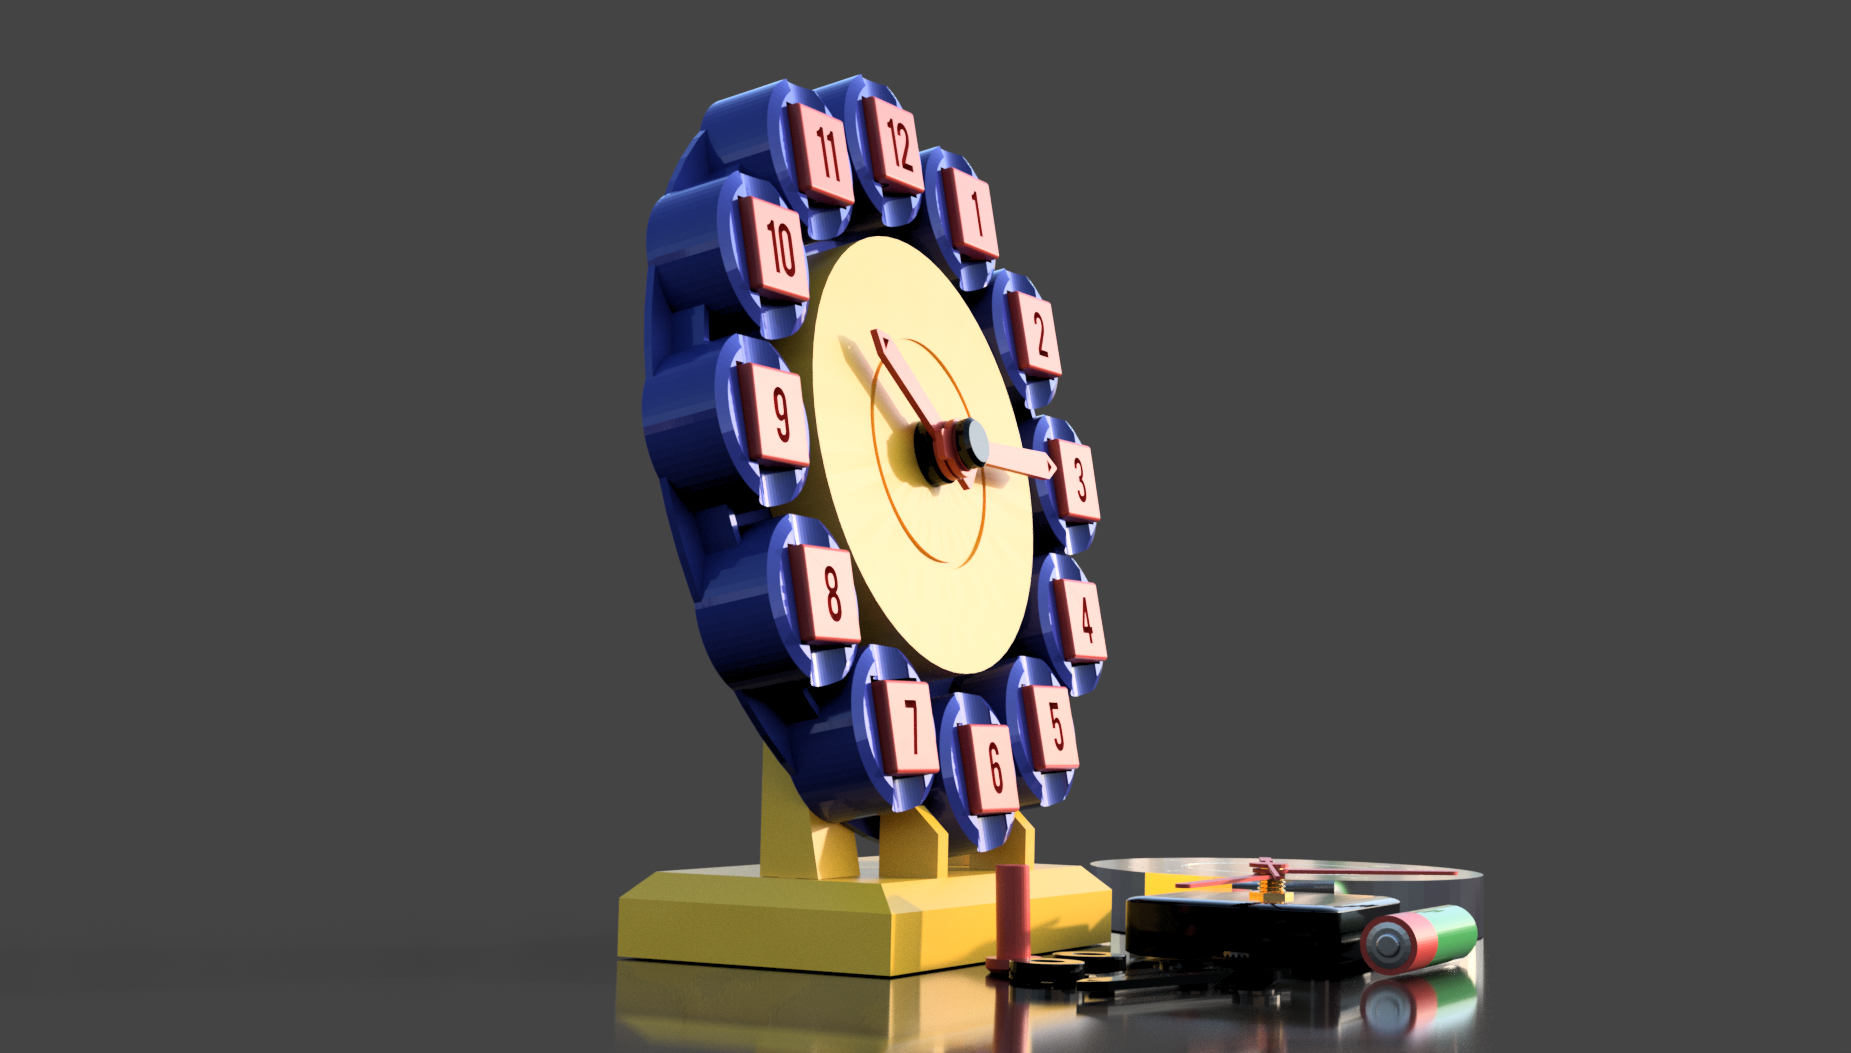
<p>Due to the six-sided insertable cubes, this clock is is, in the truest sense of the word, many-sided. A total of 6 different faces can be displayed. A challenging learning toy … but perhaps also a clock for the one or other adult 3D printing fan.</p><p>I got the inspiration for this project from a contribution on Thingiverse (https://www.thingiverse.com/thing:2852026). I completely redesigned the case and prepared it for battery operation, changed the number cubes, and occupied all the cube faces.</p><p>Primarily, I wanted to print the clock for my grandchildren to learn how to tell time. For this, there are play hands that can be inserted into the clock case. However, I thought it would be a "shame" to use the clock only as a learning toy. Therefore, I designed the clock in a way that it can also be used as a normal clock with a battery-powered movement. Then, of course, it depends on the color design to what extent this clock can also please an adult. For children, the colours should be appropriate for children. </p><p>The clock face can be customized with the number cubes for practicing clock times.</p><p>There are a total of 6 different ways to insert the cubes into the case, with the letters (AS TIME GOES BY) and the point surfaces being more in the fun area.</p><p>Once children have mastered reading the times, the play/exercise hands can be replaced with a battery operated movement.</p><p>The clock can be wall mounted or placed on a stand.</p><figure class="media"><oembed url="https://www.youtube.com/watch?v=x5qoa6nvtUM"></oembed></figure><p><strong>Dimensions:</strong></p><ul><li>Case: Ø 200 x 25mm (cubes included)</li><li>Number cube: 22x22x22mm</li><li>Stand: L 122 x W 74 x H 95mm</li><li>Learning clock hand hour: 45 x 2.2mm</li><li>Learning clock hand minute: 55 x 2.2mm</li><li>Battery movement clock hand hour: 45 x1mm</li><li>Battery movement clock hand minutes: 55 x 1mm</li><li>Battery movement clock hand seconds: 60 x 1mm</li></ul><p> </p><p><strong>Cube surfaces:</strong></p><ul><li>Arabic: 1-12</li><li>Roman: I - XII</li><li>12/24 hour display 1/13 - 12/24</li><li>Minutes: 5 - 60/0</li><li>Points: 1-12</li><li>Letters: A, S, T, I, M, E, G, O, E, S, B, Y</li></ul><p><br><strong>Preparing:</strong></p><p><img src="https://media.prusaprinters.org/media/prints/135511/rich_content/2f32db6d-b07a-41eb-bfed-778afe622c75/img_10jpg.jpg#%7B%22uuid%22%3A%22f8cf9d0a-0055-4656-9096-91d4aeb3f7a5%22%2C%22w%22%3A992%2C%22h%22%3A744%7D"><br> </p><p><strong>Print files case:</strong></p><ul><li>Clock_case.stl</li><li>Clock_clockworkcase_text.stl (or Clock_clockworkcase_clean.stl)</li></ul><p><strong>Print files number cubes:</strong></p><ul><li>Clock_No_01-12.stl</li></ul><p>or</p><ul><li>Clock_No_01.stl</li><li>Clock_No_02.stl</li><li>Clock_No_03.stl</li><li>Clock_No_04.stl</li><li>Clock_No_05.stl</li><li>Clock_No_06.stl</li><li>Clock_No_07.stl</li><li>Clock_No_08.stl</li><li>Clock_No_09.stl</li><li>Clock_No_10.stl</li><li>Clock_No_11.stl</li><li>Clock_No_12.stl</li></ul><p><strong>Print files stand:</strong></p><ul><li>Clock_standsocket.stl</li><li>Clock_standbacks_leftright.stl</li><li>Clock_standsafebar.stl</li></ul><p><strong>Print files clock hands:</strong></p><ul><li>Clock_clockhand_big.stl</li><li>Clock_clockhand_small.stl</li><li>Clock_clockhand_bolt.stl</li><li>Clock_clockhand_washer.stl (2x)</li></ul><p><strong>Print Settings</strong></p><ul><li>Printer brand: Prusa; Flashforge</li><li>Printer: MK3S, Mini; Finder</li><li>Supports: No</li><li>Resolution: 0,2</li><li>Infill: case 5%, clockwork case 15%, stand 10%, cubes 20%</li><li>Filament brand: Prusa; Geetech; ICE</li><li>Filament color: Galaxy Black; Silky Silver; Romantic Red</li><li>Filament material: PLA</li></ul><p><strong>Remark:</strong> As all parts are designed to fit very precisely, it may happen that you have to rework one or the other part a bit with sandpaper and/or cutter due to different dimensional accuracy of the printers and the different behavior of the filaments.</p><p><strong>What else is needed</strong> (if you want to update it)<strong>:</strong></p><ul><li>Clock movement, battery AA 1,5V</li><li>4 self-tapping screws Ø 2,9x 12mm</li><li>Phillips screwdriver</li><li>Superglue</li><li>Fine sandpaper</li><li>Pliers</li></ul><p>There are always several sets of hands in the kit. You can find suitable hands for this clock (Ø 200mm) e.g. here: </p><p>https://www.amazon.de/dp/B002A4KFM2/ref=cm_sw_em_r_mt_dp_3Z6T855CWW3THAQKWDDS </p><p><strong>Step 1: Stand Assembly</strong></p><figure class="image"><img src="https://media.prusaprinters.org/media/prints/135511/rich_content/ef0ca6d1-8281-45f0-97c5-3a88ebaa7532/img_11.jpg#%7B%22uuid%22%3A%22735f8f8a-eff1-4dea-8d3e-78ad51d47915%22%2C%22w%22%3A992%2C%22h%22%3A744%7D"></figure><figure class="image"><img src="https://media.prusaprinters.org/media/prints/135511/rich_content/a12d92c2-f0bd-4d12-b076-aeed95226840/img_13.jpg#%7B%22uuid%22%3A%225fb2752d-48e0-44ed-9e57-e41a83559246%22%2C%22w%22%3A992%2C%22h%22%3A744%7D"></figure><figure class="image"><img src="https://media.prusaprinters.org/media/prints/135511/rich_content/fa72ef70-5b7e-4155-a517-c41624ad4e11/img_18.jpg#%7B%22uuid%22%3A%22eff47023-7d31-469e-976d-3407091cc903%22%2C%22w%22%3A992%2C%22h%22%3A744%7D"></figure><p>If you want to hang the clock on the wall, you can do without this step. Otherwise you will need:</p><ul><li>Clock_standsocket.stl</li><li>Clock_standbacks_leftright.stl</li><li>Clock_standsafebar.stl</li><li>Super glue</li></ul><p>All you have to do is apply a little superglue to the stand backs and insert them into the recesses in the base. Make sure that they are at right angles.<br> </p><p><strong>Step 2: Clock Case Assembly</strong></p><figure class="image"><img src="https://media.prusaprinters.org/media/prints/135511/rich_content/595438cc-ffcb-43f3-b4a7-c97c473491dc/img_20jpg.jpg#%7B%22uuid%22%3A%22495799bf-ccd2-452c-8db5-46e774902d41%22%2C%22w%22%3A992%2C%22h%22%3A744%7D"></figure><figure class="image"><img src="https://media.prusaprinters.org/media/prints/135511/rich_content/9ec701fd-32d0-498f-89b5-5fc6b846bc5c/img_24.jpg#%7B%22uuid%22%3A%224362e4c9-7058-42cc-a114-afd2535bd9dd%22%2C%22w%22%3A992%2C%22h%22%3A744%7D"></figure><figure class="image"><img src="https://media.prusaprinters.org/media/prints/135511/rich_content/d9e9a1a6-bb02-4ade-a0f8-f05c6c9e11d7/img_25.jpg#%7B%22uuid%22%3A%22a3c28022-e533-452a-a6fd-ac9f2d8aae92%22%2C%22w%22%3A992%2C%22h%22%3A744%7D"></figure><figure class="image"><img src="https://media.prusaprinters.org/media/prints/135511/rich_content/542e56a7-9d7d-4c45-9b75-4df0b171a4ff/img_25ajpg.jpg#%7B%22uuid%22%3A%221fe71f4f-32c4-4d84-8848-3f420d2ef5ab%22%2C%22w%22%3A992%2C%22h%22%3A744%7D"></figure><figure class="image"><img src="https://media.prusaprinters.org/media/prints/135511/rich_content/7b9e958e-5fbd-41a8-8bdd-3cbec14c89e4/img_25b.jpg#%7B%22uuid%22%3A%22325c9a97-3114-41e2-a2f5-f96afb0bf4b7%22%2C%22w%22%3A992%2C%22h%22%3A744%7D"></figure><figure class="image"><img src="https://media.prusaprinters.org/media/prints/135511/rich_content/61f8a147-4414-4697-b6b0-1b311e29c781/img_25c.jpg#%7B%22uuid%22%3A%2250969011-5880-461d-9caf-737a00b8b1aa%22%2C%22w%22%3A992%2C%22h%22%3A744%7D"></figure><p>For this step you need:</p><ul><li>Clock_case.stl</li><li>Clock_clockworkcase_text.stl (or Clock_clockworkcase_clean.stl)</li><li>Clock_standsafebar.stl</li><li>4 self-tapping screws Ø 2,9x 12mm</li><li>Phillips screwdriver</li></ul><p>You can decide whether you want the clockwork case without or with text (AS TIME GOES BY).</p><p>Make sure that the mark in the movement case matches the arrow on the case. Do not overtighten the screws, as they can easily overwind in the plastic!</p><p>To prevent the case from tipping out of the stand, "Clock_standsafebar.stl" is now screwed on as a lock.</p><p> </p><p><strong>Step 3: Installing Learning Clock Hands</strong></p><figure class="image"><img src="https://media.prusaprinters.org/media/prints/135511/rich_content/cf9d264e-fcb7-47aa-801c-633f886135b7/img_28.jpg#%7B%22uuid%22%3A%22c6c9c039-7e3c-452a-9f22-07c0ab4734c6%22%2C%22w%22%3A992%2C%22h%22%3A744%7D"></figure><figure class="image"><img src="https://media.prusaprinters.org/media/prints/135511/rich_content/f276afd6-77b8-41fb-9c7a-40256b758ce5/img_29.jpg#%7B%22uuid%22%3A%229f102fc1-e132-46e0-8f1b-01955479e3dc%22%2C%22w%22%3A992%2C%22h%22%3A744%7D"></figure><figure class="image"><img src="https://media.prusaprinters.org/media/prints/135511/rich_content/21a89b70-e4bc-4eb0-b1a3-c550538abccd/img_32.jpg#%7B%22uuid%22%3A%224ec58a96-5ea4-47bb-b81d-3cb345cfde38%22%2C%22w%22%3A992%2C%22h%22%3A744%7D"></figure><figure class="image"><img src="https://media.prusaprinters.org/media/prints/135511/rich_content/4bc8d8d9-679f-4e32-b023-ad6467018725/img_34jpg.jpg#%7B%22uuid%22%3A%22f8857582-3e92-4d97-b87e-d6464c5d769f%22%2C%22w%22%3A992%2C%22h%22%3A744%7D"></figure><figure class="image"><img src="https://media.prusaprinters.org/media/prints/135511/rich_content/7178cac7-ec23-4b62-ad89-81677975e11b/img_36.jpg#%7B%22uuid%22%3A%22cecd5dc5-255a-4bd2-a695-37baf0d0b36d%22%2C%22w%22%3A992%2C%22h%22%3A744%7D"></figure><figure class="image"><img src="https://media.prusaprinters.org/media/prints/135511/rich_content/759d823e-1d63-4bf2-8666-1b63368e5def/img_38.jpg#%7B%22uuid%22%3A%22fa56486b-1e1c-4820-bcbe-8d60d8f438de%22%2C%22w%22%3A992%2C%22h%22%3A744%7D"></figure><p>For this step you need:</p><ul><li>Clock_clockhand_big.stl</li><li>Clock_clockhand_small.stl</li><li>Clock_clockhand_bolt.stl</li><li>Clock_clockhand_washer.stl (2x)</li><li>Fine sandpaper</li></ul><p>Don't get confused, I took pictures of differently coloured bolts during the installation.</p><p>The hand holes are very precisely dimensioned. At first you have the impression that the centering bolt does not fit. This is how it should be!</p><p>Better a little tighter than too loose. It will loosen up after a few turns of the pointer. If necessary, sand the holes and the bolt with fine sandpaper.</p><p>Mount the hands as shown in the pictures.</p><p> </p><p><strong>Step 4: Set Up Clock - Insert Cubes</strong></p><figure class="image"><img src="https://media.prusaprinters.org/media/prints/135511/rich_content/06350d46-ce66-4da6-8f49-7dacdc66f83f/img_5009.jpg#%7B%22uuid%22%3A%2271dde717-3059-4437-b084-25701a19d442%22%2C%22w%22%3A4032%2C%22h%22%3A3024%7D"></figure><figure class="image"><img src="https://media.prusaprinters.org/media/prints/135511/rich_content/7a587ebd-e0e7-4abe-a766-aacb4e320961/img_5010.jpg#%7B%22uuid%22%3A%220a61643d-9856-4716-a6b9-bfdc83269de9%22%2C%22w%22%3A4032%2C%22h%22%3A3024%7D"></figure><figure class="image"><img src="https://media.prusaprinters.org/media/prints/135511/rich_content/9c3436ad-bb10-42e0-808b-2d80f2a4367a/img_5013.jpg#%7B%22uuid%22%3A%22ee478996-b407-4d3d-a024-635837a6ec2b%22%2C%22w%22%3A4032%2C%22h%22%3A3024%7D"></figure><p>After you have printed the file</p><ul><li>Clock_No_01-12.stl</li></ul><p>you can place the clock in the stand and insert the 12 number cubes into the recesses.</p><p>There are 6 different ways to place the cubes.</p><p>Have fun practising the clock times!</p><p> </p><p><strong>Step 5: Installing Battery Clockwork</strong></p><figure class="image"><img src="https://media.prusaprinters.org/media/prints/135511/rich_content/51bc82f1-f68e-43ea-a307-b6dfb14383f8/img_56.jpg#%7B%22uuid%22%3A%22dc9b6dc9-94f5-4993-94f6-fc91daed8abf%22%2C%22w%22%3A992%2C%22h%22%3A744%7D"></figure><figure class="image"><img src="https://media.prusaprinters.org/media/prints/135511/rich_content/d65dd3d7-5687-41fe-8d5a-e0d6c3fec266/img_61.jpg#%7B%22uuid%22%3A%22c05b5f9c-958a-4447-816d-ac209a4e1eb8%22%2C%22w%22%3A992%2C%22h%22%3A744%7D"></figure><figure class="image"><img src="https://media.prusaprinters.org/media/prints/135511/rich_content/802fe2d8-e731-48f6-ae33-c013b3b31b8f/img_63.jpg#%7B%22uuid%22%3A%228374a6a2-e9c9-41db-96ff-8571fd0bbfb2%22%2C%22w%22%3A992%2C%22h%22%3A744%7D"></figure><figure class="image"><img src="https://media.prusaprinters.org/media/prints/135511/rich_content/fe2afd75-3cba-4482-91fc-8d9ae72b36f5/img_66.jpg#%7B%22uuid%22%3A%22823ebca8-563d-4917-8a9c-74af26f94fea%22%2C%22w%22%3A992%2C%22h%22%3A744%7D"></figure><figure class="image"><img src="https://media.prusaprinters.org/media/prints/135511/rich_content/62484535-38ea-4083-8ca1-e5424d4179b6/img_69.jpg#%7B%22uuid%22%3A%22d3e3b267-46e7-4a9f-bdec-866b3d77b891%22%2C%22w%22%3A992%2C%22h%22%3A744%7D"></figure><p> </p><p> </p><figure class="image"><img src="https://media.prusaprinters.org/media/prints/135511/rich_content/ef20d3aa-840a-474c-b8b1-ac42a911f817/img_5023.jpg#%7B%22uuid%22%3A%22937e01a7-ded2-41ff-b255-fafef1f807f2%22%2C%22w%22%3A4032%2C%22h%22%3A3024%7D"></figure><p>With the installation of a battery-operated movement you can update to a normal clock. You need a</p><ul><li>Clock movement</li><li>Hour-, minute- and second hand</li><li>small pliers</li><li>battery AA 1,5V</li></ul><p>Insert the movement from the back into the hole of the movement case, secure it from the front with a washer and screw it tight with the enclosed screw. To tighten, use a small pair of pliers or, if you have them, a suitable spanner.</p><p>Now insert the hour hand first, then the minute hand and finally the second hand.</p><p>After that you must turn carefully the hour and minute hands to set the current time and then insert the battery. Later, the time can be set using a knob on the back of the movement.</p><p>Have fun with this versatile clock!</p>
With this file you will be able to print Learning Clock with your 3D printer. Click on the button and save the file on your computer to work, edit or customize your design. You can also find more 3D designs for printers on Learning Clock.