Lasercut Siege Catapult
thingiverse
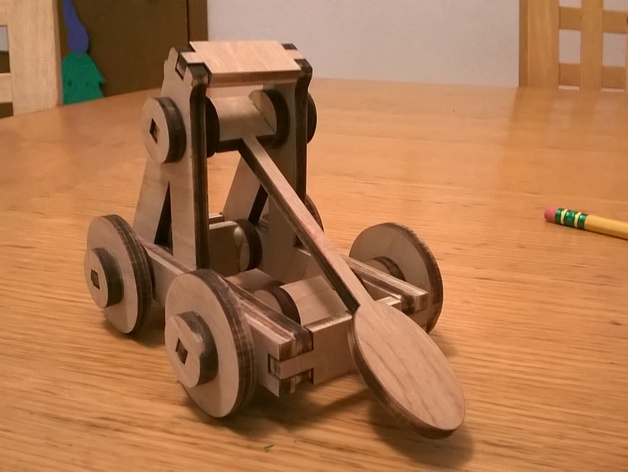
Siege Catapult in Heroic Scale - Version 1.0. Working Wheels Swinging Arm Firing Motion if Hooked up to Rubber Band, but the Motion is Clumsy. TODO: Decorate (My Children Have Lots of Ideas...) Improve the Firing Arm Improve the Firing Basket Instructions First of all, know what the pieces are: Body Frames: The Biggest Two Pieces, Shaped Kind of Like the Number 4. They Look the Same, but the Decorations Face Different Ways. Each Has Three Circular Holes and Notches in Various Places. Body Sides: Two Round-Edged Long Pieces with Two Holes. Each End Has a Square Notch. Body Braces: Two Square-Edged Pieces with Two Long Notches Taken Out of Each End. They Look Kind of Like Plus Signs. Axles: Two Long Sticks with Squares in the Middle. Launch Arm: Kind of Like a Spoon Attached to an Axle. This is the Thing That Fires Stuff if this Were a Real Catapult. Washers: Lots of Little Circles with Square Holes in Them. Six of These are Hubs, Which are the Ones that Human Hands Will Touch When it's all Done. They Are Otherwise All Alike. Wheels: The Four Big Circles with Square Holes in Them. Overhead Brace: Like Body Braces, but One is Shorter and Has Smaller Notches in It. Instructions: Cut it from 5mm Stock (I use Plywood) Clean it if you used Wood. At the Very Least, You'll Want to Sand the Edges of the Four Wheels Down So They Don't Track Soot on Your Play Surface. With the Exception of the Hubs, You Really Don't Need to Sand the Washers. If you're going to Paint or Stain it, Do it Now. Do not Paint or Stain the Washers at all if you want the Wheels to Turn. It's Okay to Paint/Stain the Hubs Though. Find two Axles and four Washers. Glue Two Washers onto Each Axle Such that the Axle Goes through the Washer, and the Washer is Stuck up Against the Square Thingie in the Middle. Do the same thing for the Launch Arm and two Washers. Clamp these three items and set them aside to Dry. STOP. Wait for Them to Dry. Don't Rush This or You May Have Problems Later. Pair the two Body Frames with the Body Sides. Put the Axles through the Bottom Holes and the Launch Arm through the Top Hole-- Everything should Fit Together. Glue the Body Braces to the Notches in the Sandwiched Body Sides/Body Frame Assembly Outside the Body Sides, Add four Washers to the protruding Axles Outside the washers, glue the four wheels to the axles. Avoid Getting Glue on the Washers-- The washers prevent the Wheels from getting glued to the body, which will Prevent Turning. Glue the Hubs to the Axles (Important) and Wheels (Less Important). Again, Try to Avoid Getting any Glue on the Body. Clamp the Whole Thing Together to Dry. The wheels Should be Tight, but not So Tight They can't Move.
With this file you will be able to print Lasercut Siege Catapult with your 3D printer. Click on the button and save the file on your computer to work, edit or customize your design. You can also find more 3D designs for printers on Lasercut Siege Catapult.