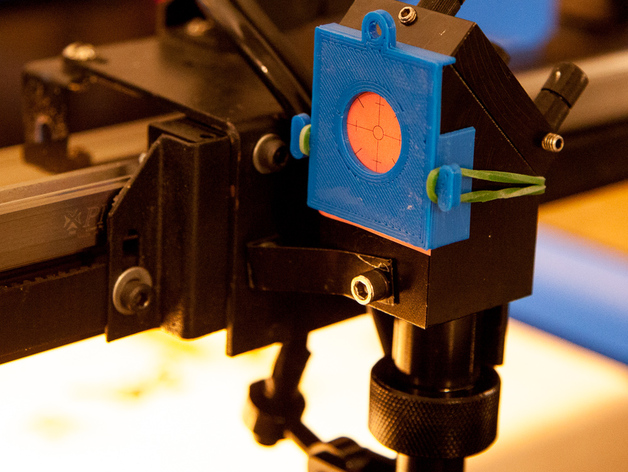
Laser Cutter Mirrors Calibration Jig V2
thingiverse
These two printed guides firmly secure a piece of paper/card against both the 2nd and 3rd mirror mounts during CO2 laser cutter beam calibration, putting an end to guessing where the hole is or the sticky tape mess. They were designed to fit Shenhui Laser SH-G350 (also known as Blue/White 50W eBay laser) mirror mounts but may vary in compatibility. Warning: Misaligned mirrors can result in laser burn damage to this jig so always wear laser safety glasses. This revised jig now enables the calibration of both mirrors and includes additional features such as "ears" that secure it firmly to the 3rd mirror using a rubber band. A handy ring has also been added, which functions as a hanger for easier handling. Paper/card template inserts are included, along with design files in Sketchup, Adobe Illustrator, and DWG. Update: The paper target templates have now been updated to reflect accurate dimensions, with the inclusion of a project file for RDWorks/LaserWorks calibrated specifically for 50W cutters (updated May 2nd, 2015). For users of the same 50W laser cutter model, note that when replacing paper targets, it's unnecessary to remove the second piece - simply lift it slightly and pull or push the new target in/out. To make this process even smoother, targets can be made longer for easier removal (added June 30th, 2015). Please post any questions you may have in the comments section. Instructions: Print both guides using ABS or PLA (the user utilized ABS). If your laser cutter is operational, use it to cut out target inserts from cardboard/card stock. Ensure that a cross-hair design is created during this process. If not yet connected to your cutting machine, simply print the templates on your printer and then cut them out with scissors. Next, insert these card targets into both printed guides and attach your laser's 2nd and 3rd mirrors. Use a rubber band to secure the second jig by looping it around the back of the 3rd mirror holder. Now, proceed with calibrating your mirrors as usual.
With this file you will be able to print Laser Cutter Mirrors Calibration Jig V2 with your 3D printer. Click on the button and save the file on your computer to work, edit or customize your design. You can also find more 3D designs for printers on Laser Cutter Mirrors Calibration Jig V2.
