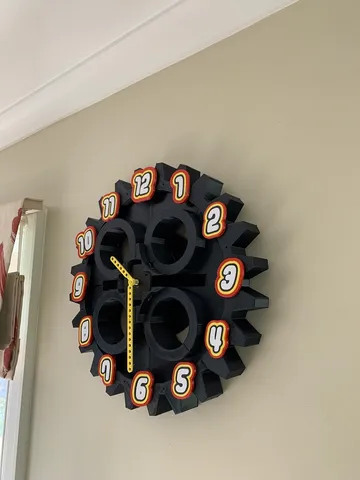
Large Lego Technic Clock
prusaprinters
Large Lego Technic Clock with Numbers.This Clock took ages to work out!Sorry about the massive amount of files but necessary for complete project.We had a clock that was not getting used, so I pulled the clock apart and removed the mechanism.I used a lot of magnets to put together. The idea of magnets I got from completing the skull from #DaveMakesStuff, an excellent designer and I recommend checking out some of his designs.The clock is split into 8 pieces(gears.stl) .Numbers were designed around the Lego Logo on a Lego box.The minute and hour hand are designed to look like technic beams.Print SettingsPrinter Brand:CrealityPrinter: Ender 3Resolution:0.2Infill: 15Filament: Pantech PLA Does Not Matter Notes: Black, Red, White and Yellow filament used.The technic clock hands were done with a finer setting(0.12)Post-PrintingI used 136(yes 136!) 6X3mm N50 magnets to make the model connect together, similar to item below;https://www.ebay.com.au/itm/271959987832.There is also 7 3X2mm holes on the face for smaller N50 magnets, the idea was to use these holes for decorating the clock with Lego heads or minifigures for certain times of the year, Xmas/Halloween etc.Just use the magnets on the face like the clock numbers and blu-tak or glue magnets inside minifigures to stick to clock face. I have not done this yet but could give the clock a change of face(pardon the pun!)I was not happy with the 3 and 9 o'clock connection of the magnets, so I created the backplate to make the clock more secure on the wall. I also made a mounting hole on the backplate. When all the pieces are connected and backplate is secured the clock will not fall apart. To make sure I tested the clock mounted hanging on a cabinet for 3 days before mounting on wall.How I Designed ThisI installed a technic sprocket SVG in to Fusion360 and Upscaled it to approximately 400mm.I then measured the clock mechanism (60mmX 60mm) and extracted out the area in the centre of the clock at height where the minute and hour hand would clear the model.I then cut the model in 8 slices and installed the magnet holes on each piece.The Hour and Minute hand are designed to look like technic beams, but thinner. I did not like the original clock hands. I would print these out at a finer quality than the rest of the model so the fit on the mechanism securely.The numbers are mounted on the clock using the same magnets as the clock piece, each number has 6X3 holes in certain areas in the back to match the clock face magnet location.I design the numbers to look like the Lego Logo.The different colours around the numbers are printed separately and clip together easily.Once the number are complete, I would recommend using a little bit of glue on the back.The back mount I designed to hold the model together and for mounting.To replace battery, take clock off wall and lay down on bench. Remove the triangle bits in one or two circles and take mechanism out. reverse order to put back together. Category: Household
With this file you will be able to print Large Lego Technic Clock with your 3D printer. Click on the button and save the file on your computer to work, edit or customize your design. You can also find more 3D designs for printers on Large Lego Technic Clock.
