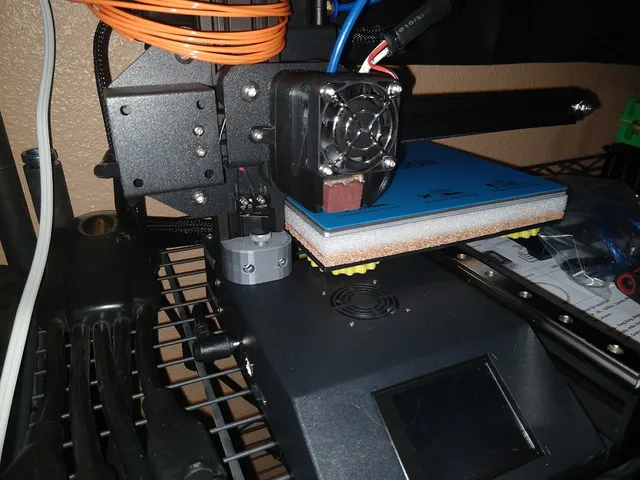
Kingroon S200 Z-Stop Shim
prusaprinters
My Kingroon S200 arrived with a warped bed - the center was a low spot, by about a full 1 mm. To solve this, I planned to shim the center. However, this printer has very little space between the Y carriage and the heated bed (literally 5mm, max). The main issue here is that the bed springs are incredibly short (6mm). To solve the bed leveling issue, I replaced the springs with longer ones (20mm, like the ones on the CR-10). I then cut some cork & foam to size and stuck that between the Y carriage and the heated bed. This lets me lower the bed enough that the Y-carriage exerts pressure through the foam & cork to the underside of the heated bed. Solved my problem - however, it introduced some issues of its own. New problems: The original bed-leveling M3 screws were only 6mm long, so clearly wouldn't work with 20mm springs. Now that the whole bed sits higher, the nozzle digs into the print surface long before the Z limit switch is triggered. The solution to problem 1 was easy - buy some 30mm M3 screws. To do so however, I had to peel the magnetic sheet off the heated bed to expose the original screws, which ruins the original adhesive. I was able to remove the original adhesive remnant with a soak in mineral spirits, then cleaned the residue with isopropyl. I sandwiched the heated bed between the new M3 30mm flat screws and a nylon lock nut so the screw won't just spin in its hole, then slapped the magnetic sheet back on top with a fresh 8"x8" sheet of 3M adhesive (trim the excess). Problem #2 was less shop-able. I really like the way the Kingroon S200 uses an M4 bolt as an adjustable Z endstop, but the M4 bolt wasn't long enough to reach now. As such, I printed a spacer block that raises the bolt about 20mm. That's this Thing (TM). To install the printed Shim, remove the front two M3 bolts that secure the vertical Z-axis to the base. They're right behind the M4 bolt adjustable Z end stop. Right under the Z limit switch. Discard the 6mm M3 bolts, but save the M3 slot nuts. Remove and save the M4 bolt that's used as an adjustable Z endstop. Install the printed Shim, using the same M3 Slot Nuts, in the same 2040 slots, but with longer M3 16mm screws. Apply pressure downward and backward (ie: toward the vertical 2040 Z-axis) as you tighten these. Now you can screw the M4 adjustable Z endstop into the printed Shim, and it's about an inch taller. Now read carefully, because this part's important. Stop being cheap, and go buy all the screws. I used to be just like you - I avoided using hardware, wanting to find a fully-printable solution instead of buying the right screws. That was stupid. Face it - plastic isn't generally known for strength, and FDM printers can't get as precise as legitimate machining equipment. Buy the screws. If you put it off now, you're just going to find another project tomorrow that also wants screws. Buy them now and solve that dilemma forever. The parts I used: 30mm M3 flat screws: https://smile.amazon.com/gp/product/B07NWL5HK3 16mm M3 hex screws: https://smile.amazon.com/gp/product/B014OO5KQG M3 nylon lock nuts: https://smile.amazon.com/gp/product/B07GNXDQJZ 20mm CR-10 springs: https://smile.amazon.com/gp/product/B07P5RMRZP 8" 3M adhesive sheet: https://smile.amazon.com/gp/product/B07Q6NWWLR There are multiple models attached to this Thing (TM). Here's what they are: Z-Stop Shim 01: This is the one I'm actually using. Prints upside-down, sits a bit taller than the others. Probably not the one you want, honestly. Z-Stop Shim 02: Shorter than 01 by about 4mm. This is the one you should use, most likely. Z-Stop Shim 03: Same as 02, but with a space for a captured M4 nut. It's important to print this one as originally oriented, because it leverages sacrificial bridging to pull off the overhang for the captured nut. Will likely require a bit of post-processing cleanup. Print Settings Printer: Kingroon S200 Rafts: No Supports: No Resolution: 0.1 mm Infill: 10% Filament: 3d Solutech PLA Metallic Silver Notes: Use a layer height 0.1mm or less, or the screw threads won't turn out. I also recommend 4x perimeters/walls. If you have any issues with warping, I strongly recommend a very wide brim. Category: 3D Printer Parts
With this file you will be able to print Kingroon S200 Z-Stop Shim with your 3D printer. Click on the button and save the file on your computer to work, edit or customize your design. You can also find more 3D designs for printers on Kingroon S200 Z-Stop Shim.
