JWST Desktop Display for Prusa
prusaprinters
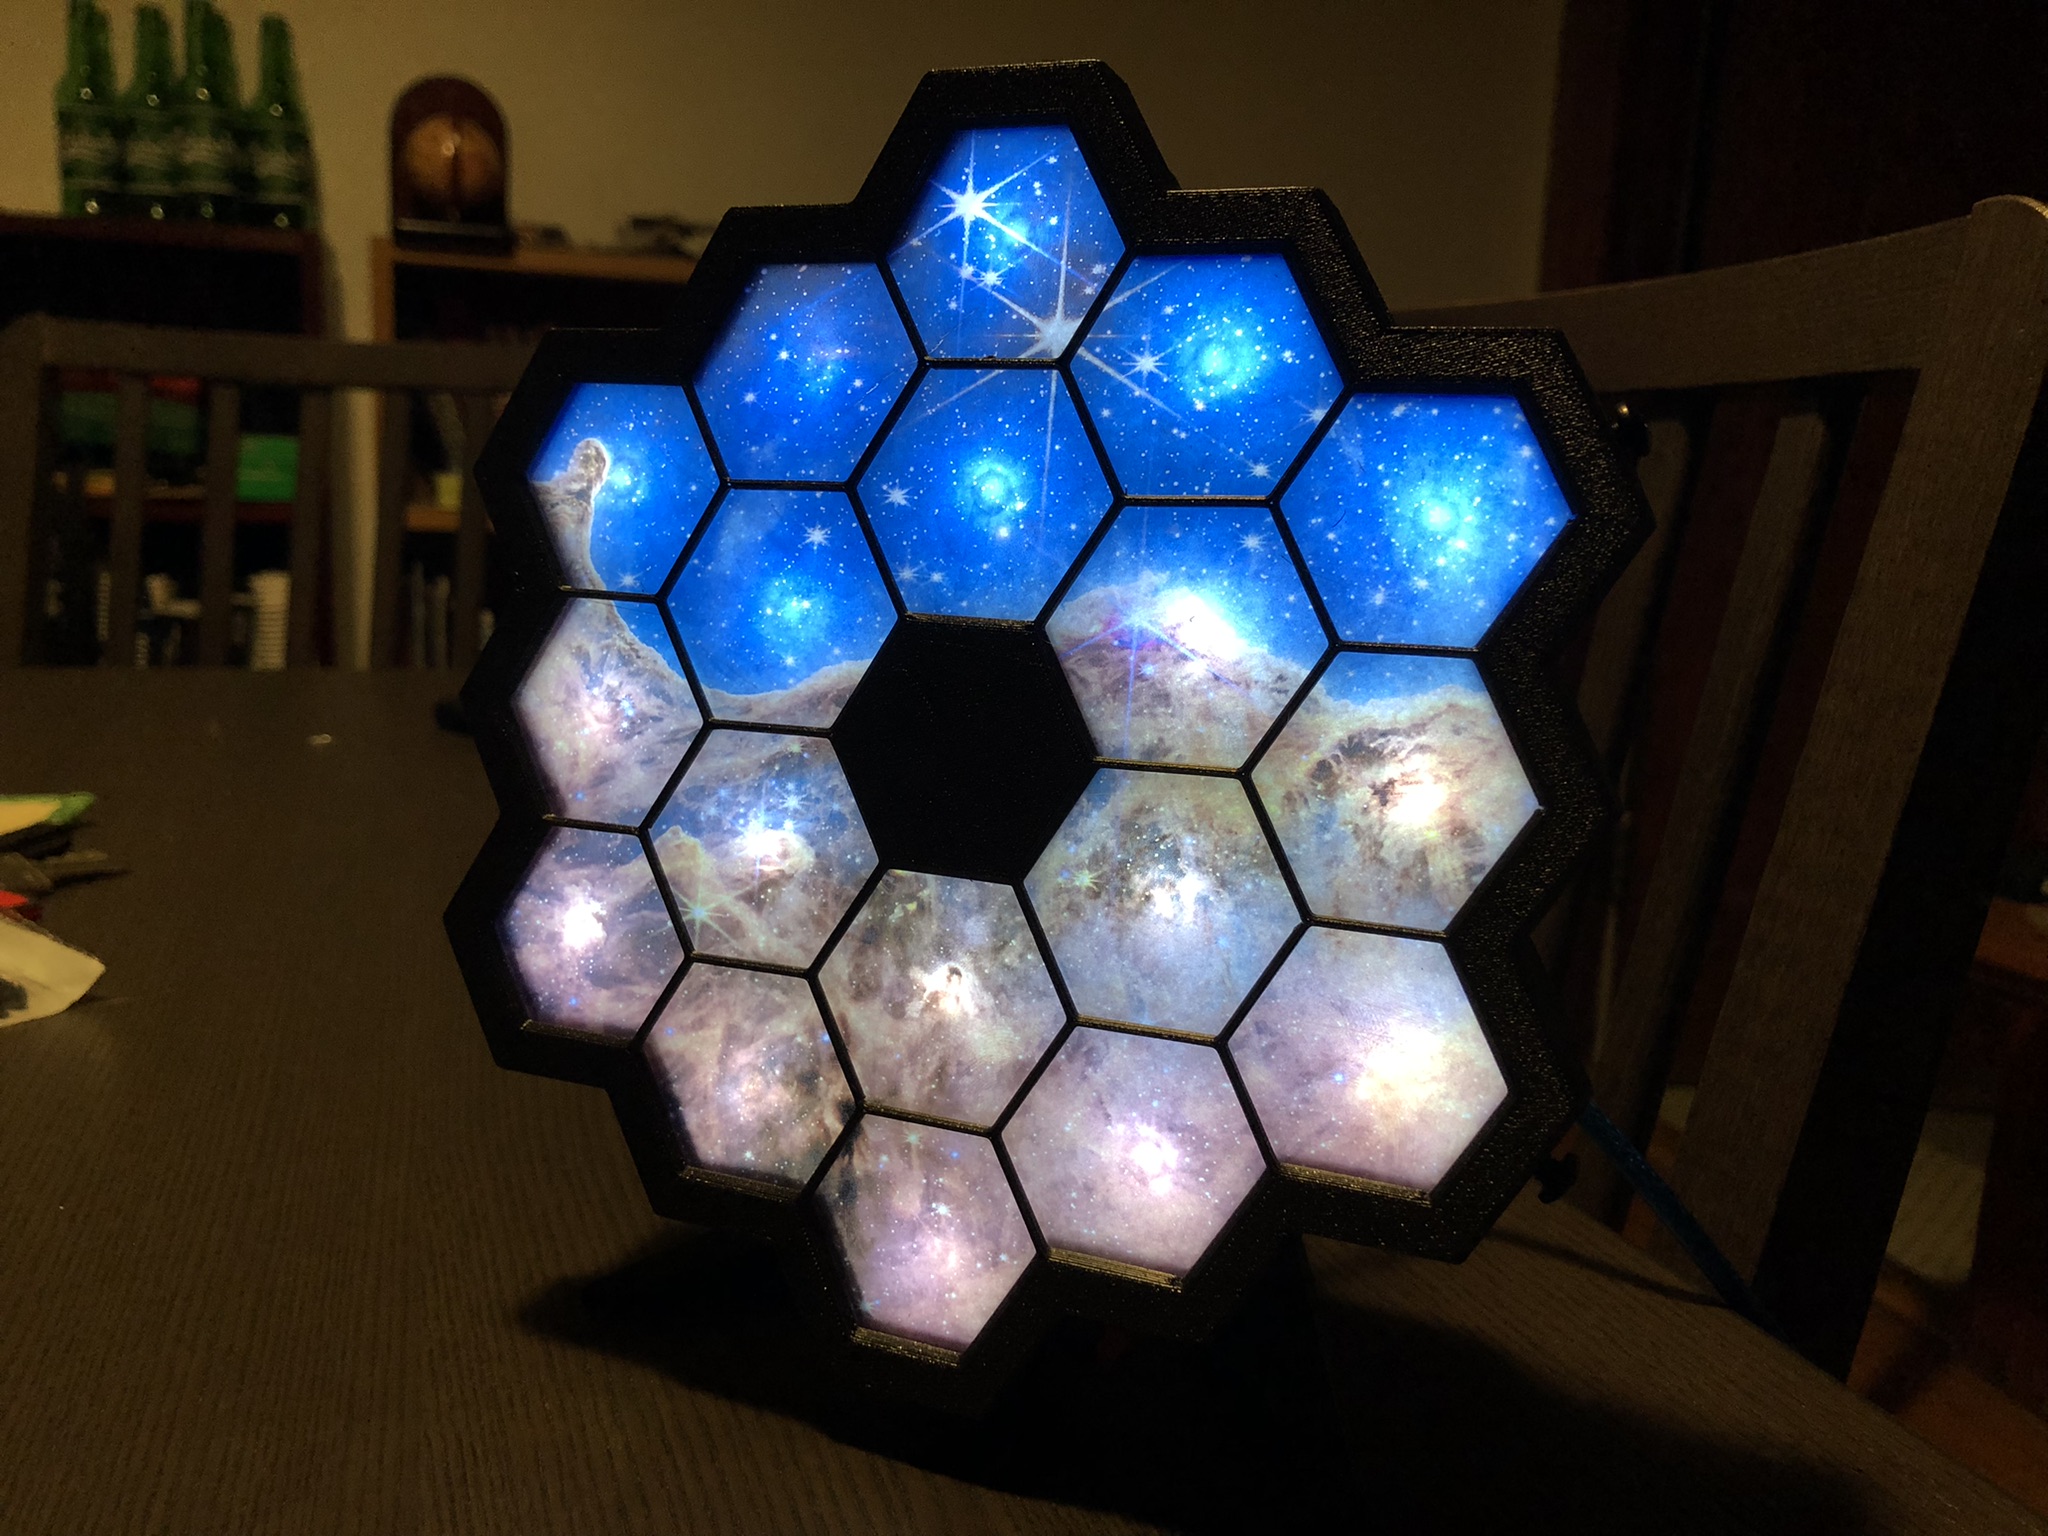
<p>This remix is based on VegaWoodWorks's <a href="https://www.printables.com/model/228595-led-james-webb-galaxy-desktop-display">LED James Webb Galaxy Desktop Display</a>, which is beautifull but too big to be printed on a Prusa printer. This remix contains STL files made to fit on a i3MK3S+ bed. The biggest part is 19.5 cm x 18.2 cm. You can take the files and follow the original instructions using LED strips. This remix also contains a new way to light the display, allowing to control each hex independantly with an Arduino. The GCODE files are available for the independant LED design. It gives you an idea of the time and filament needed for the original design also.</p><p> </p><h4>Original LED Lighting</h4><p>Print the Base (1x), Guide (1x) and Stand (1x) in the <i>Small version of original design</i> folder. Print one (1) ring between the Ring_noGrid of the <i>Small version of original design</i> folder and the other models in the <i>News Rings</i> folder. You can follow <a href="https://www.printables.com/model/228595-led-james-webb-galaxy-desktop-display">VegaWoodWorks's instructions</a> for the assembly. The holes of the Ring and the Base have been enlarged to fit 8-32 screws without drilling. </p><p>Here are the components you need:</p><ul><li>3x 1'' screws to connect the stand to the base (<a href="https://www.amazon.ca/gp/product/B00F34ZIG4/ref=ppx_yo_dt_b_asin_title_o03_s00?ie=UTF8&psc=1">here is what I bought</a>)</li><li>6x ¼'' screws to fix the ring to the base (<a href="https://www.amazon.ca/gp/product/B00F34YVZS/ref=ppx_yo_dt_b_asin_title_o03_s00?ie=UTF8&psc=1">here is what I bought</a>)</li><li>2x pieces of 0.093''/2.4 mm clear acrylic were you can make 8'' circles</li><li>1x backlight print or sticker printed on transparent material of your image (at least 20 mm x 18 mm). I ordered mine at <a href="https://www.shopacollants.com/">https://www.shopacollants.com/</a>.</li></ul><p> </p><h4>Independant hex design</h4><p>This new design allows you to light the hex independantly and make cool patterns with and Arduino controller circuit. Print the Stand (1x) and Guide (1x) of the <i>Small version of original design</i> folder, the Ring_gridPlain (1x) of the <i>New Rings</i> folder and the NewBase (1x) of the <i>Independant hexagon design</i> folder. The LEDaligner (1x) and LEDattenuator (18x) of the <i>Independant hexagon design</i> folder, both need to be <strong>printed in white </strong>to assure good light transmission/reflextion. </p><p>You will need:</p><ul><li>3x 1'' screws to connect the stand to the base (<a href="https://www.amazon.ca/gp/product/B00F34ZIG4/ref=ppx_yo_dt_b_asin_title_o03_s00?ie=UTF8&psc=1">here is what I bought</a>)</li><li>6x ¼'' screws to fix the ring to the base (<a href="https://www.amazon.ca/gp/product/B00F34YVZS/ref=ppx_yo_dt_b_asin_title_o03_s00?ie=UTF8&psc=1">here is what I bought</a>)</li><li>2x pieces of 0.093''/2.4 mm clear acrylic were you can make 8'' circles</li><li>1x paper sheet</li><li>1x backlight print or sticker printed on transparent material of your image (at least 20 mm x 18 mm). I ordered mine at <a href="https://www.shopacollants.com/">https://www.shopacollants.com/</a>.</li></ul><p>And for the electronic components:</p><ul><li>18x 5 mm white LEDs</li><li>18x 220 ohm resistors (for the LEDs)</li><li>1x 10k ohm resistor (for the button)</li><li>3x 74HC595 shift registers (<a href="https://www.arduino.cc/en/Tutorial/Foundations/ShiftOut">Tutorial on how to use them</a>) (<a href="https://www.amazon.ca/gp/product/B06WD3W8Q3/ref=ppx_yo_dt_b_asin_title_o02_s00?ie=UTF8&psc=1">here is what I bought</a>)</li><li>1x Arduino</li><li>1x ~15 mm large button; as long as the shaft is M12 it's ok (<a href="https://addison-electronique.com/produits/pieces-et-composantes/interrupteur-pieces-et-composantes/interrupteur-a-bouton-poussoir/boutton-poussoir-rond-rouge-125v-3a/">here is what I bought</a>)</li><li>1x breadboard or circuit board DIY</li><li>Wires</li></ul><p>The circuit is shown in the following figure:</p><figure class="image"><img src="https://media.printables.com/media/prints/283694/rich_content/d788692e-eaf6-45ec-a43c-355d221fd490/image1.png#%7B%22uuid%22%3A%2265d5862b-2d9e-4da6-a77f-31437237bd3a%22%2C%22w%22%3A3221%2C%22h%22%3A2200%7D"></figure><p>The assembly is as follows:</p><ol><li>Make the circuit and test it out with the available Arduino code.</li><li>Screw the stand to the base with the 1'' screws.</li><li>Place the circuit in the base with the Arduino power wire coming out in the back.</li><li>Fix the button in the designed hole.</li><li>Place each LED in the LEDaligner with respect to the following hex order:</li></ol><figure class="image image-style-align-center image_resized" style="width:50%;"><img src="https://media.printables.com/media/prints/283694/rich_content/aadc0807-1831-4018-8bc5-c48a621fef02/298719011_602752408246670_1703242146533077553_n.png#%7B%22uuid%22%3A%2217427edc-bad1-4185-b64a-e4db859ba274%22%2C%22w%22%3A689%2C%22h%22%3A739%7D"></figure><ol><li>Glue a LEDattenuator to the top of each LED. This is important, do it carefully since if the LEDattenuator is off the light of the LED won't be attenuated and you'll have a hot spot on your display</li><li>Cut both your acrylics using the outside of the Guide. As recommanded by VegaWoodWorks, use a jigsaw with a high tooth count metal cutting blade.</li><li>Glue your image on one acrylic and trim what exceeds.</li><li>Place your second acrylic sheet to sandwich the image inbetween both acrylics.</li><li>Place a sheet of paper on the LEDattenuator in the Base and place the acrylic sandwich.</li><li>Place the Ring over the Base and use 6 ¼'' screws to secure.</li></ol><p>The Arduino code available contains 5 different modes: all lights off, all lights on, 3 hex rotating clockwise, 3 random hex, outside-inside alternating (see images). The mode are switch by pressing the push button.</p><h4> </h4><h4>My print settings</h4><p>Printer: Prusa i3MK3S+</p><p>Slicing: PrusaSlicer</p><p>Filament: Prusament Galaxy Black PLA and Overture White PLA</p><p>Nozzle: 0.4 mm</p><p>Infill: Gyroid 15%</p><p>Layer height: 0.2 mm</p>
With this file you will be able to print JWST Desktop Display for Prusa with your 3D printer. Click on the button and save the file on your computer to work, edit or customize your design. You can also find more 3D designs for printers on JWST Desktop Display for Prusa.